Introduction
Setup
to include: http://wiki.bluelightav.org/display/BLUE/LVM+Howto
On Debian and Ubuntu
In the examples the LVM physical volume (PV) is md1.
To name a volume group, please use the first two components of the hostname, separtated by dot (.), for example ac001.blue, for the naming convention please look at http://wiki.bluelightav.org/x/ewEW
To create more volume groups, use the same beginning and add _(description), where description is a meaningful identifier, for example ac001.blue_2TB_backup
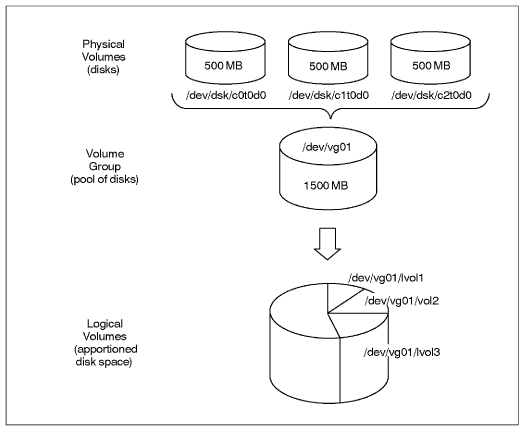
Create the physical volume (PV)
Note: this step can be omitted; it is implied by the next step.
pvcreate /dev/md1
Create the volume group (VG)
vgcreate ac001.blue /dev/md1
Create logical volumes (LVs)
Here we are going to create an LV for swap. 10G gives the size of the volume (10 GB)
lvcreate -L 10G -n root ac001.blue
If you want to create other volume, check the space left on the group with the following command:
vgs
To add another volume redo the lvcreate step.
Format a logical volume (LV)
For a file system. The example formats the LV with JFS, Blue Light's standard file system other than for the /boot partition:
mkfs.jfs /dev/ac001.blue/root
For a swap device:
mkswap /dev/ac001.blue/swap
Resize a logical volume (LV)
http://wiki.bluelightav.org/display/BLUE/How+to+resize+LVM+partitions
Rename a logical volume (LV)
Umount any file system contained by the LV and rename
umount <device>
lvrename <vgname> <oldlvname> <newlvname>
Activate LVMs
vgchange -ay
Recover a deleted LV
It can happen that you want to restore a deleted LV (deleted with lvremove). It is possible ![]()
The data are on the disk, actually the changes you do on your LVMs are located in the first bytes of the partition.
First run a pvscan do check if something is available.
pvscan
You can also check for the changes made on the LVMs replacing sda4 by the partition containing the LVMs
pvck -d -v /dev/sda4
Then the next part is a bit tricky, as you need to located the changes made on the LVMs and restore the good one.
You can either do as in the following link using hexadecimal: http://blog.adamsbros.org/2009/05/30/recover-lvm-volume-groups-and-logical-volumes-without-backups/
Or use Sam's method... If you decide so, follow me ![]()
The method explained in the link didn't work for me or I missed something. The calculated hexadecimal offset was not corresponding to the start of the needed sections even though the hex was correctly calculated. So I did it manually ![]()
Do a less of the partition and move up to section containing the data you are looking for:
less -f /dev/sda4
the section will look like that:
raspberry {
id = "V06yZ8-pHGl-CCq7-B8zl-UUVO-RmCx-sHT1je"
seqno = 5
status = ["RESIZEABLE", "READ", "WRITE"]
flags = []
extent_size = 8192
max_lv = 0
max_pv = 0
physical_volumes {
pv0 {
id = "x1U1YI-PpqQ-wDDS-r32a-TOgJ-kEsv-FhlAso"
device = "/dev/sda5"
status = ["ALLOCATABLE"]
flags = []
dev_size = 1951567872
pe_start = 384
pe_count = 238228
}
}
logical_volumes {
root {
id = "Pn30BB-pBQT-1myN-LGq6-CqUq-E3fU-dsa5Iv"
status = ["READ", "WRITE", "VISIBLE"]
flags = []
segment_count = 1
segment1 {
start_extent = 0
extent_count = 7152
type = "striped"
stripe_count = 1 # linear
stripes = [
"pv0", 0
]
}
}

var {
id = "9i2TV0-JYZe-2ghb-Lf9n-k5f8-w1jE-5Vvion"
status = ["READ", "WRITE", "VISIBLE"]
flags = []
segment_count = 1
segment1 {
start_extent = 0
extent_count = 2384
type = "striped"
stripe_count = 1 # linear
stripes = [
"pv0", 7152
]
}
}
home {
id = "taFnuT-k6WB-Bnsu-jpNG-oOXA-yOmo-YTQodP"
status = ["READ", "WRITE", "VISIBLE"]
flags = []
segment_count = 1
segment1 {
start_extent = 0
extent_count = 4768
type = "striped"
stripe_count = 1 # linear
stripes = [
"pv0", 9536
]
}
}
data {
id = "Nh5Y4K-62W7-U22c-oSYZ-5oM5-tjZr-lmCOd0"
status = ["READ", "WRITE", "VISIBLE"]
flags = []
segment_count = 1
segment1 {
start_extent = 0
extent_count = 119209
type = "striped"
stripe_count = 1 # linear
stripes = [
"pv0", 14304

 ]
}
}
}
}
# Generated by LVM2 version 2.02.66(2) (2010-05-20): Wed Nov 21 06:05:21 2012
contents = "Text Format Volume Group"
version = 1
description = ""
creation_host = "raspberry" # Linux raspberry 3.2.0-23-generic-pae #36-Ubuntu SMP Tue Apr 10 22:19:09 UTC 2012 i686
creation_time = 1353477921 # Wed Nov 21 06:05:21 2012
Above you can see the different LV present: root, data, var, swap
To find out the step before the deletion of an LV just look at the difference between 2 sections. If one LV is missing in one section it means the previous section is the one you want. Hope I'm clear. If not just figure it out or ask ![]()
As explained in the earlier link, the seqno value will indicate you if the size has been changed.
Once you have found the right section, copy it to a file on your disk. You need to copy from the VG name to after the creation time (as shown in the above code piece)
Then run the following command replacing what is necessary to be replaced:
vgcfgrestore -f <name_of_created_data_file> -v <LV_name>
If the restored LVs are not active use:
vgchange -ay --ignorelockingfailure
You are done ![]()
Outdated
Resize existing file system without LiveCD
pvs
  PV         VG   Fmt  Attr PSize   PFree
  /dev/sda3  rose lvm2 a-   144.85G 44.85G

lvm

lvm> lvs
  LV   VG   Attr   LSize  Origin Snap%  Move Log Copy%
  home rose -wi-ao 50.00G
  opt  rose -wi-ao 10.00G
  root rose -wi-ao 10.00G
  tmp  rose -wi-ao 10.00G
  var  rose -wi-ao 20.00G
lvm> lvresize -L +30G /dev/rose/home
  Extending logical volume home to 80.00 GB
  Logical volume home successfully resized
lvm> quit
  Exiting.

resize_reiserfs -s +30G /dev/rose/home

df -h
Filesystem            Size  Used Avail Use% Mounted on
/dev/mapper/rose-home  80G   49G   32G  61% /home
Using LVM on Live CD
here is a great howto getting LVM working.
what I did here was
aptitude install lvm2 dmsetup
modprobe dm-mod
pvscan
vgscan
vgchange -a y
and all the lvm's are active and mountable
LVM on RAID
A great howto is here http://www.gagme.com/greg/linux/raid-lvm.php
Chrooting and installing GRUB 2 on LVM setup
Boot with a live CD or CrowBar
mkdir /mnt/root
mount /dev/mapper/volume_group_name-root /mnt/root
mount /dev/mapper/volume_group_name-home /mnt/root/home
mount /dev/mapper/volume_group_name-var /mnt/root/var
mount /dev/sda1 /mnt/root/boot
mount -t proc none /mnt/root/proc
mount --bind /dev /mnt/root/dev
mount --bind /sys /mnt/root/sys

chroot /mnt/root
update-initramfs -u
update-grub
grub-install /dev/sda