| Table of Contents |
|---|
Introduction
Setup
On Linux Debian and Ubuntu
We will assume that you create the LVM on a RAID partition called md1. Adapt this to your situation.
Also replace pinkflower by a relevant name identifying your volume group.
...
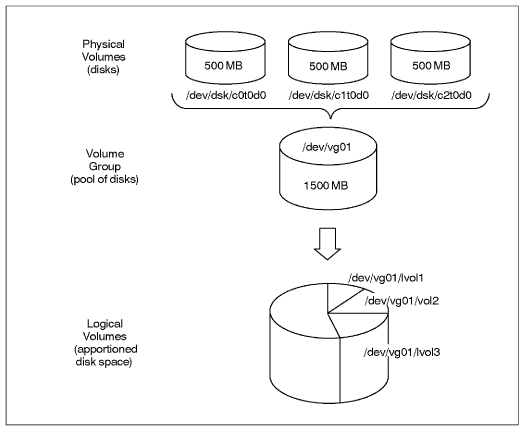
LVM creates virtual block devices out of other block devices. In the simplest case, "other block devices" are hard disk partitions. LVM calls them "physical volumes" or PVs.
LVM groups physical volumes into volume groups (VGs).
From the volume groups' pool of blocks, LVM creates virtual block devices which it calls "logical volumes" or LVs.
Here's a diagram of all that:
In the standard Blue Light setup, the physical volumes are not disk partitions but Multiple devices (md, software RAID) devices.
Setup
In the examples the LVM physical volume (PV) is md1.
Create a physical volume (PV)
Note: this step can be omitted; it is implied by the next step.
| Code Block |
|---|
pvcreate /dev/md1 |
Create
...
a volume group (VG)
The volume group name was normally the first two components of the hostname separated by dot; now we use the FQDN.
| Code Block |
|---|
vgcreate pinkflowerltsp.th /dev/md1 |
Create the logical volumes
...
![]() The Blue Light volume group naming convention is designed to ensure names which are unique amongst computers we support. This allows us to put HDDs containing LVM storage in any computer for recovery purposes.
The Blue Light volume group naming convention is designed to ensure names which are unique amongst computers we support. This allows us to put HDDs containing LVM storage in any computer for recovery purposes.
Create logical volumes (LVs)
For example (10G gives a 10 GB size):
| Code Block |
|---|
lvcreate -L 10G -n root pinkflower |
If you want to create other volume, check the space left on the group with the following command:
| Code Block |
|---|
vgs |
To add another volume redo the lvcreate step.
Create the file system
mkfs.ext4 /dev/pinkflower/root
Check the filesystem
lvs
Outdated
ltsp.th |
Operations
Show current LVM usage
Overall picture: lsblk (not available on Debian 6)
Show PVs: pvs
Show VGs: vgs
Show LVs: lvs
Activate LVM volume groups (VGs)
This is the command which is run during early boot.
| Code Block |
|---|
vgchange -ay |
Format a logical volume (LV)
This is exactly the same as formatting any other sort of block device; only the device file path is LV-specific, for example /dev/ltsp.th/root
Extend a logical volume (LV)
![]() In case multiple PVs are being used to minimise the effect of storage device failure, keep the LV on a single PV if possible.
In case multiple PVs are being used to minimise the effect of storage device failure, keep the LV on a single PV if possible.
LVs are extended by the lvextend command. The --help is, er, helpful.
Single PV
Extending an LV on a single PV may require moving the LV to a PV which has more space or moving other LV(s) off the initial PV.
Find which PVs are hosting each LV:
lvs -o lv_name,devices
Find how much space available on each PV:
pvs
Finally the PV is specified on the lvextend command. Examples:
lvextend --size 400G /dev/bafi.backup/th /dev/sdc1
lvextend --extents +55172 /dev/bafi.backup/blue /dev/sdb3
Reduce a logical volume (LV)
Use the lvreduce command.
Move storage or logical volumes (LVs) between physical volumes (PVs)
Move storage
This is useful when changing physical volumes (PVs). After adding the new HDDs, usually as a RAID 1 md array, to the volume group, the LVs can be moved from the old PV to the new. Finally the old PV can be removed from the VG and the old HDDs removed, usually after powering down.
For example:
pvmove /dev/md1 /dev/md3
Move a logical volume (LV)
For example:
pvmove --name atlassian.blue.av-disk /dev/md1 /dev/sdb1
Rename a logical volume (LV)
Umount any file system contained by the LV and rename
| Code Block |
|---|
umount <device>
lvrename <vgname> <oldlvname> <newlvname> |
Remove a Physical Volume (PV) from a Volume Group (VG)
vgreduce VG_name PV_name
For example:
vgreduce ls1 /dev/sdb2
Troubleshooting
Messages
File descriptor * leaked on * invocation. Parent PID *
Can be safely ignored. Can be suppressed by setting LVM_SUPPRESS_FD_WARNINGS environment variable before doing whatever produced the message.
![]() Code to generate the message was added when it was alleged that LVM was leaking file descriptors. The message shows that a file descriptor has already been leaked when an LVM program is called.
Code to generate the message was added when it was alleged that LVM was leaking file descriptors. The message shows that a file descriptor has already been leaked when an LVM program is called.
WARNING: lvmetad is running but disabled. Restart lvmetad before enabling it!
Can be safely ignored.
![]() From https://wiki.gentoo.org/wiki/Talk:LVM#lvmetad_warning: "Normally lvmetad is not even enabled. Neither in initscripts nor in /etc/lvm/lvm.conf. But the lvm service has a useless rc_need on lvmetad. Remove it to get rid of those messages".
From https://wiki.gentoo.org/wiki/Talk:LVM#lvmetad_warning: "Normally lvmetad is not even enabled. Neither in initscripts nor in /etc/lvm/lvm.conf. But the lvm service has a useless rc_need on lvmetad. Remove it to get rid of those messages".
Recover a deleted logical volume (LV)
It can happen that you want to restore a deleted LV (deleted with lvremove). It is possible ![]()
The data are on the disk, actually the changes you do on your LVMs are located in the first bytes of the partition.
First run a pvscan do check if something is available.
| Code Block |
|---|
pvscan |
You can also check for the changes made on the LVMs replacing sda4 by the partition containing the LVMs
| Code Block |
|---|
pvck -d -v /dev/sda4 |
Then the next part is a bit tricky, as you need to located the changes made on the LVMs and restore the good one.
You can either do as in the following link using hexadecimal: http://blog.adamsbros.org/2009/05/30/recover-lvm-volume-groups-and-logical-volumes-without-backups/
Or use Sam's method... If you decide so, follow me ![]()
The method explained in the link didn't work for me or I missed something. The calculated hexadecimal offset was not corresponding to the start of the needed sections even though the hex was correctly calculated. So I did it manually ![]()
Do a less of the partition and move up to section containing the data you are looking for:
| Code Block |
|---|
less -f /dev/sda4 |
the section will look like that:
| Code Block |
|---|
raspberry {
id = "V06yZ8-pHGl-CCq7-B8zl-UUVO-RmCx-sHT1je"
seqno = 5
status = ["RESIZEABLE", "READ", "WRITE"]
flags = []
extent_size = 8192
max_lv = 0
max_pv = 0
physical_volumes {
pv0 {
id = "x1U1YI-PpqQ-wDDS-r32a-TOgJ-kEsv-FhlAso"
device = "/dev/sda5"
status = ["ALLOCATABLE"]
flags = []
dev_size = 1951567872
pe_start = 384
pe_count = 238228
}
}
logical_volumes {
root {
id = "Pn30BB-pBQT-1myN-LGq6-CqUq-E3fU-dsa5Iv"
status = ["READ", "WRITE", "VISIBLE"]
flags = []
segment_count = 1
segment1 {
start_extent = 0
extent_count = 7152
type = "striped"
stripe_count = 1 # linear
stripes = [
"pv0", 0
]
}
}

var {
id = "9i2TV0-JYZe-2ghb-Lf9n-k5f8-w1jE-5Vvion"
status = ["READ", "WRITE", "VISIBLE"]
flags = []
segment_count = 1
segment1 {
start_extent = 0
extent_count = 2384
type = "striped"
stripe_count = 1 # linear
stripes = [
"pv0", 7152
]
}
}
home {
id = "taFnuT-k6WB-Bnsu-jpNG-oOXA-yOmo-YTQodP"
status = ["READ", "WRITE", "VISIBLE"]
flags = []
segment_count = 1
segment1 {
start_extent = 0
extent_count = 4768
type = "striped"
stripe_count = 1 # linear
stripes = [
"pv0", 9536
]
}
}
data {
id = "Nh5Y4K-62W7-U22c-oSYZ-5oM5-tjZr-lmCOd0"
status = ["READ", "WRITE", "VISIBLE"]
flags = []
segment_count = 1
segment1 {
start_extent = 0
extent_count = 119209
type = "striped"
stripe_count = 1 # linear
stripes = [
"pv0", 14304

 ]
}
}
}
}
# Generated by LVM2 version 2.02.66(2) (2010-05-20): Wed Nov 21 06:05:21 2012
contents = "Text Format Volume Group"
version = 1
description = ""
creation_host = "raspberry" # Linux raspberry 3.2.0-23-generic-pae #36-Ubuntu SMP Tue Apr 10 22:19:09 UTC 2012 i686
creation_time = 1353477921 # Wed Nov 21 06:05:21 2012 |
Above you can see the different LV present: root, data, var, swap
To find out the step before the deletion of an LV just look at the difference between 2 sections. If one LV is missing in one section it means the previous section is the one you want. Hope I'm clear. If not just figure it out or ask ![]()
As explained in the earlier link, the seqno value will indicate you if the size has been changed.
Once you have found the right section, copy it to a file on your disk. You need to copy from the VG name to after the creation time (as shown in the above code piece)
Then run the following command replacing what is necessary to be replaced:
| Code Block |
|---|
vgcfgrestore -f <name_of_created_data_file> -v <LV_name> |
If the restored LVs are not active use:
| Code Block |
|---|
vgchange -ay --ignorelockingfailure |
You are done ![]()
Outdated
Resize existing file system without LiveCD
| Code Block |
|---|
pvs PV VG Fmt Attr PSize PFree /dev/sda3 rose lvm2 a- 144.85G 44.85G lvm lvm> lvs LV VG Attr LSize Origin Snap% Move Log Copy% home rose -wi-ao 50.00G opt rose -wi-ao 10.00G root rose -wi-ao 10.00G tmp rose -wi-ao 10.00G var rose -wi-ao 20.00G lvm> lvresize -L +30G /dev/rose/home Extending logical volume home to 80.00 GB Logical volume home successfully resized lvm> quit Exiting. resize_reiserfs -s +30G /dev/rose/home df -h Filesystem Size Used Avail Use% Mounted on /dev/mapper/rose-home 80G 49G 32G 61% /home |
...
A great howto is here http://www.gagme.com/greg/linux/raid-lvm.php
Chrooting and installing GRUB 2 on LVM setup
Boot with a live CD or CrowBar
| No Format |
|---|
mkdir /mnt/root
mount /dev/mapper/volume_group_name-root /mnt/root
mount /dev/mapper/volume_group_name-home /mnt/root/home
mount /dev/mapper/volume_group_name-var /mnt/root/var
mount /dev/sda1 /mnt/root/boot
mount -t proc none /mnt/root/proc
mount --bind /dev /mnt/root/dev
mount --bind /sys /mnt/root/sys

chroot /mnt/root
update-initramfs -u
update-grub
grub-install /dev/sda
|