The QNAP manual offers information on how to use the QNAP. You can find it here:
http://docs.qnap.com/nas/en/index.html
Most of what is the present document is complementary to the manual because explained differently or uses different methods. First read this document and read the manual if you need further information.
Daily maintenance
Turning on / off
Pressing the Power button when the NAS is off will obviously turn it on. We might take some time for it to finish booting (around 5 min if there RAID array is not damaged and the system not corrupted). You will a first “bip” shortly after pressing the button and another one few minutes later indicating that the QNAP booted.
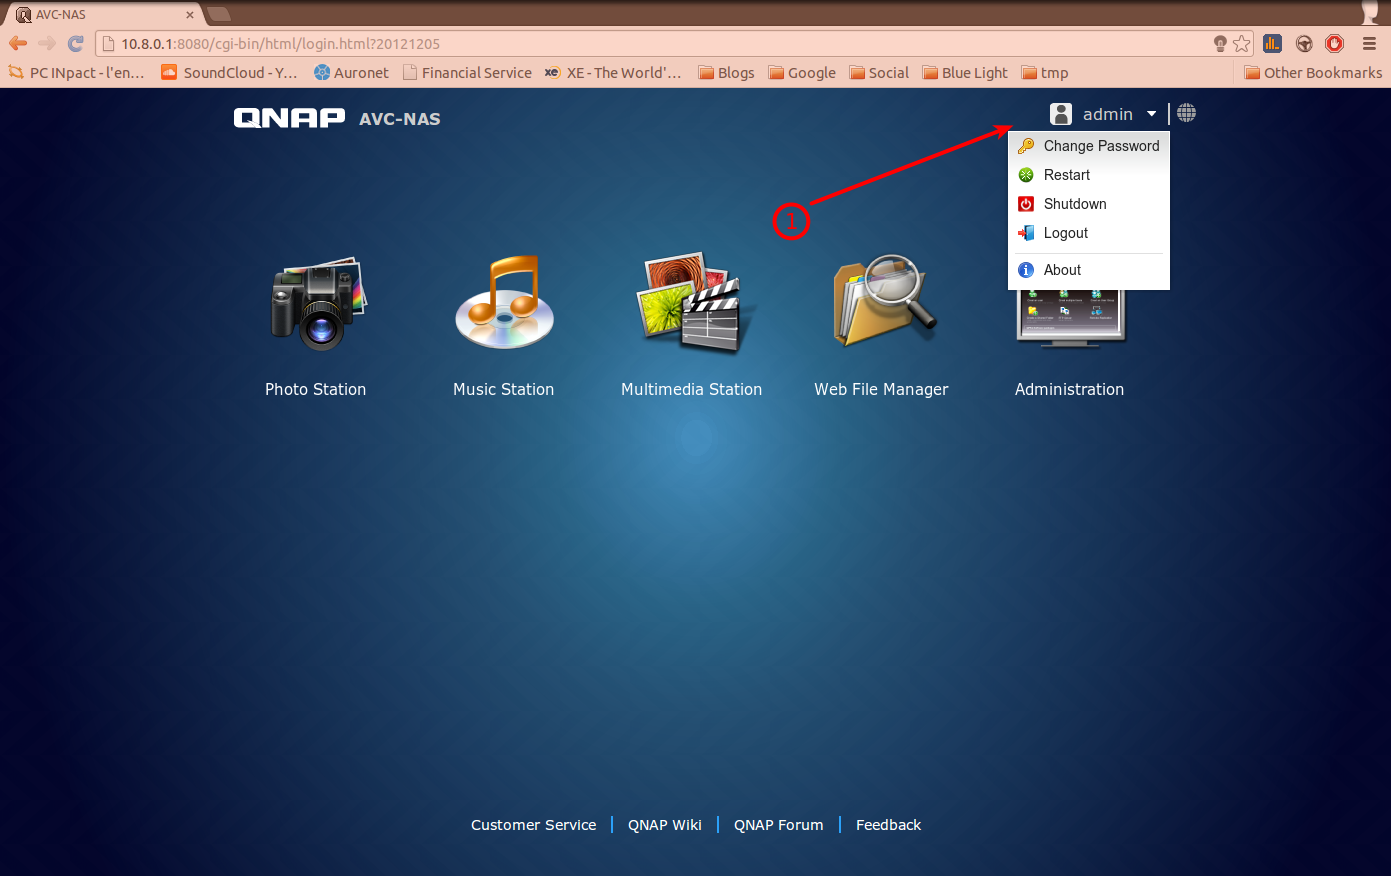
To power it off you can use the web interface. On the login page at the top (1)
Another way is to press for 4 seconds the Power button. It should take few minutes to shutdown.
Access
There are different ways to access the NAS locally and remotely:
As a drive
As a web interface
Both are available on local and can be accessible remotely. You might want to choose the drive access to easily find the files and the web interface to manage the NAS, access without configuring much or have a graphical interfaces to interact with.
Local Access
Be sure that the IP address of the computer willing to access the NAS is on the network 192.168.1.x.
Web
Open the web browser (Firefox, Chrome, Safari,...) and enter the following address in the address bar:
You will find an interface asking for you authentication.
OS
Microsoft Windows
- Set your computer as being part of the AVC Workgroup
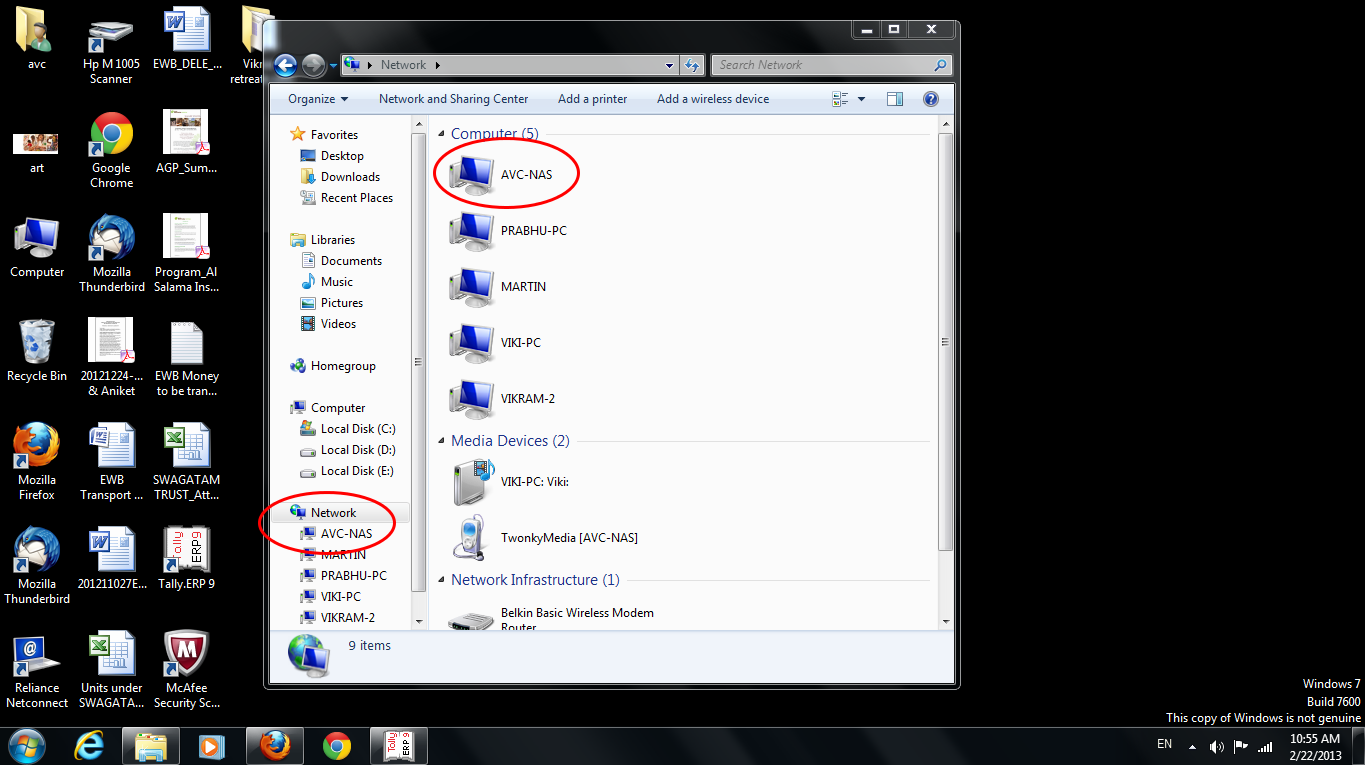
- Go to My Computer and you should see the NAS appearing. Click on it and enter your password.
Apple MAC iOS
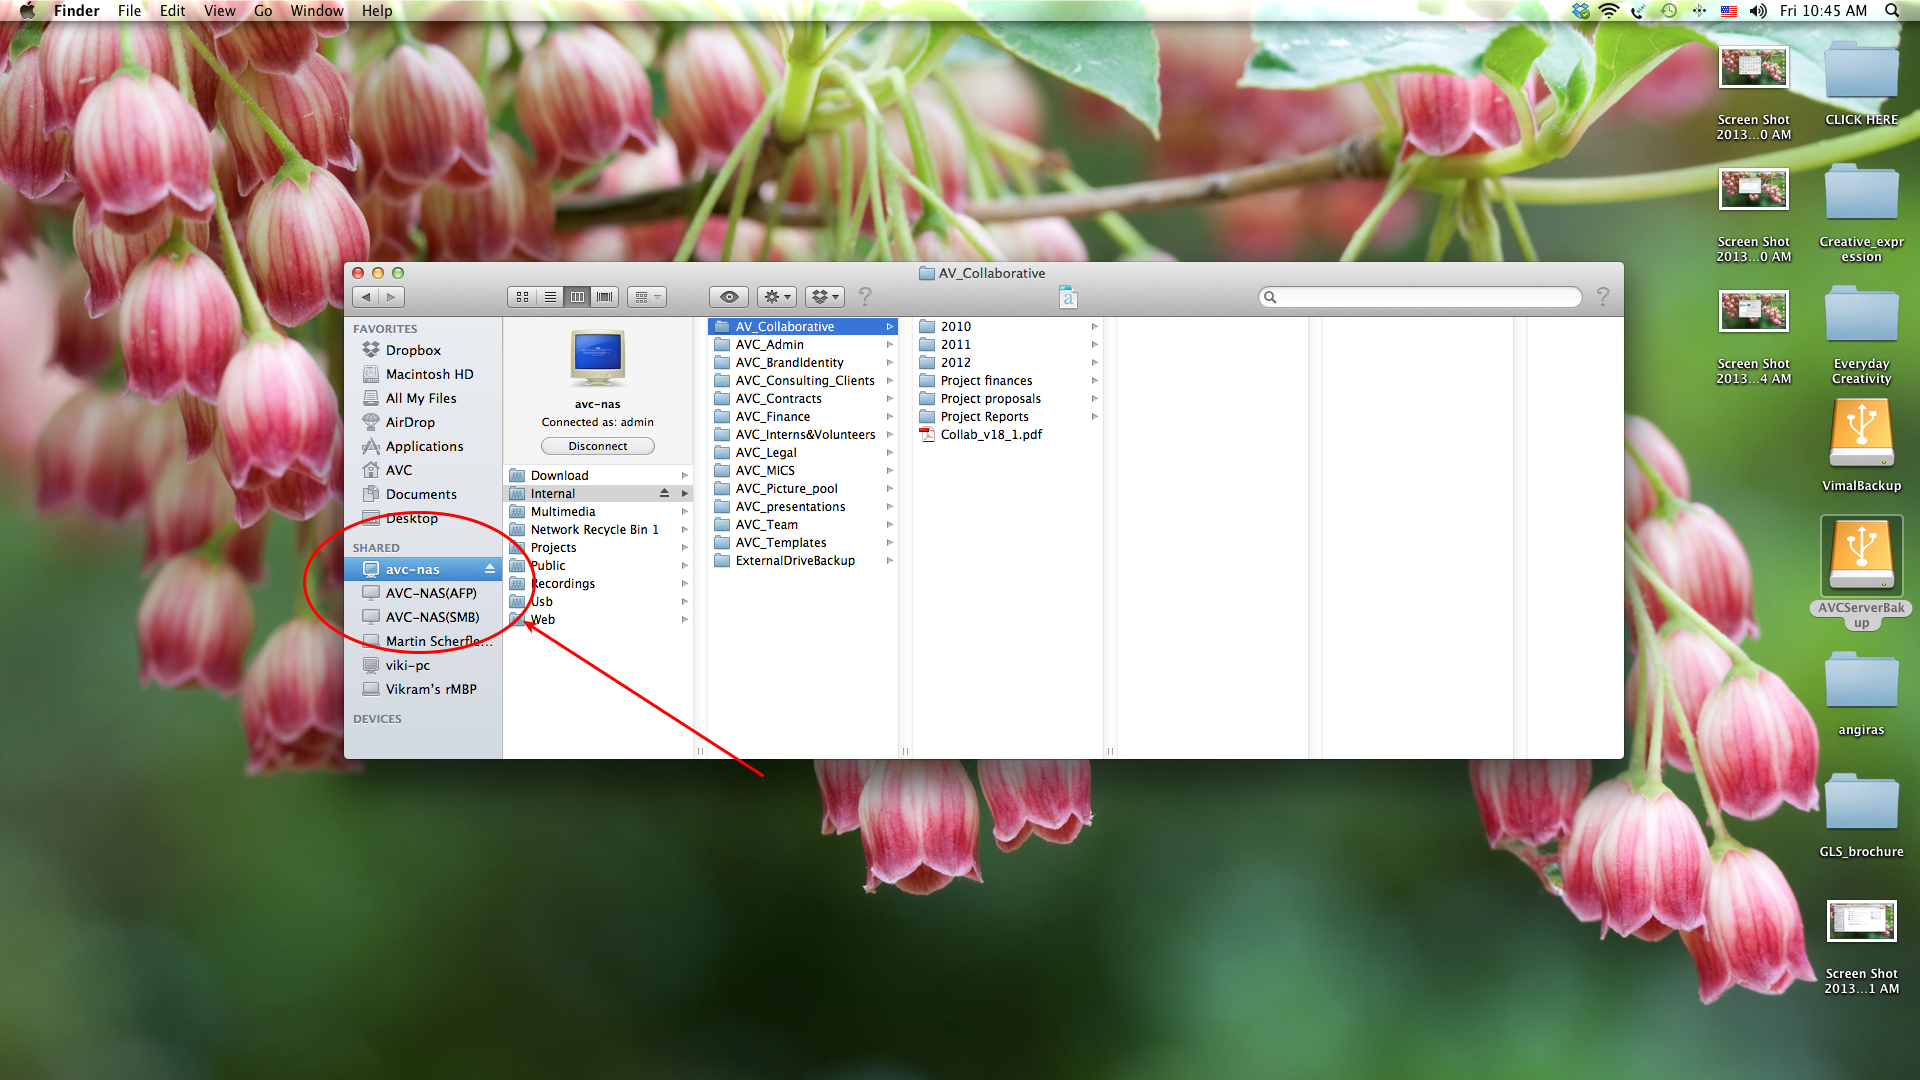
- The NAS is part of your Network so you can find it among the Shared devices.
Remote Access
The remote access uses 2 technologies: DDNS and VPN.
To access the NAS a user will have to install some package/software to his/her computer.
General Use
With the present configuration you will be able to use the web interface of the Qnap.
Once the VPN side is setup, start your web browser and enter the following address: http://10.8.0.1:8080/
We copied the openvpn zip file on the nas: Public > VPN > openvpn.zip
Client Setup
Microsoft Windows
- Download OpenVPN from http://openvpn.net/index.php/open-source/downloads.html
- Install OpenVPN client on Windows. The default installation directory is C :\Program Files\OpenVPN.
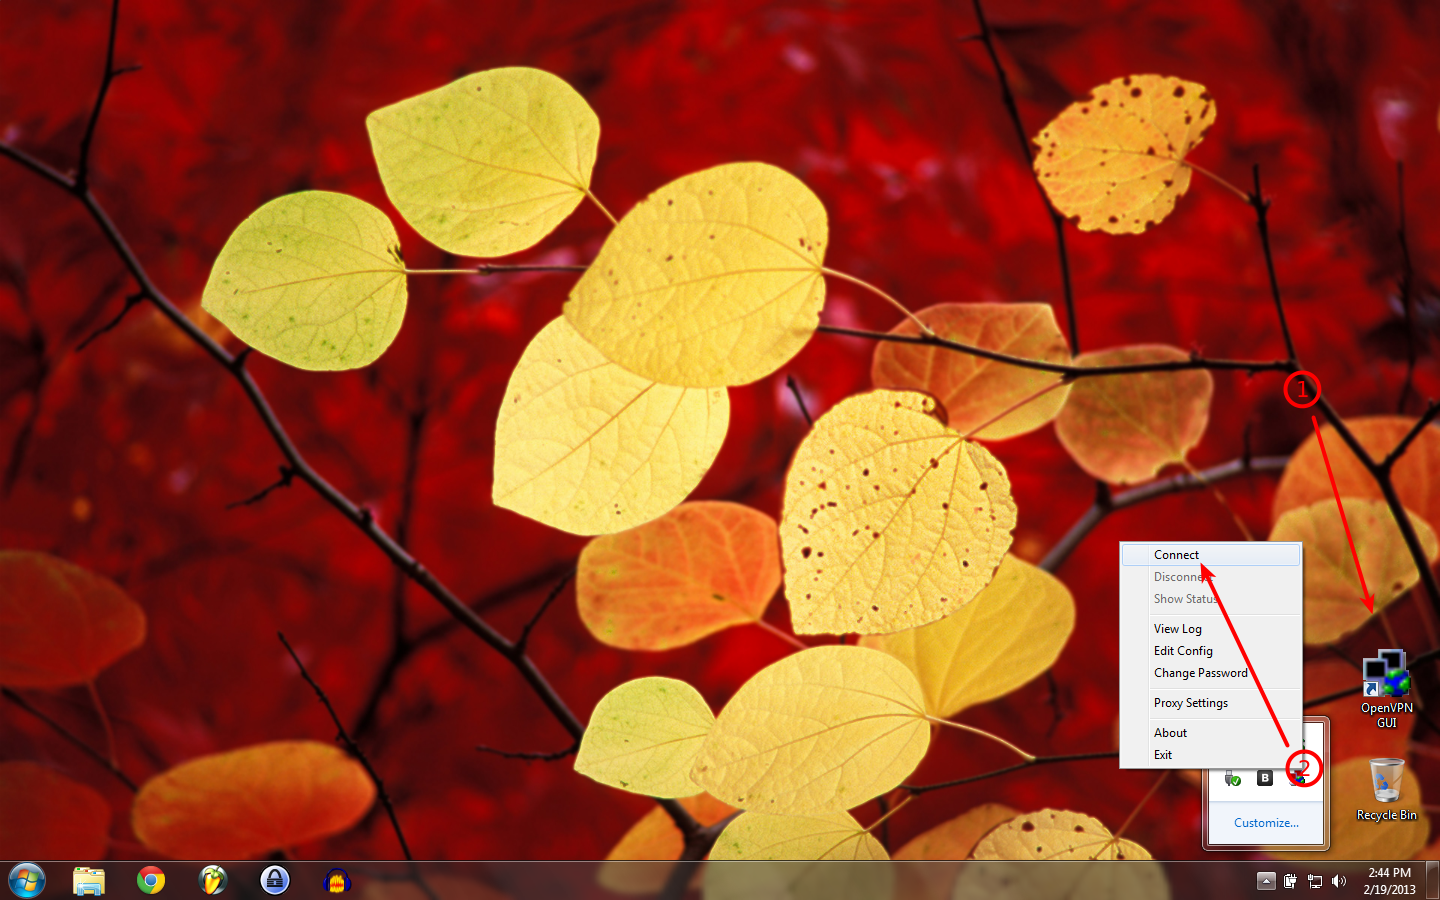
- Run OpenVPN GUI as administrator (1)
- Extract data of the archive. Put “ca.crt” and “openvpn.ovpn” into the configuration folder under OpenVPN configuration subdirectory (C :\Program Files\OpenVPN\config).
- Connect to the VPN network (2). It will ask for your username and password. If everything goes right you should get a positive notification after 30 seconds to 1 min.
Apple MAC OS
- Download the disk image of OpenVPN client from http://code.google.com/p/tunnelblick/
(note, for Mac IOS 10.8 you will need to download a version higher than 3.2.9)
- Double click on the downloaded .dmg file and install tunnelblick.
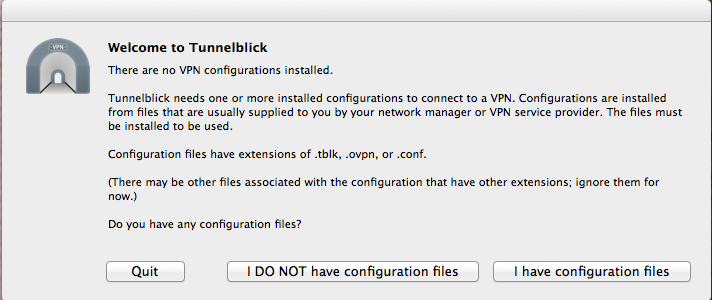
- After installation it will ask for the configuration files. Click on I have configuration files
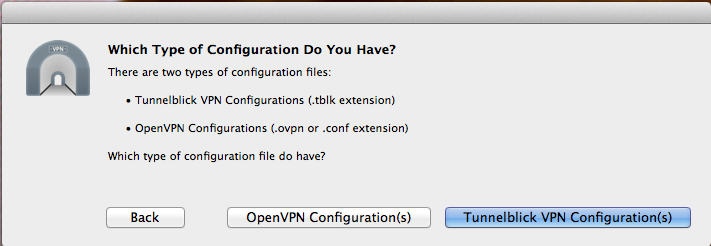
- Click on Tunnelblick VPN Configuration(s)
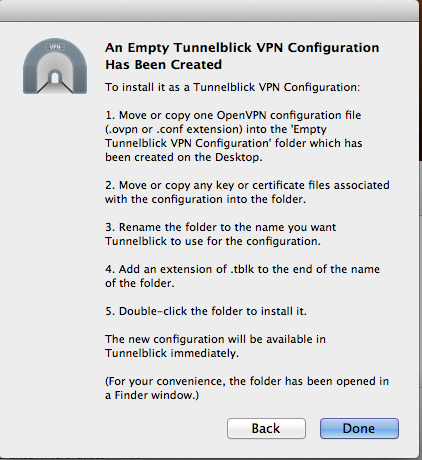
- Extract the configuration files from the openvpn.zip and Put “ca.crt” and “openvpn.ovpn”
- And follow the following instructions:
- Now connect to the nas doing a right click on the icon (top right of the screen) and click on: Connect <name of the tlbk file>
Linux
We will assume here that the person has some computer knowledge...
In a shell use the following commands:
apt-get install openvpn
Unpack the archive you took from the NAS to the /etc/openvpn folder
Start openvpn using the following command:
service openvpn start
If it doesn't work, contact BlueLight ;)
Printing
Microsoft Windows
Install the drivers located on the Public folder of the NAS
Apple MAC iOS
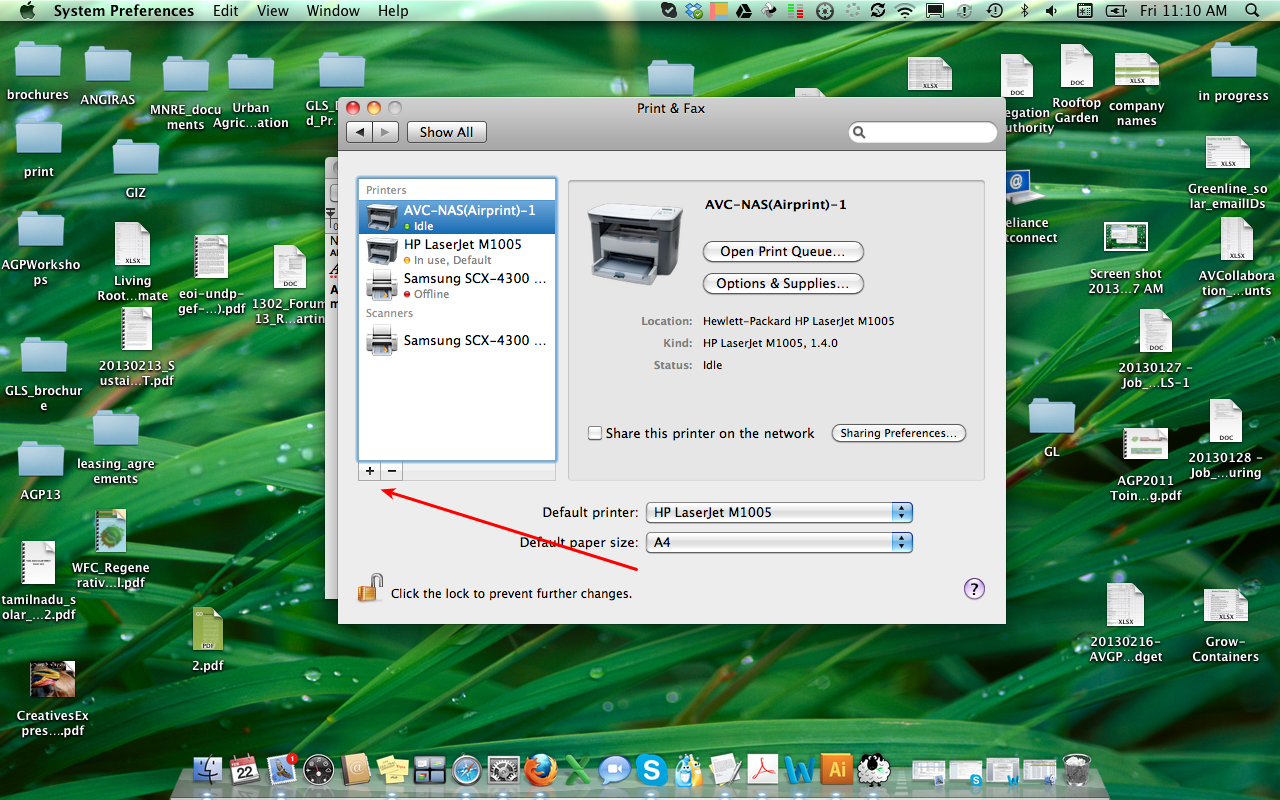
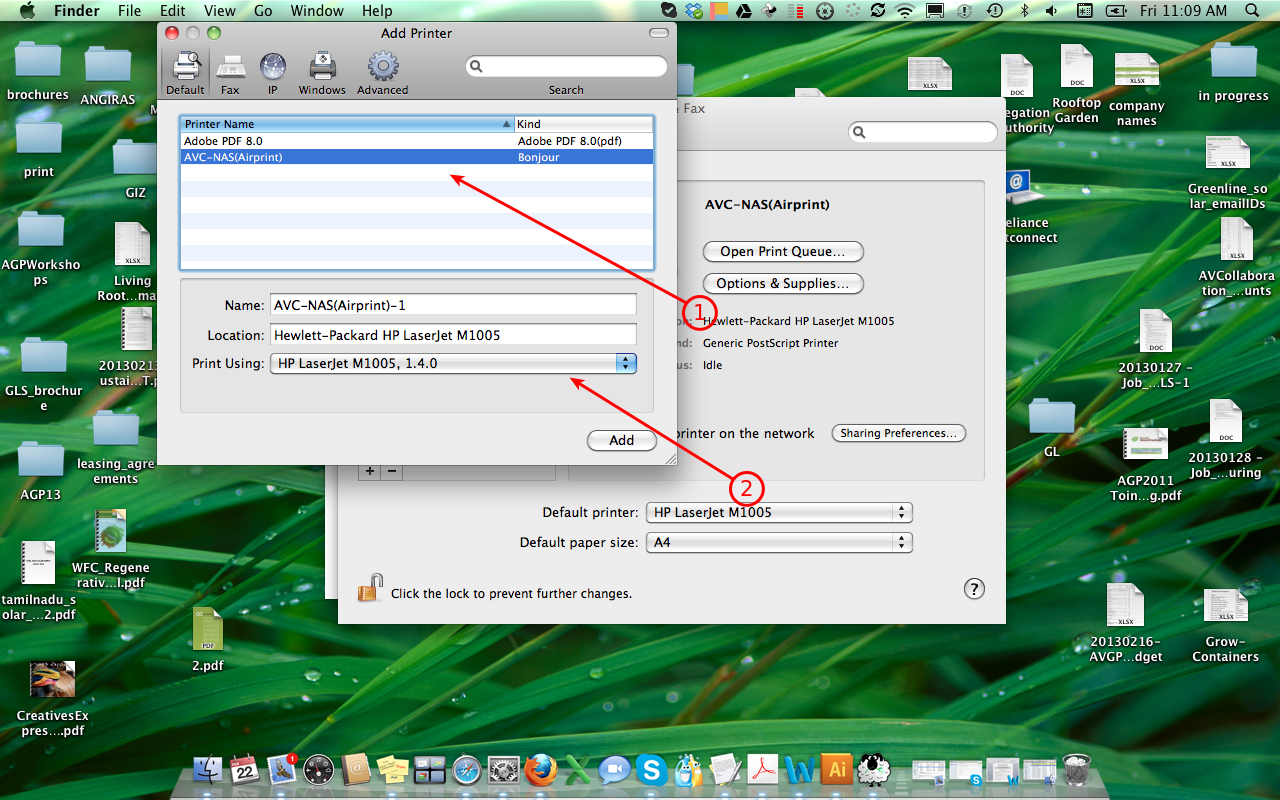
- Go to System Preferences > Printer & Fax
- Add a printer
- Select AVC-NAS(Airprint)
- in Printer Using go to Printer Software and choose the appropriate printer model (HP Laserjet M1005).
- If the printer is not available from the menu you will need to install the drivers.
Scanning
For scanning you will need the sane drivers and software.
Packages for Windows and Mac are available directly on the NAS at the following address:
Public > Scanning Software
Microsoft Windows
- Uncompress the sane software located on the NAS (sane-windows.zip)
- Place the folder called sane at the root of yout C:\ partition
- You are good to go :) Just launch the software: C:\sane\bin\xsane.exe
Apple MAC iOS
- Install all the packaged corresponding to your OS located on the NAS (Public > Scanner Software>Mac Os)
- Open the terminal and do: emacs /usr/local/etc/sane.d/net.conf
- Add the following NAS IP address at the end of the file: 192.168.1.2
- Press Ctrl+x Ctrl+s to save and Crtl+x Crtl+c to exit
- Close the terminal
- You should now be able to scan using SANE with most software (doesn’t seem to work with Image Capture)
Group Management
Group management allows you to define privileges not according to users but group. It is an easier and faster to define access privileges. Different groups can therefore have different access.
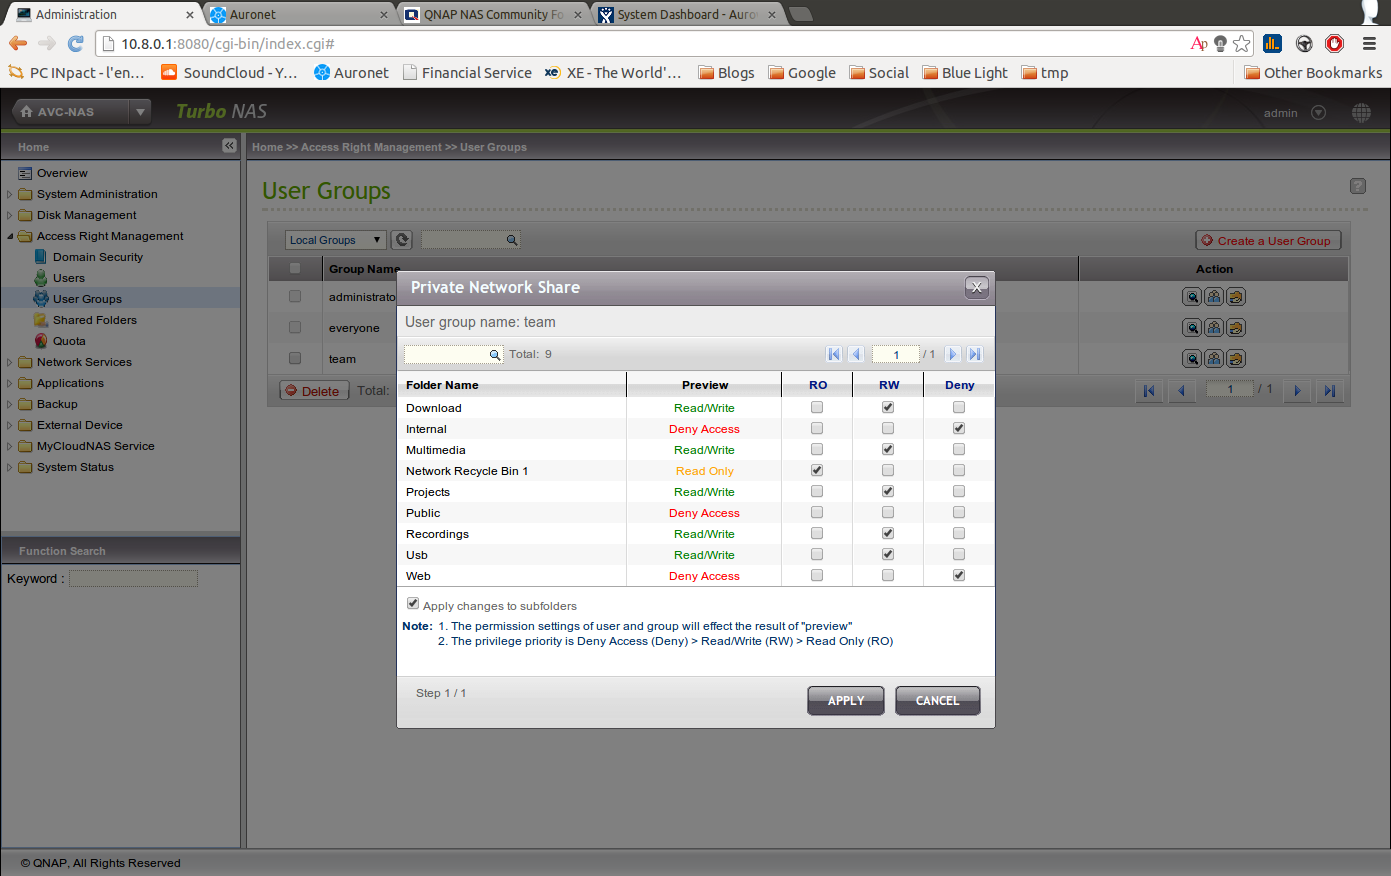
As an example: The “administrator” members will have access to the full Qnap data, the “team” group might have access only to the data concerning them, the “volunteer” members will only have a very restricted access in order to prevent any critical data lose.
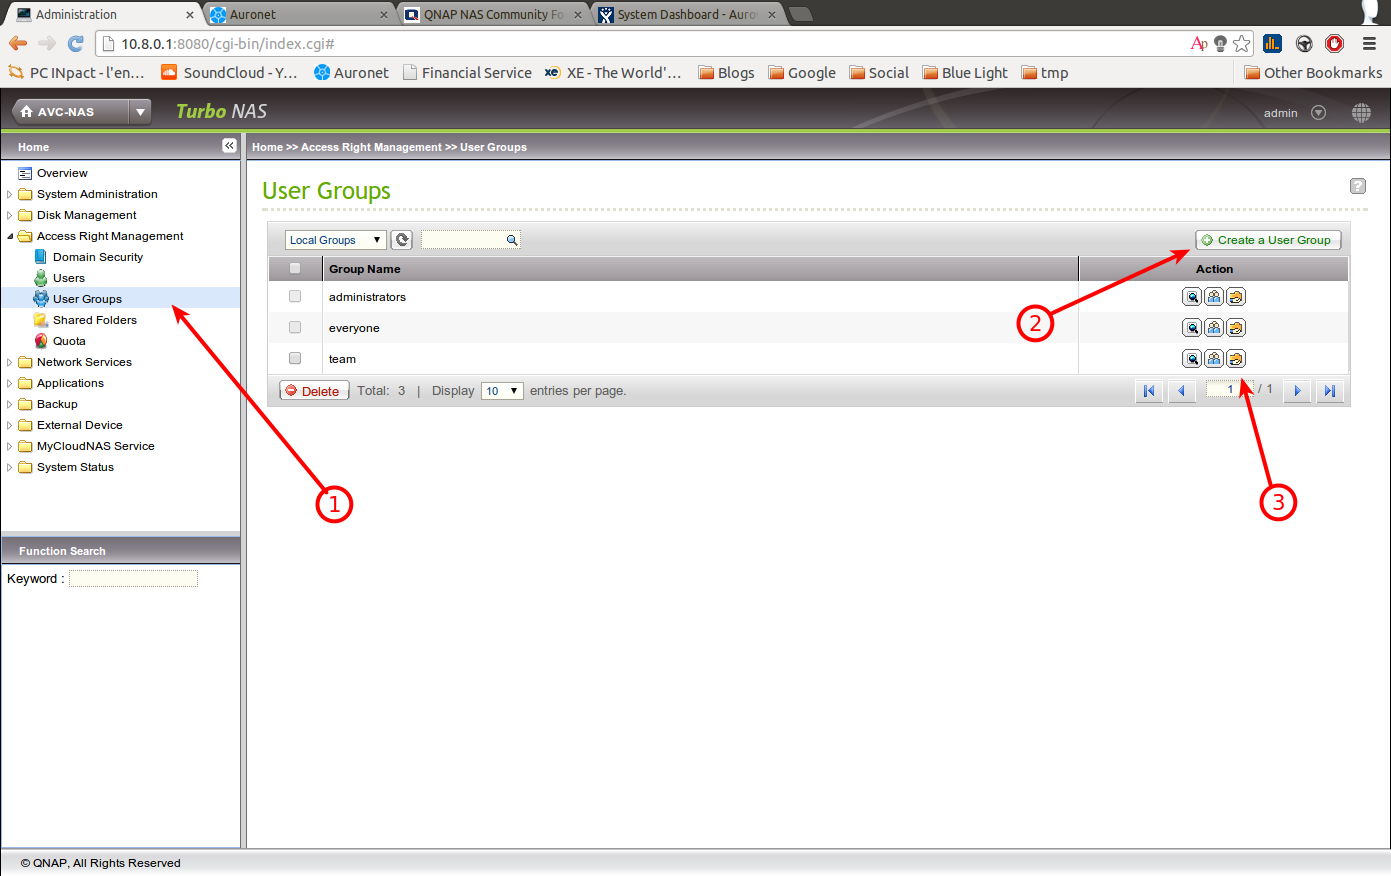
Create group
Not complicated as such the following picture will easily guide you, follow the number (1) and (2)
Group configuration
The third icon if (3) will allow you to change the access of a group to various folders
User Management
User management allows you to prevent misuse of the device. Different users will have different privileges with their own password. Once the access to the device is not required by a person anymore, do not forget to delete the user account especially if this person has external access to the NAS.
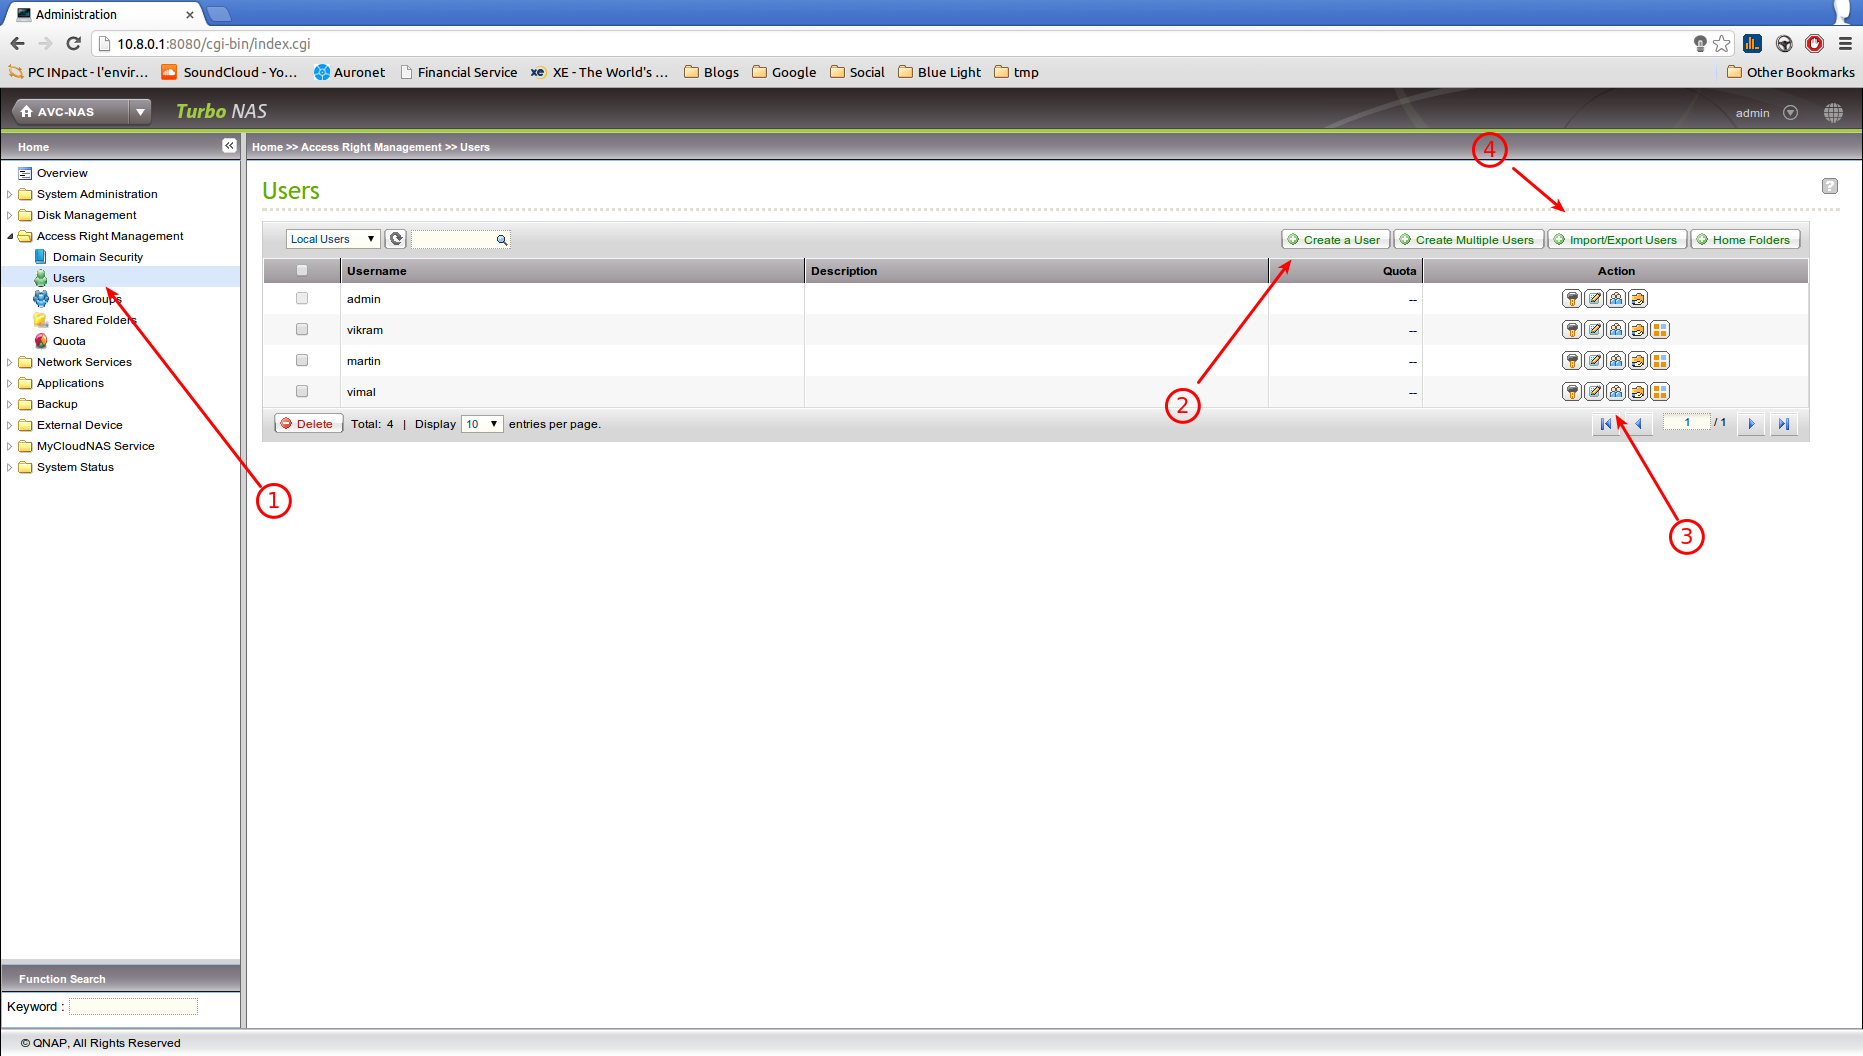
Create users
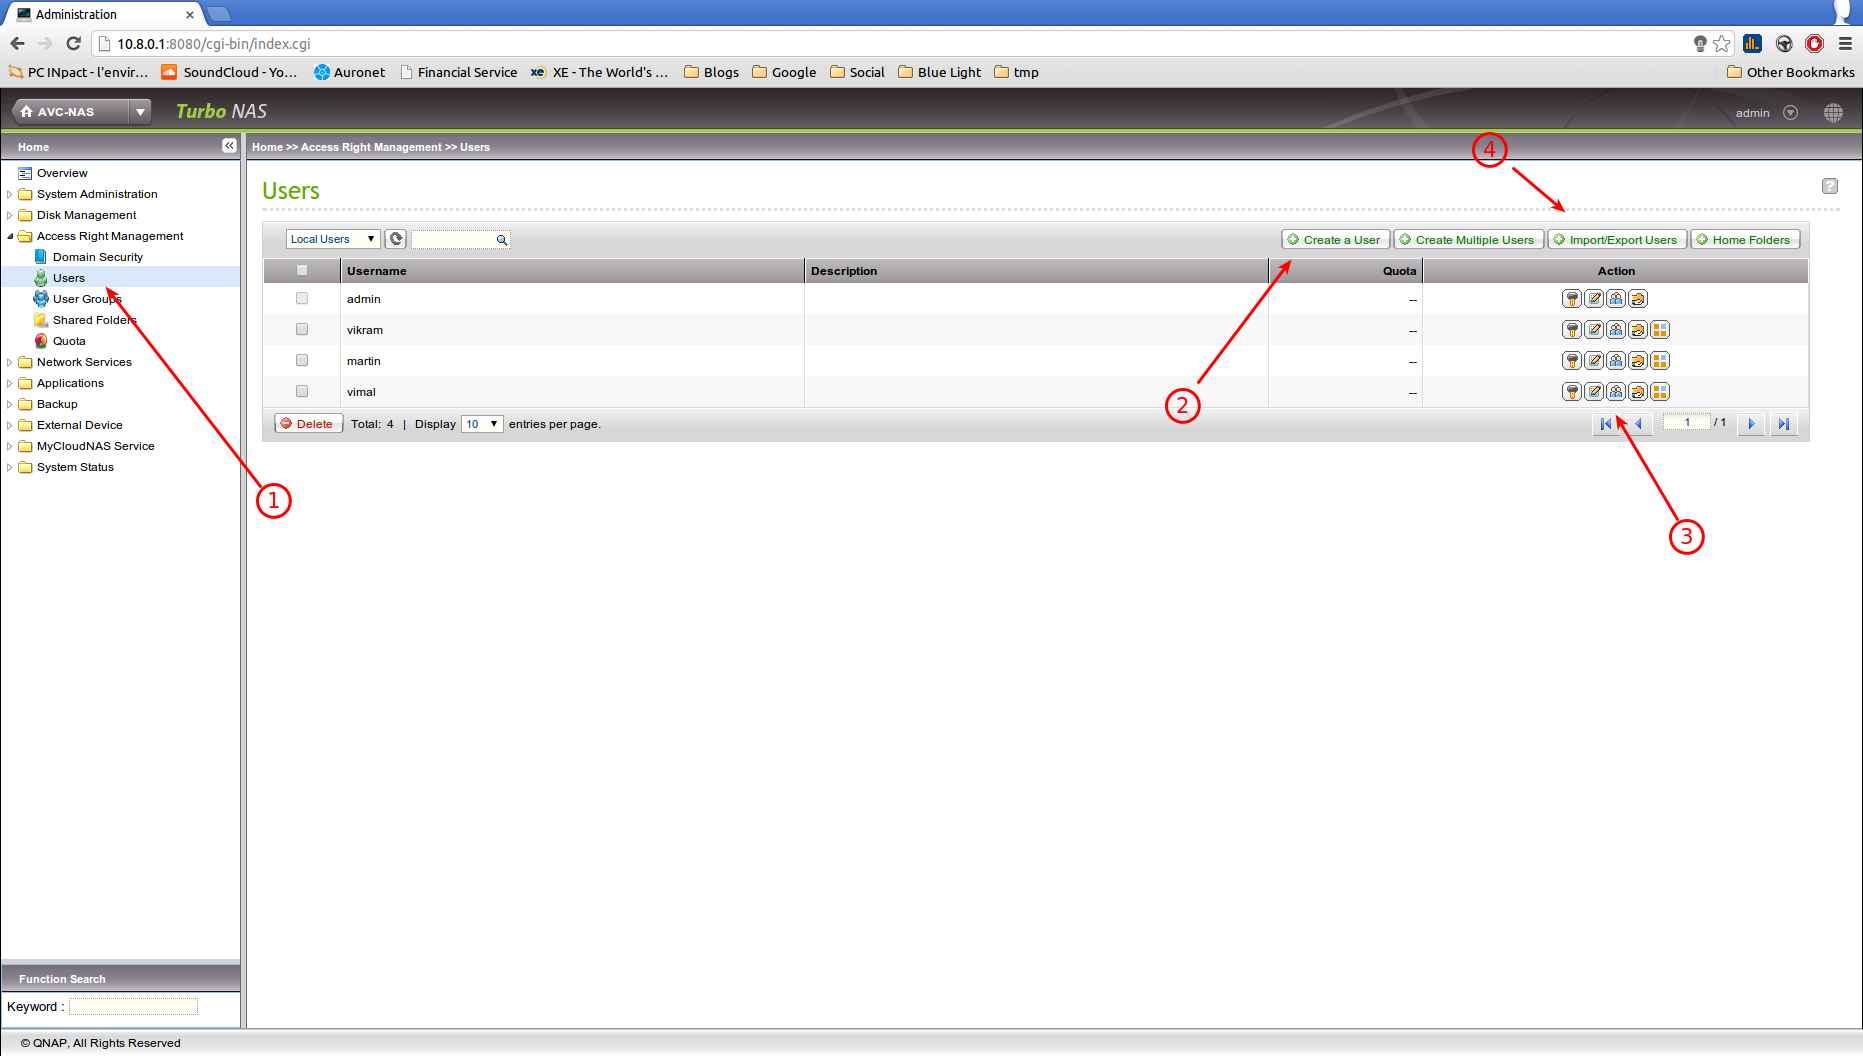
(1) Go to “Access Right Management > Users”
(2) Click on “Create a User”
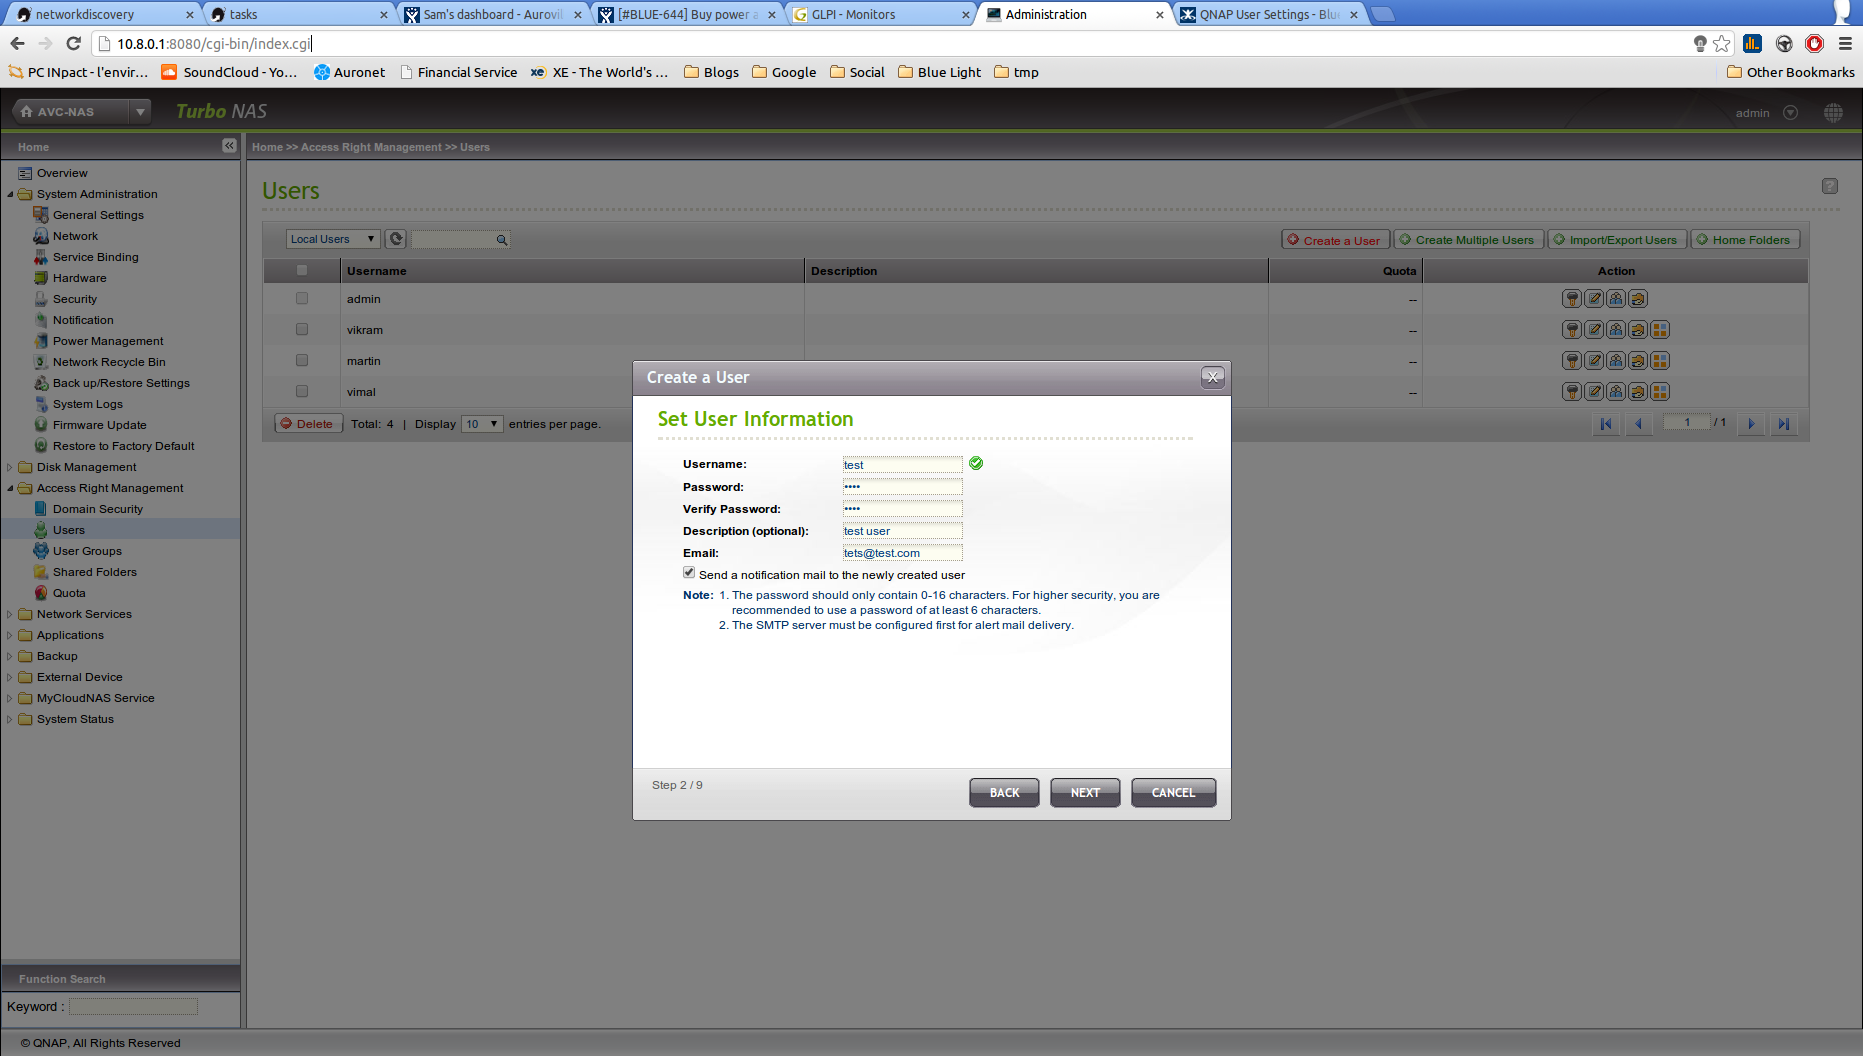
Enter the needed information for the user (name, password, ...)
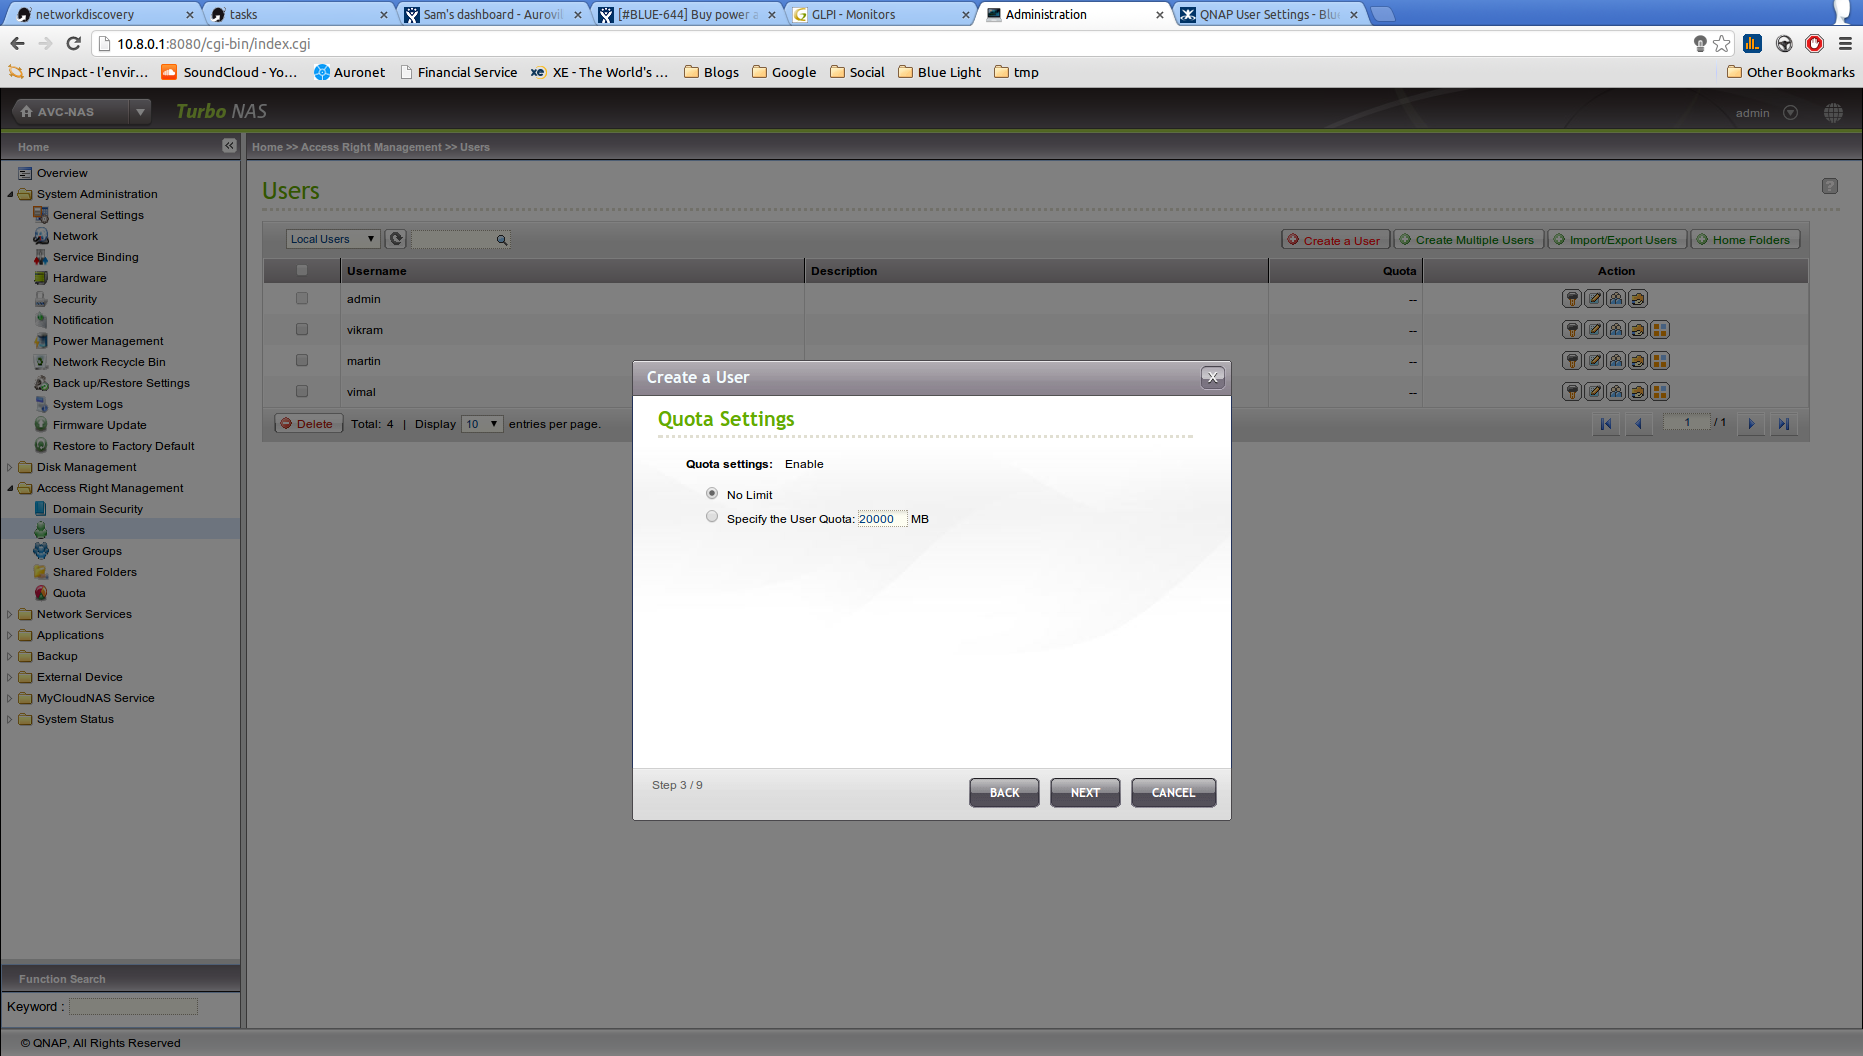
By default you will have quota of 20G per user. You don't have to keep it and it can be disable. Quotas are just here to avoid you from running out of space unnecessarily.
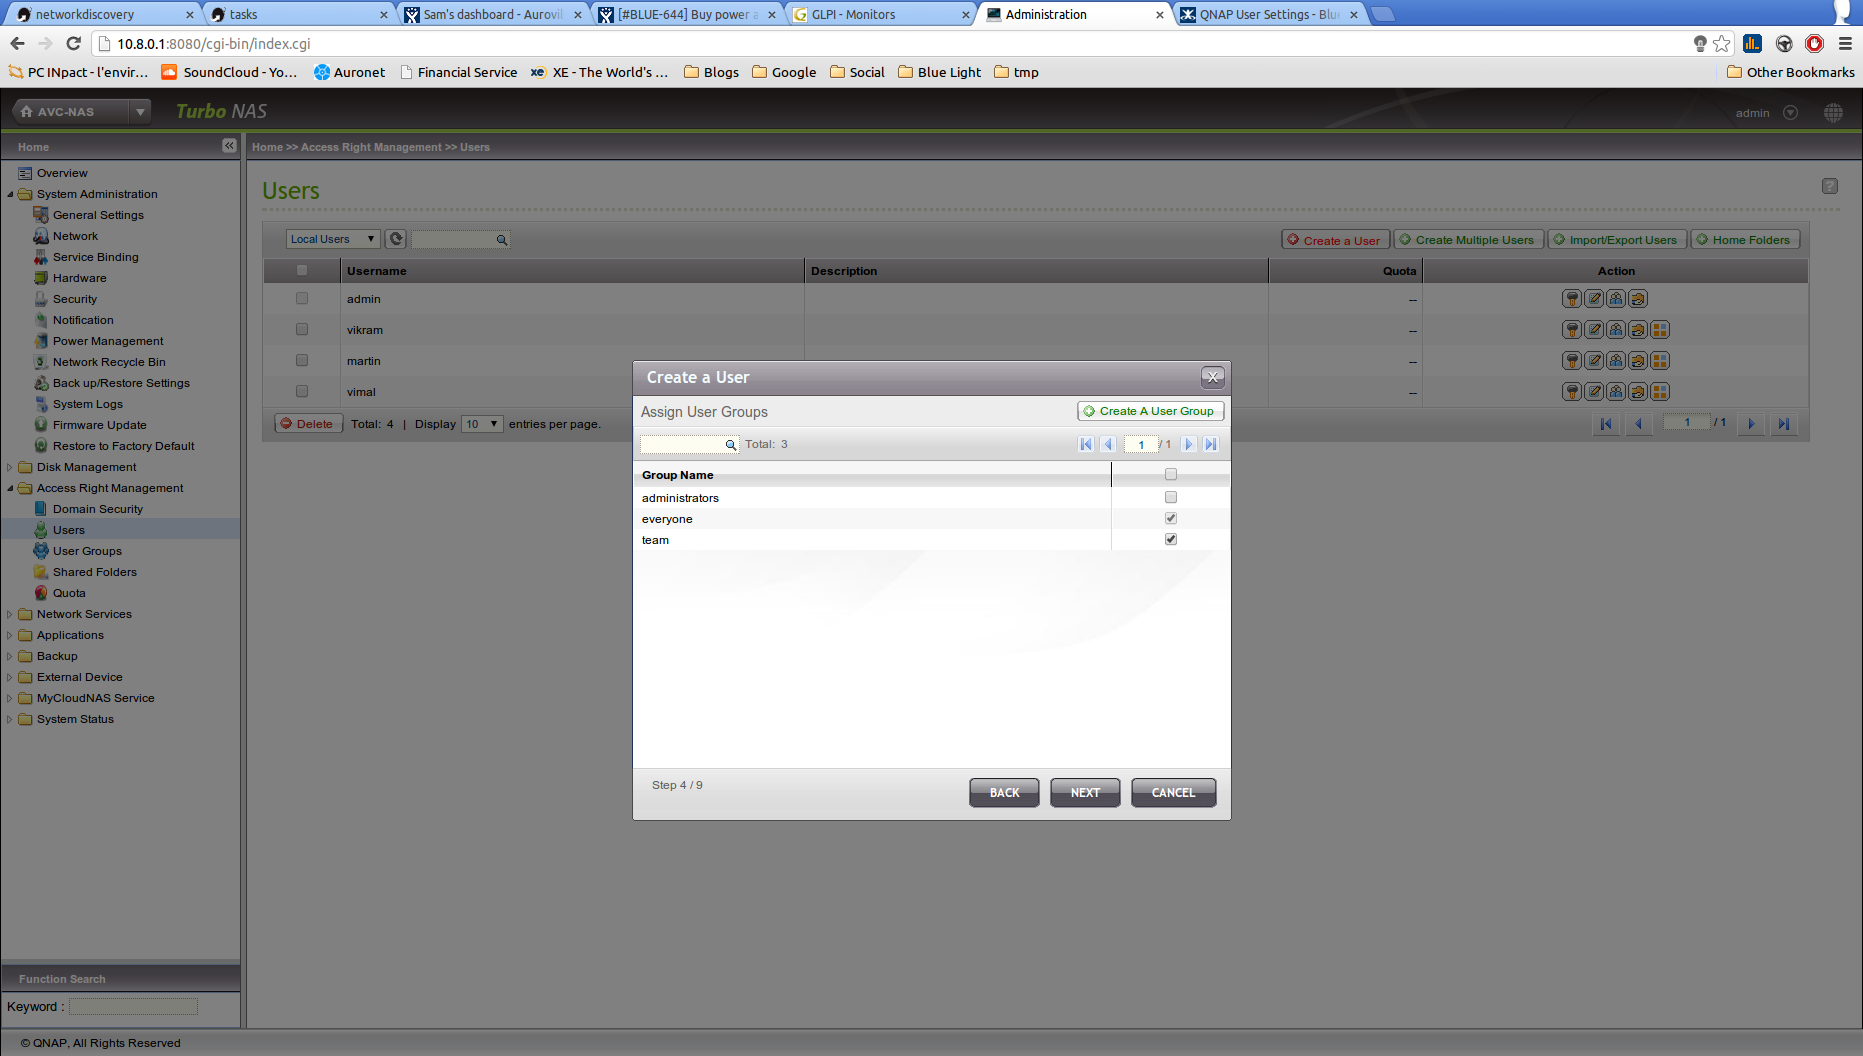
This page will allow you to assign an user to a group. Note that you can't add the user to “administrator” and “team” at the same time as there will be some conflicting permissions.
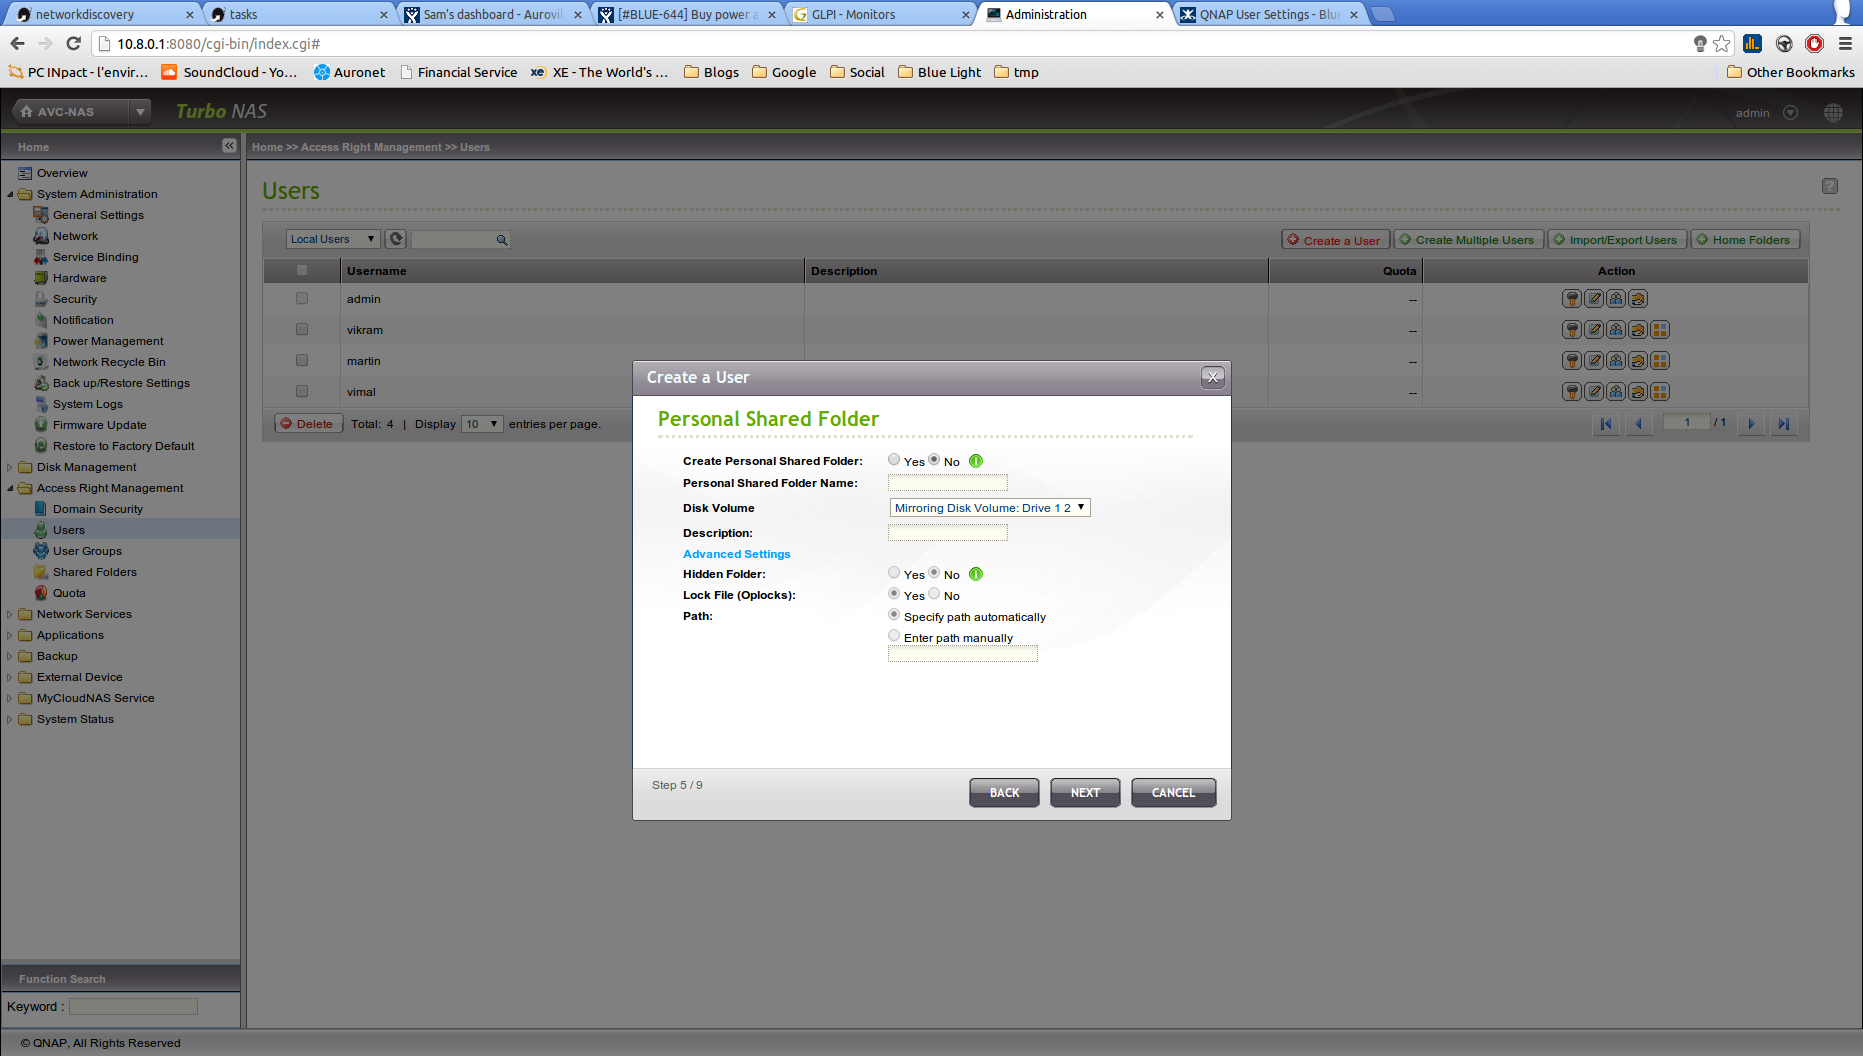
The Personal Shared folder might not be needed but if you set it up, the quota will be important to be set.
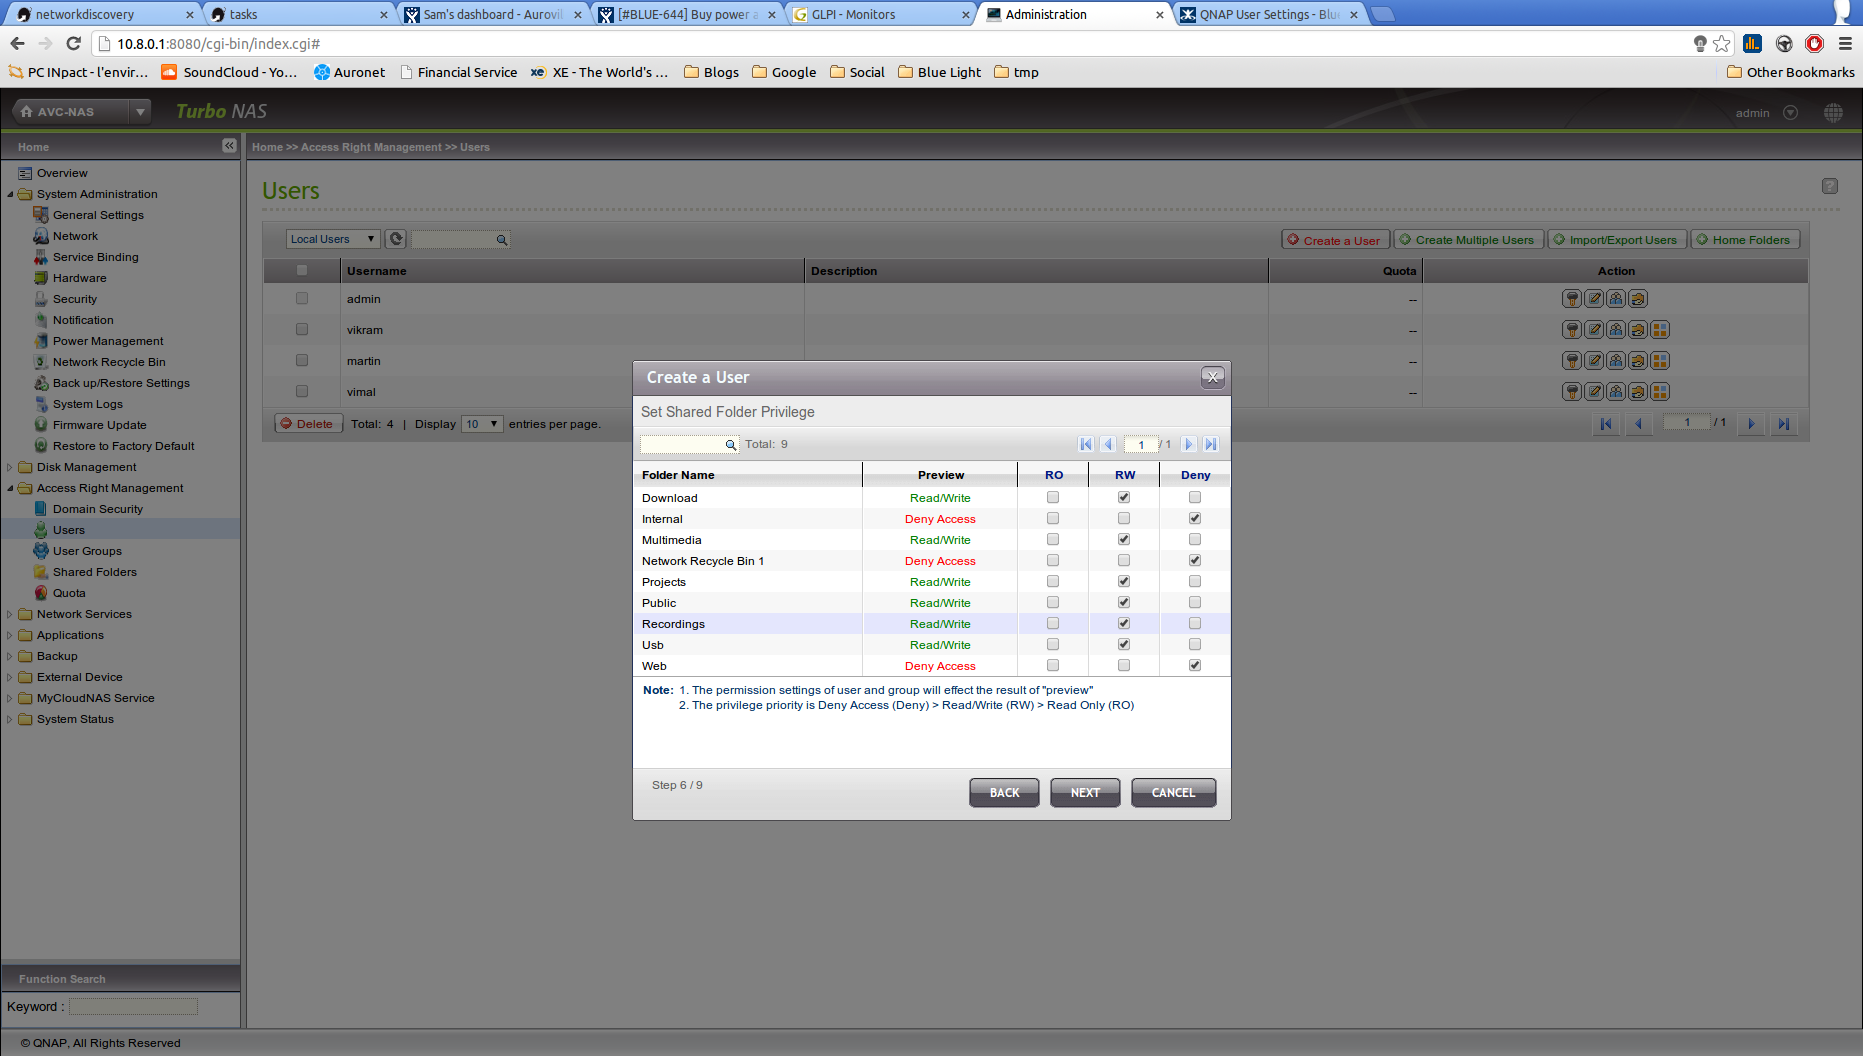
On this page you might not have to configure anything as the folder privileges are set by the group. Note that you can't allow more access than the group defines it.
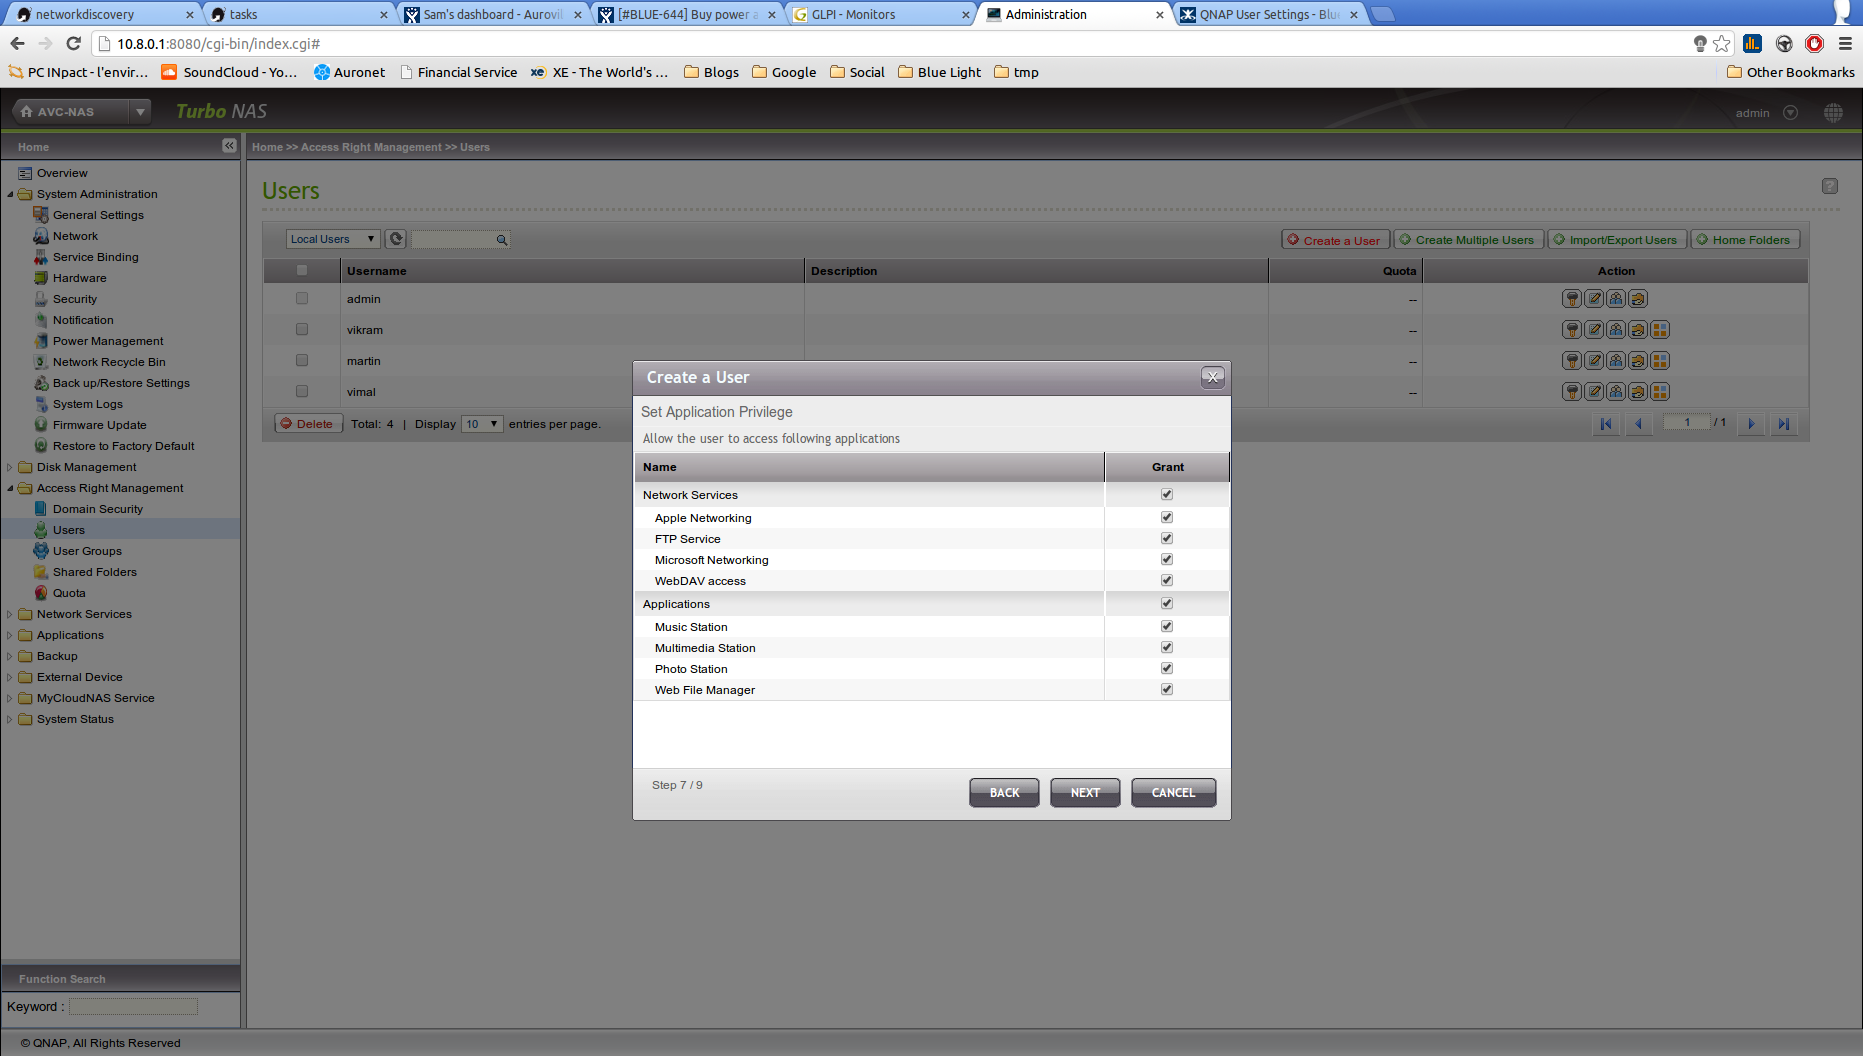
This screen set priviliges for the services.
Change user password and other
(1) Go to “Access Right Management > Users”
(3) The first icon will allow you to change the password corresponding to the user.
(3) You can also change the access to the folders, the group and other.
Notification setup
You might want to receive notifications from the NAS such as hard-drive failure or other system failure.
This can be done through email, SMS or chat notification. Here will be described the email setup to receive notifications. It will happen in two step: The configuration of the sender and the configuration of the recipient.
Outgoing setup
One needs to use an working email address to send the notifications. It can be an existing used daily or one that you setup just for this specific purpose.
The necessary information needed for this step are usually provided by your email provider.
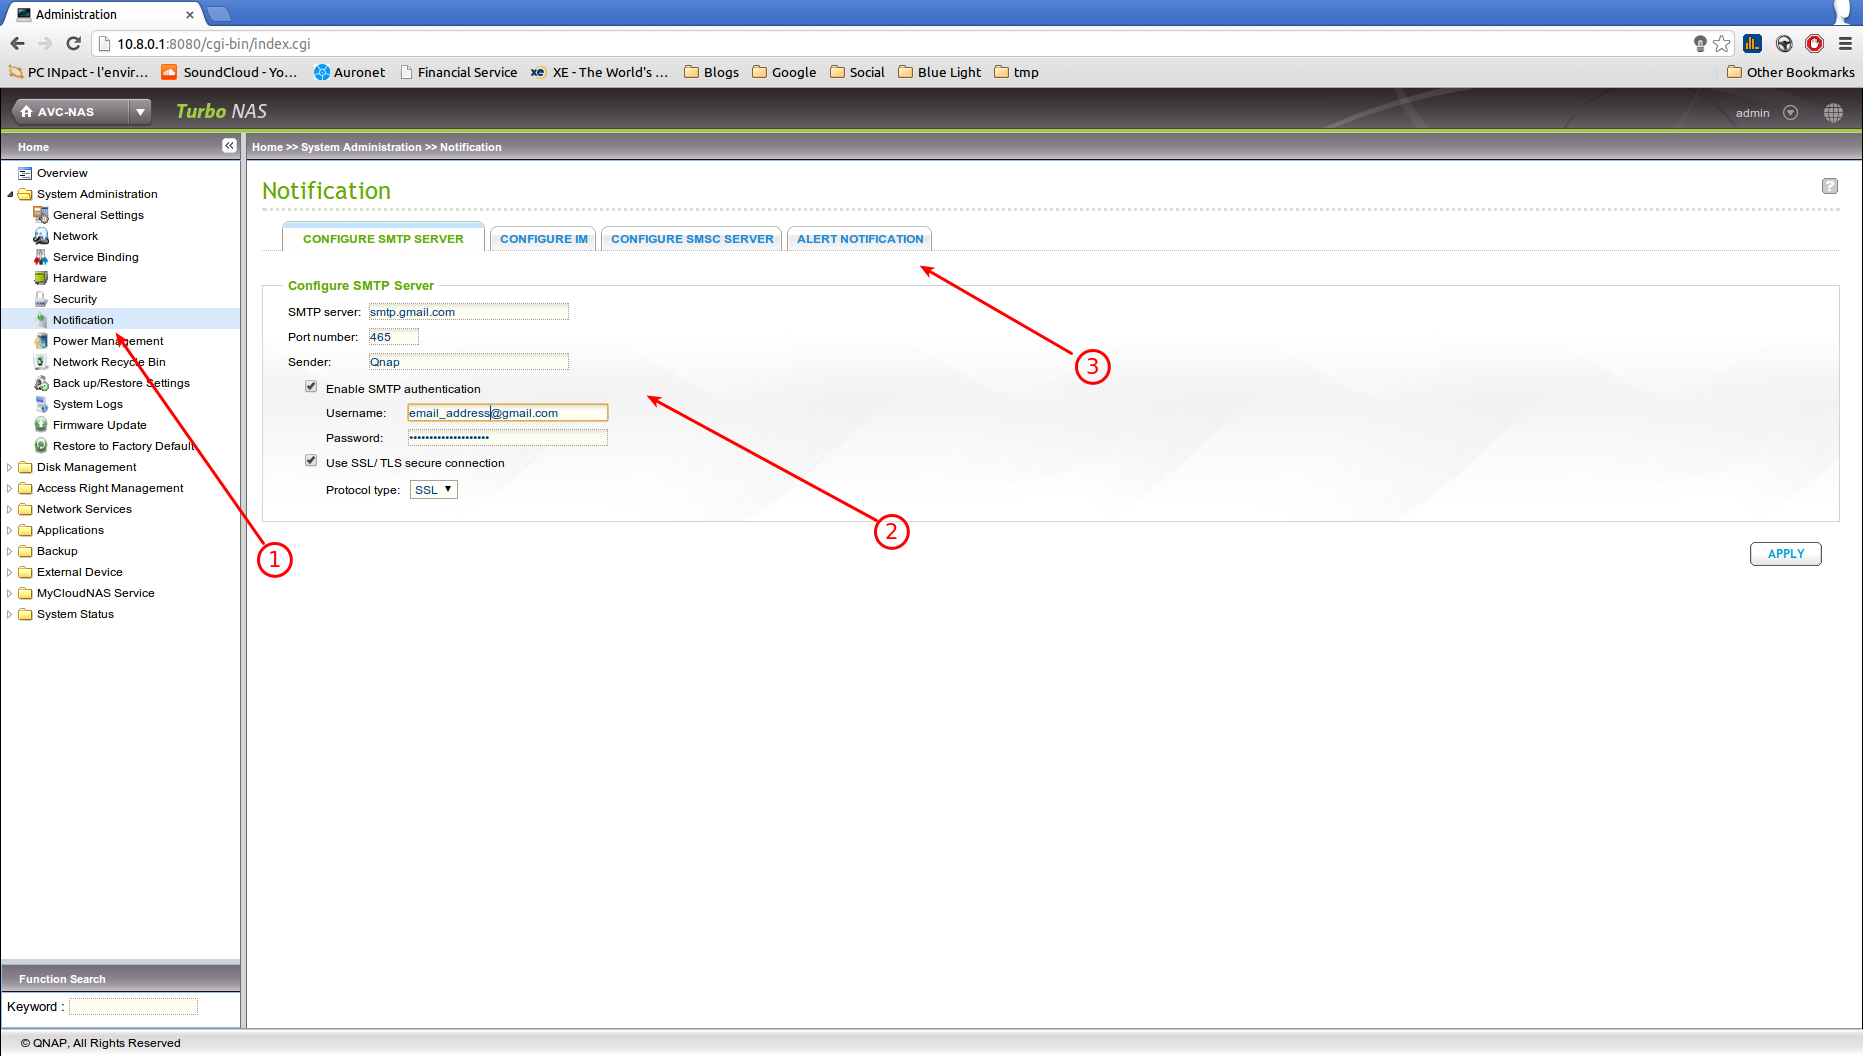
(1) Go to the Notification > Configuration SMTP Server
(2) Enter the needed information according to what is given by the email provider
The "sender" section will be the name you want to give to the sender. Something like "QNAP" will clearly indicate from what the email was sent from when you receive it.
Adding a new recipient
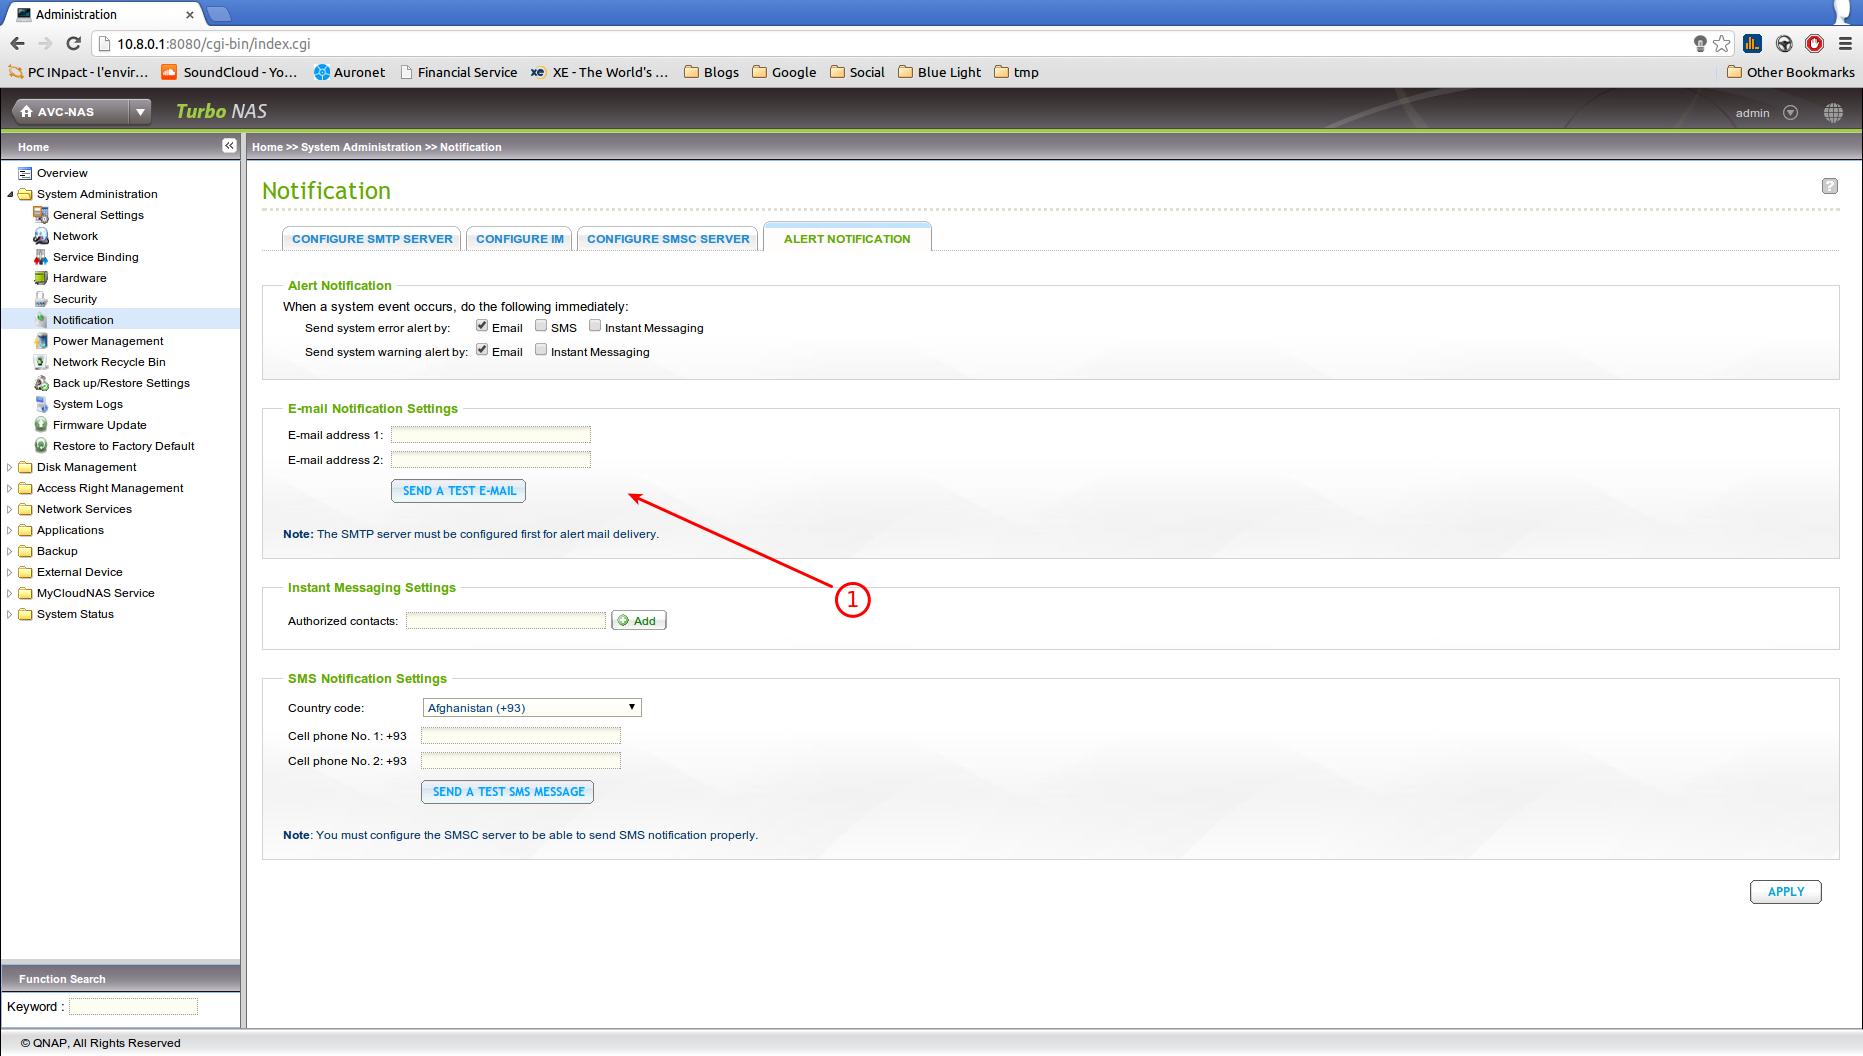
(3) Click on the Alert Notification tab
(1) Now enter one or two email receiver and click on “Send a test email” and don't forget to click “Apply”
Check the email inbox of the receiver. If nothing is received check the spam folder
