WORKS ONLY ON VERSION PRIOR 4.02
The QNAP manual offers information on how to use the QNAP. You can find it here:
http://docs.qnap.com/nas/en/index.html
Most of what is the present document is complementary to the manual because explained differently or uses different methods. First read this document and read the manual if you need further information.
QNAP Systems, Inc., as its brand promise "Quality Network Appliance Provider", aims to deliver comprehensive offerings of cutting edge network attached storage (NAS) and network video recorder (NVR) solutions featured with ease-of-use, robust operation, large storage capacity, and trustworthy reliability. QNAP integrates technologies and designs to bring forth quality products that effectively improve business efficiency on file sharing, virtualization applications, storage management and surveillance in the business environments, as well as enrich entertainment life for home users with the offering of a fun multimedia center experience. Headquartered in Taipei, QNAP delivers its solutions to the global market.
Link to the website: http://www.qnap.com/
If any problem refer to the source which was simply copied over except for the startup: http://forum.qnap.com/viewtopic.php?f=182&t=8351
Every QNAP is different so adapt...
After long searching and trying i have got sane working on my qnap TS209 pro
Sane is a project to use an usb or scsci or parralell port scanner on a server and access it with other computers over the network. In fact the same like a printerserver. That's why i post it here.
FIXED:
I have got it working but i have still a problem to start it automatically. I edit the autorun.sh script for starting de xinetd but it doesn't start at boot. When i start it manaually sane backend server start but it gives still a error. I used the name : admin and for the group : admin . The error comes for the group, Still don't know why but i'm looking for it. FIXED
All what you need is installing Qpkg on your qnap.
then install sane-backends and xinetd, configure it for your network.
Then i searched for a frontend: I used Xsane, that is supported for windows.
you have to configure it also in the same way as for Qnap NAS.
Then you can have acces to your scanner.
When more people like this feature maybe i will consider to write a tutorial when i have the time.
NOTE: I DON'T TAKE ANY RESPONSIBILITY IF SOMETHING GOES WRONG WITH YOUR DEVICE OR IF YOU LOOSE DATA.
First of al i installed QPKG. I will not explain how to do that because you can find all that information here on the forum.
On some systems like the QNAP TS210 i get an error after install when using the ipkg command:
Result:
[~] # ipkg list '*xinet*' -sh: ipkg: command not found |
Solution:
run this command:
export PATH=$PATH:/opt/bin:/opt/sbin |
I use telnet to login my qnap. You can find that in system tool , remote login. If you use windows xp or any other windows version change the port to 23.
Note: people that use windows vista or windows 7 beta.
Telnet is not standard available anymore you have to install it first.
So open a windows command window in Vista or windows 7 and type this code.
pkgmgr /iu:TelnetClient |
Now you can use telnet in Vista and windows 7
for the people that don't know how to login to your NAS by telnet:
open a windows command prompt an type:
telnet 192.168.1.102 |
where 192.168.1.102 is the IP adres of my Qnap device
it will ask you after password and login and these are the same like administration password when you login via Webinterface
Older Firmwares:
Normal:
/share/HDA_DATA/optware/opt/etc/xinetd.d |
Raid1 :
/share/MD0_DATA/optware/opt/etc/xinetd.d |
Newer Firmwares path is :
cd /share/HDA_DATA/.qpkg/Optware/etc |
Normal:
/share/HDA_DATA/.qpkg/Optware/etc[/code |
Raid1 :
/share/MD0_DATA/.qpkg/Optware/etc[/code |
you need 2 ipkg software pieces. xinetd and sane.
With this code you can find all the software that contains xinet in the name:
ipkg list '*xinet*' |
Result:
xinetd - 2.3.14-9 - Highly configurable, modular and secure inetd Successfully terminated. |
With this code you can find all the software that contains sane in the name:
ipkg list '*sane*' |
Result:
sane-backends - 1.0.21-1 - SANE is a universal scanner interface Successfully terminated. |
Install this 2 packages:
ipkg install xinetd ipkg install sane-backends |
If you get an error about md5sum mismatch like this:
Installing xinetd (2.3.14-9) to root... Downloading http://ipkg.nslu2-linux.org/feeds/optware/cs05q1armel/cross/unstable /xinetd_2.3.14-9_arm.ipk Nothing to be done Successfully terminated. Collected errors: Package xinetd md5sum mismatch. Either the ipkg or the package index are corrupt . Try 'ipkg update'. |
ipkg update |
And try to install again.
Then execute the following command:
[~] # sane-find-scanner |
If you get no error then everything is installed correctly. This happens on the older qnap firmwares.
On the newer one you have this output:
[~] # sane-find-scanner sane-find-scanner: error while loading shared libraries: libieee1284.so.3: canno t open shared object file: No such file or directory |
solution: install libieee1284.
So we check the ipkg list first:
[~] # ipkg list '*libie*' libieee1284 - 0.2.11-1 - libieee1284 is a cross-platform library for parallel port access. Successfully terminated. |
So we install:
[~] # ipkg install libieee1284 |
Normally this shouldn't be any problem.
When this is done we need to configure all this.
From now on i only give the foldernames for RAID1 configurations.
So keep in mind if your Foldernames contains HDA_DATA then use this in stead of my examples with MD0_DATA, If you are using older firmware versions also think about the different folder structure.
Browse to the following folder in telnet command window:
[~] # cd /share/MD0_DATA/.qpkg/Optware/etc/xinetd.d |
(note HDA_DATA can be different , check your configuration)
create here a new file named : saned it this not yet exist if already exist just open with vi
vi saned |
(vi is a text application)
type now the following : (note: type first an "I" now you add text)
service saned
{
port = 6566
socket_type = stream
server = /opt/sbin/saned
protocol = tcp
user = admin
group = administrators
wait = no
disable = no
} |
save the file : first press few times on the ESC button
then type :
:wq |
( w for write, q for exit, note when you open a file an you don't want to save type then :q!)
so now this file is created.
add the following line to /etc/services: (services is not writable so we need to copy it first) NOTE: When you just installed sane there is already a line like this, however when you restart Qnap overwrite again and the line is gone
saned 6566/tcp # SANE network scanner daemon |
cp /etc/services /usr/local/etc/services |
now you have to edit the copied file:
vi /usr/local/etc/services |
I have added the saned service at the end of the file
Here part of the file:
amidxtape 10083/tcp # amanda backup services isdnlog 20011/tcp # isdn logging system isdnlog 20011/udp # isdn logging system vboxd 20012/tcp # voice box system vboxd 20012/udp # voice box system binkp 24554/tcp # Binkley binkp 24554/udp # Binkley asp 27374/tcp # Address Search Protocol asp 27374/udp # Address Search Protocol tfido 60177/tcp # Ifmail tfido 60177/udp # Ifmail fido 60179/tcp # Ifmail fido 60179/udp # Ifmail |
ADD THIS LINE to services file:
# Local services saned 6566/tcp # SANE network scanner daemon |
save the file : first press few times on the ESC button
then type :
:wq |
NEXT:
Edit saned.conf:
cd /share/MD0_DATA/.qpkg/Optware/etc/sane.d |
vi saned.conf |
My file contains this :
# # saned.conf # # The contents of the saned.conf file is a list of host names, IP # addresses or IP subnets (CIDR notation) that are permitted to use local # SANE devices. IPv6 addresses must be enclosed in brackets, and should # always be specified in their compressed form. # # The hostname matching is not case-sensitive. # #scan-client.somedomain.firm #192.168.0.1 #192.168.0.1/29 #[2001:7a8:185e::42:12] #[2001:7a8:185e::42:12]/64 # # NOTE: /etc/inetd.conf (or /etc/xinetd.conf) and # /etc/services must also be properly configured to start # the saned daemon as documented in saned(8), services(4) # and inetd.conf(4) (or xinetd.conf(5)). 192.168.1.0/24 #grant access to scanner from network 192.168.1.x |
THIS LINE IS ONLY THAT IS IMPORTANT
My netwerk is 192.168.1.0 until 192.168.1.255 so with subnetmask : 255.255.255.0
Change it to you network settings: other example : 10.10.1.0/24 alwasy add /24 ad the end
If you want a bigger mask like 255.255.0.0 then use this : 192.168.0.0/16
save the file : first press few times on the ESC button
then type :
:wq |
NEXT: configure Xinetd:
browse to :
cd /share/MD0_DATA/.qpkg/Optware/etc/ |
vi xinetd.conf |
My file:
# Copyright 1999-2004 Gentoo Foundation
# Distributed under the terms of the GNU General Public License v2
# Sample configuration file for xinetd

defaults
{
 only_from = localhost 10.0.0.0/8 172.16.0.0/12 192.168.0.0/16
 instances = 60
 log_type = SYSLOG authpriv info
 log_on_success = HOST PID
 log_on_failure = HOST
 cps = 25 30
}

includedir /opt/etc/xinetd.d |
Change the file like above if you are use older firmware versions, on the new this file is already up to date
save the file : first press few times on the ESC button
then type :
:wq |
If you want a bigger mask like 255.255.0.0 then use this : 192.168.0.0/16
Check if the NAS finds the scanner:
sane-find-scanner |
result:
[~] # sane-find-scanner # sane-find-scanner will now attempt to detect your scanner. If the # result is different from what you expected, first make sure your # scanner is powered up and properly connected to your computer. # No SCSI scanners found. If you expected something different, make sure that # you have loaded a kernel SCSI driver for your SCSI adapter. found USB scanner (vendor=0x04b8 [EPSON], product=0x080f [USB MFP]) at libusb:00 THIS LINE IS IMPORTANT 2:004 # Your USB scanner was (probably) detected. It may or may not be supported by # SANE. Try scanimage -L and read the backend's manpage. # Not checking for parallel port scanners. # Most Scanners connected to the parallel port or other proprietary ports # can't be detected by this program. [~] # |
Like you can see it recognize my scanner
You can try to scan a testpage, this doesn't workd for my but with the command scanimage -L you may not recieve any error.
when it does it's not possible to use your scanner:
scanimage -L |
Result:
[~] # scanimage -L device `epson:libusb:002:004' is a Epson RX420 flatbed scanner LIKE YOU CAN SEE NO ERROR HERE [~] # |
I have had many problems with my epson scanner. There are 2 Epson config files. I have searched a long time on internet how to fix that and solution was to disable one of the 2 config files. so after lots of trial and errors i have found it.
if you also have problems with your scanner try to play with this:
browse to:
cd /share/HDA_DATA/optware/opt/etc/sane.d vi dll.conf |
So here a part of the file: (Note ,use PageUP en PageDOWN so scroll in large files.)
epjitsu epson MY SCANNER IS USING THIS EPSON SETTINGS #epson2 THIS IS THE ONE I HAD TO DISABLE TO MAKE MY EPSON SCANNER WORK (Note: # is placing code in comment) fujitsu #gphoto2 genesys gt68xx hp hp3900 hpsj5s hp3500 hp4200 hp5400 hp5590 hpljm1005 hs2p ibm leo lexmark ma1509 ** microtek microtek2 |
Now Start the saned server manually:
/opt/sbin/xinetd -d |
Result: when your scanner is recognized:
~] # /opt/sbin/xinetd -d
08/11/7@22:21:26: DEBUG: 1493 {handle_includedir} Reading included configuration
 file: /opt/etc/xinetd.d/saned [file=/opt/etc/xinetd.conf] [line=15]
Service defaults
 Instances = 60
 CPS = max conn:25 wait:30
 Bind = All addresses.
 Only from: 127.0.0.1(NUMERIC) 192.168.1.0/255.255.255.0(NET)
 No access: No blocked sites
 Logging to syslog. Facility = authpriv, level = info
 Log_on_success flags = HOST PID
 Log_on_failure flags = HOST

Service configuration: saned
 id = saned
 flags = IPv4
 socket_type = stream
 Protocol (name,number) = (tcp,6)
 port = 6566
 wait = no
 user = 0
 group = 0
 Groups = no
 PER_SOURCE = -1
 Bind = All addresses.
 Server = /opt/sbin/saned
 Server argv = saned
 Only from: 127.0.0.1(NUMERIC) 192.168.1.0/255.255.255.0(NET)
 No access: No blocked sites
 Logging to syslog. Facility = authpriv, level = info
 Log_on_success flags = HOST PID
 Log_on_failure flags = HOST

08/11/7@22:21:26: DEBUG: 1493 {cnf_start_services} Started service: saned
08/11/7@22:21:26: DEBUG: 1493 {cnf_start_services} mask_max = 6, services_starte
d = 1
08/11/7@22:21:26: NOTICE: 1493 {main} xinetd Version 2.3.14 started with no opti
ons compiled in.
08/11/7@22:21:26: NOTICE: 1493 {main} Started working: 1 available service
08/11/7@22:21:26: DEBUG: 1493 {main_loop} active_services = 1 |
This method consists in declaring a dummy QPKG which lunch your script at startup.
Log into your QNAP device using SSH or Telnet, for instance by using Putty
Edit QPKG config file:
vi /etc/config/qpkg.conf |
Declare a new dummy package by adding something like that in this file:
[autorun] Name = autorun Version = 0.1 Author = neomilium Date = 2013-05-06 Shell = /share/MD0_DATA/.qpkg/autorun/autorun.sh Install_Path = /share/MD0_DATA/.qpkg/autorun Enable = TRUE |
As you can see, Shell is the interesting variable: at boot-time, QNAP OS will lunch each QPKG's Shell variable content.
Note: if your NAS does have /share/MD0_DATA (ie. is a one-drive NAS), put the right directory into Shell and Install_Path variables and adapt next commands to your needs.
Create the dummy package directory:
mkdir /share/MD0_DATA/.qpkg/autorun |
Create the autorun script:
vi /share/MD0_DATA/.qpkg/autorun/autorun.sh |
#!/bin/sh sleep 5 cp /usr/local/etc/services /etc/services sleep 10 export OPTWARE_TARGET=cs05q3armel echo "xinetd start" >>/usr/local/share/autorun.log if [ ! -e "/opt/sbin/xinetd" ]; then echo "xinetd not accessible" >>/usr/local/share/autorun.log fi /sbin/daemon_mgr xinetd start "/opt/sbin/xinetd" 2>/dev/null echo "xinetd started" >>/usr/local/share/autorun.log sleep 10 |
Note: don't forget "#!/bin/sh" at the beginning of script.
Set the execute bit permission:
chmod +x /share/MD0_DATA/.qpkg/autorun/autorun.sh |
Reboot and enjoy!
reboot |
Downloaded the qnap package from:
http://www.qnap.com/en/index.php?lang=en&sn=859
Unzipped the package,
Logged in the QNAP,
Went to Home > Applications > QPKG Center > Install Manually
Installed the package.
Pressing the Power button when the NAS is off will obviously turn it on. We might take some time for it to finish booting (around 5 min if there RAID array is not damaged and the system not corrupted). You will a first “bip” shortly after pressing the button and another one few minutes later indicating that the QNAP booted.
To power it off you can use the web interface. On the login page at the top (1)
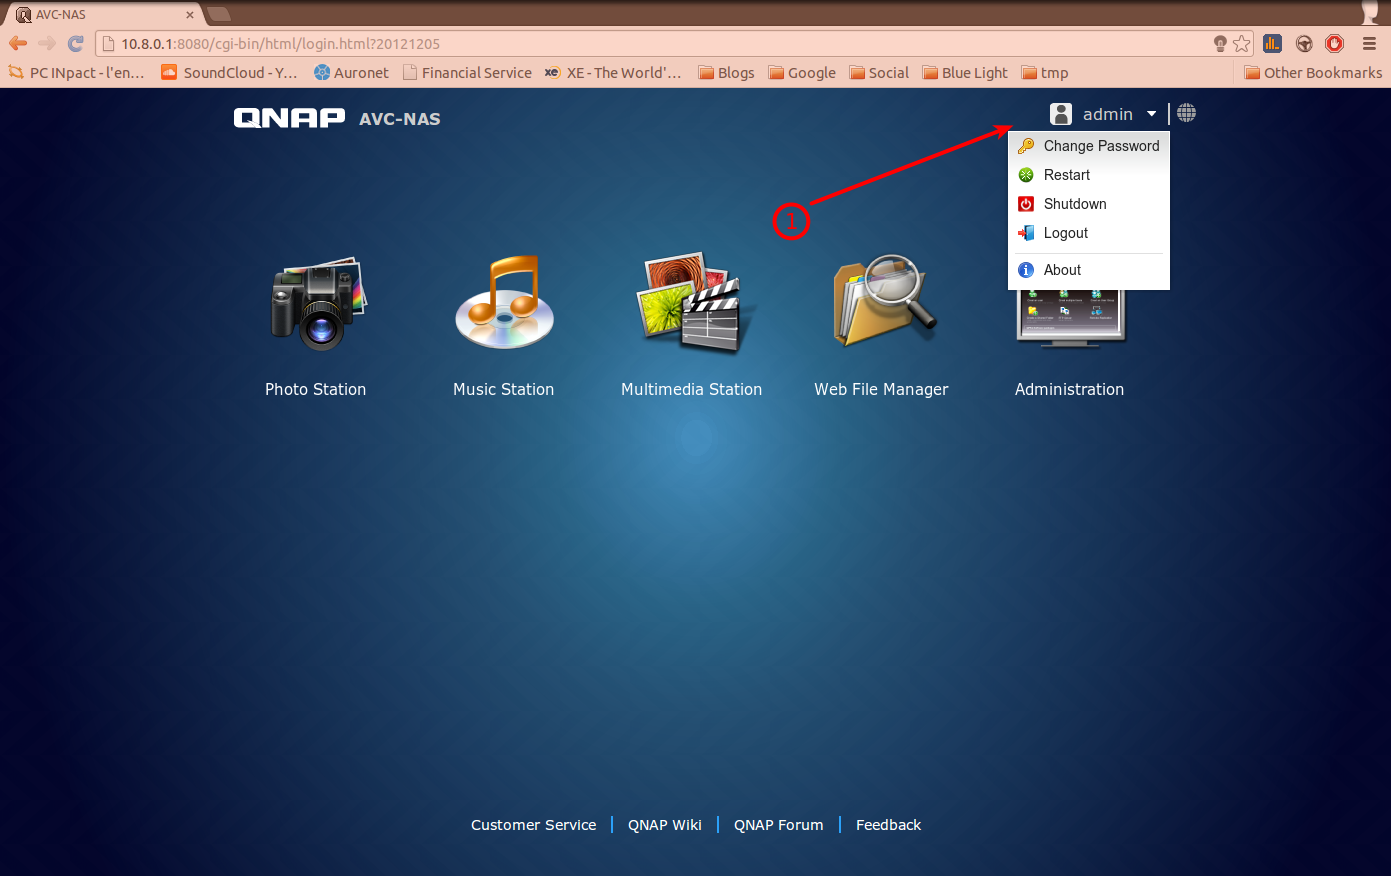
Another way is to press for 4 seconds the Power button. It should take few minutes to shutdown.
There are different ways to access the NAS locally and remotely:
As a drive
As a web interface
Both are available on local and can be accessible remotely. You might want to choose the drive access to easily find the files and the web interface to manage the NAS, access without configuring much or have a graphical interfaces to interact with.
Be sure that the IP address of the computer willing to access the NAS is on the network 192.168.1.x.
Open the web browser (Firefox, Chrome, Safari,...) and enter the following address in the address bar:
You will find an interface asking for you authentication.
- Set your computer as being part of the AVC Workgroup
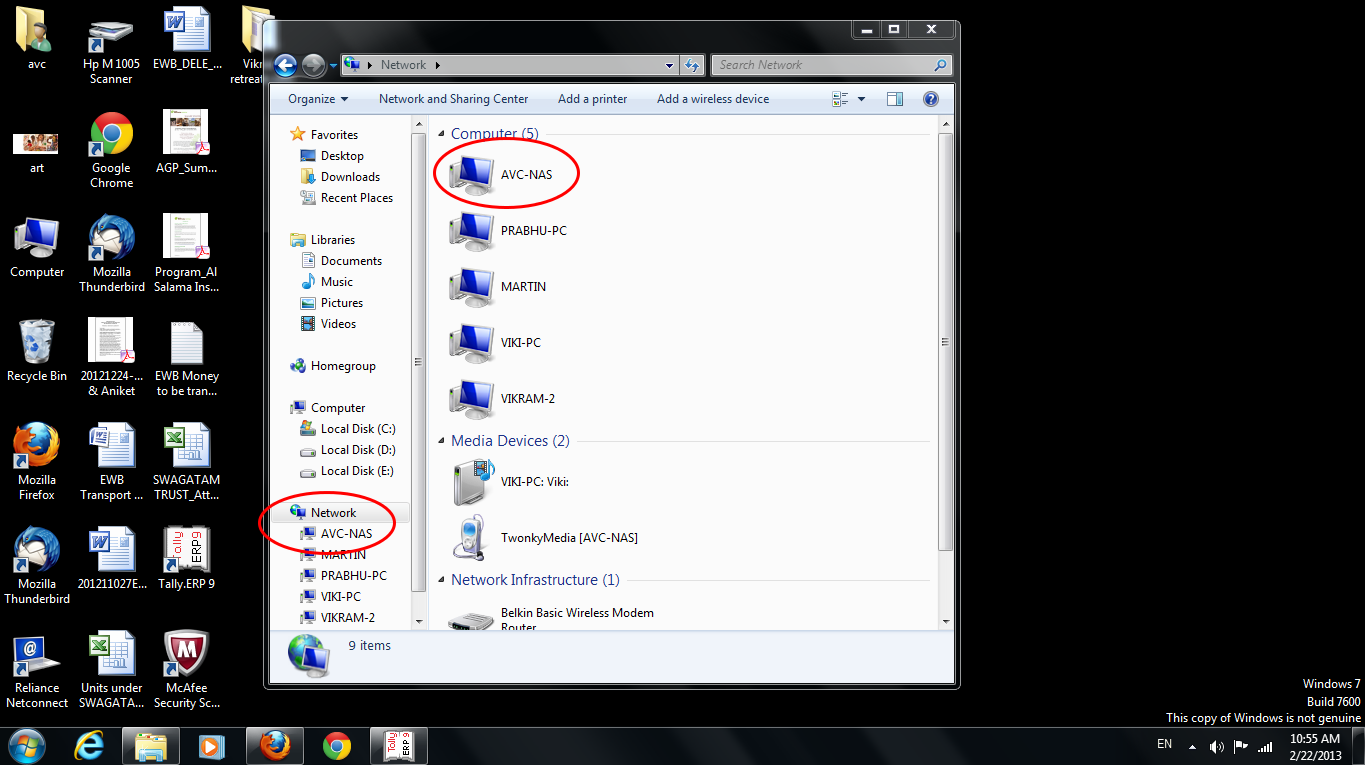
- Go to My Computer and you should see the NAS appearing. Click on it and enter your password.
- The NAS is part of your Network so you can find it among the Shared devices.
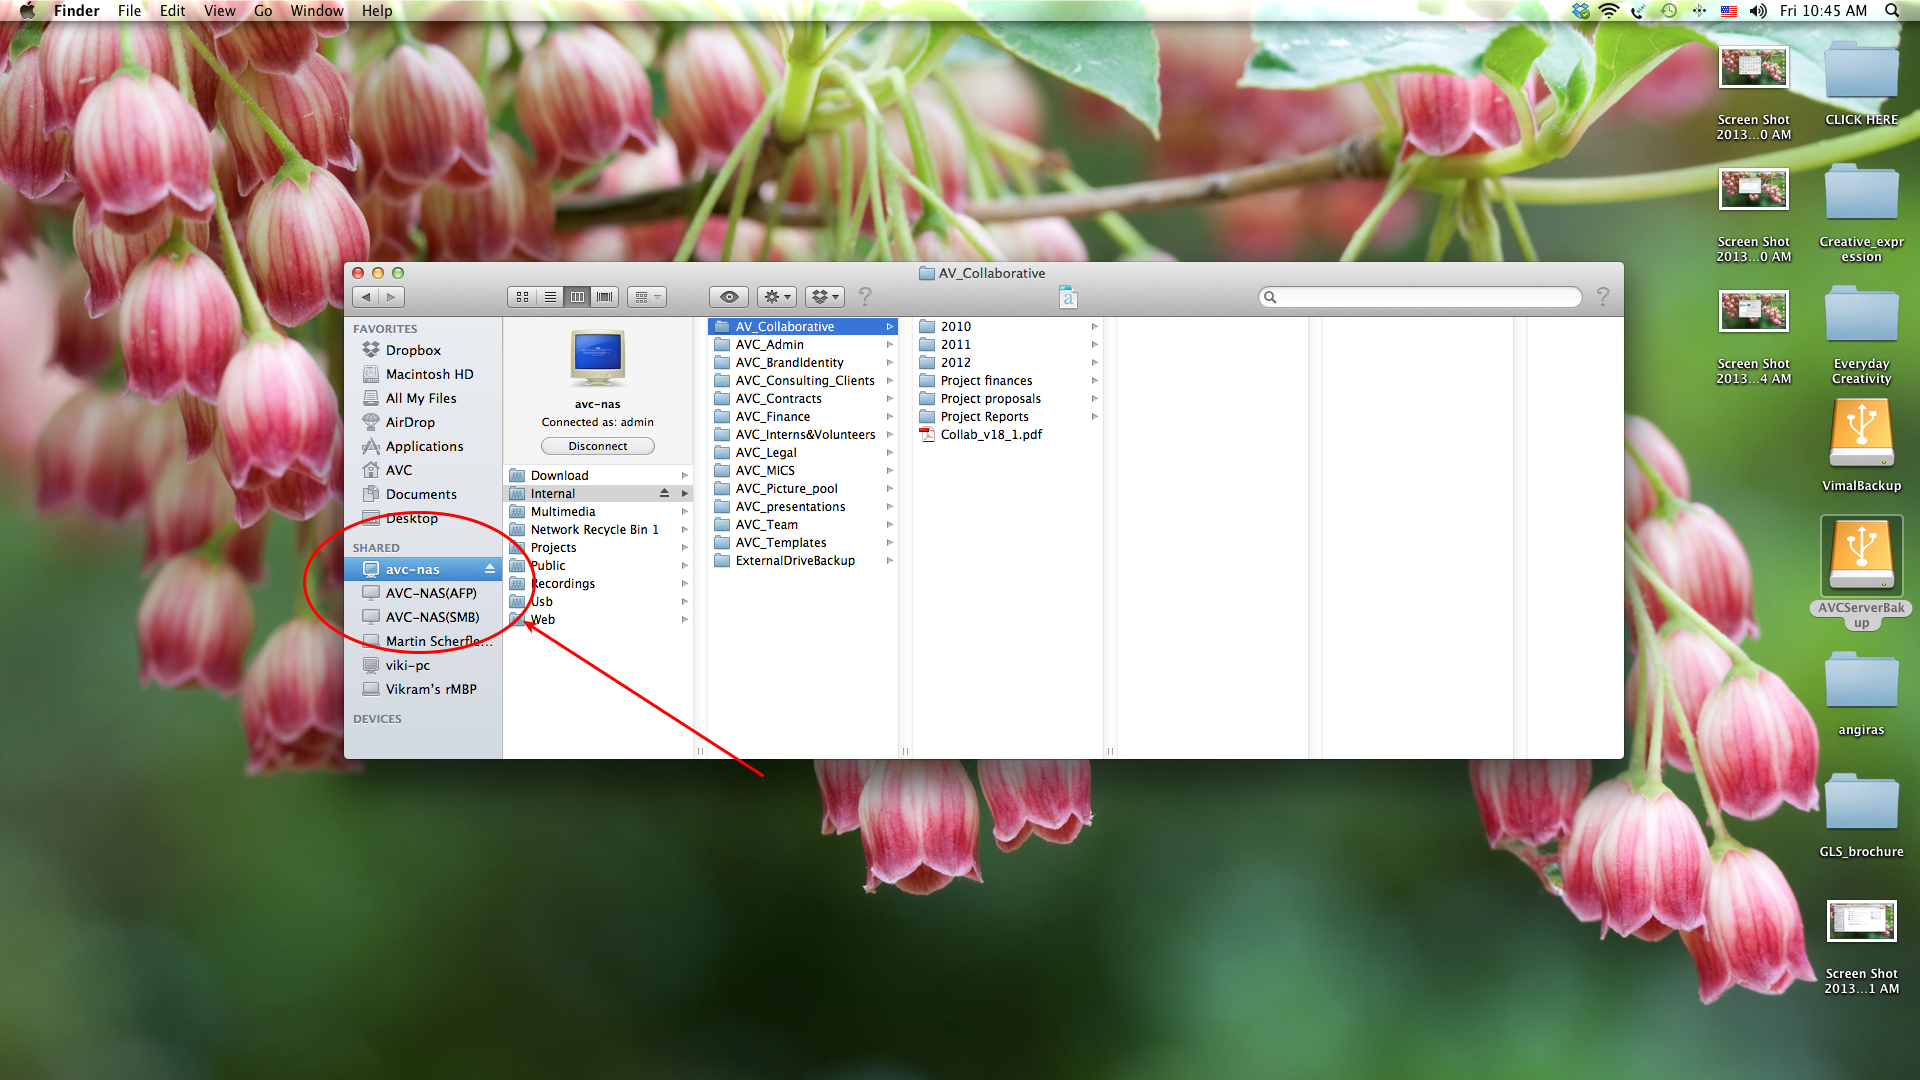
The remote access uses 2 technologies: DDNS and VPN.
To access the NAS a user will have to install some package/software to his/her computer.
With the present configuration you will be able to use the web interface of the Qnap.
Once the VPN side is setup, start your web browser and enter the following address: http://10.8.0.1:8080/
For any of the OS you will have to get the latest OpenVPN configuration files which can be downloaded form the web page for the NAS: 192.168.1.2:8080 > Applications > VPN Service > Download Configuration File
- Download OpenVPN from http://openvpn.net/index.php/open-source/downloads.html
- Install OpenVPN client on Windows. The default installation directory is C :\Program Files\OpenVPN.
- Run OpenVPN GUI as administrator (1)
- Extract data of the archive. Put “ca.crt” and “openvpn.ovpn” into the configuration folder under OpenVPN configuration subdirectory (C :\Program Files\OpenVPN\config).
- Connect to the VPN network (2). It will ask for your username and password. If everything goes right you should get a positive notification after 30 seconds to 1 min.

- Download the disk image of OpenVPN client from http://code.google.com/p/tunnelblick/
(note, for Mac IOS 10.8 you will need to download a version higher than 3.2.9)
- Double click on the downloaded .dmg file and install tunnelblick.
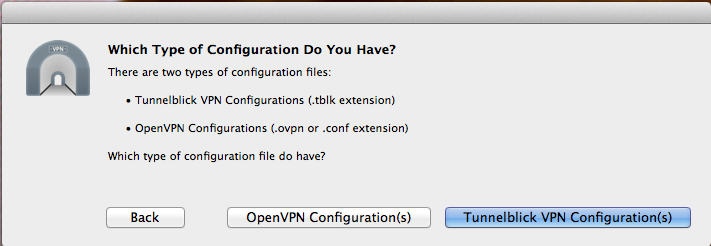
- After installation it will ask for the configuration files. Click on I have configuration files
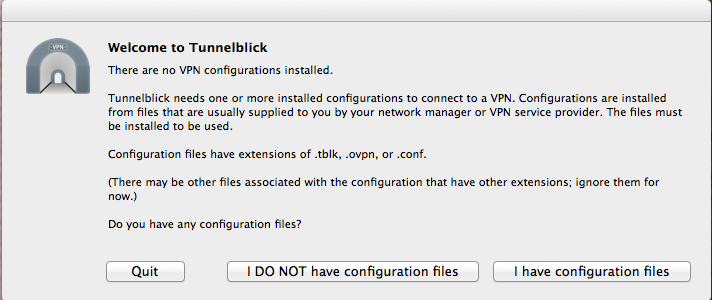
- Click on Tunnelblick VPN Configuration(s)
- Extract the configuration files from the openvpn.zip
- And follow the following instructions:
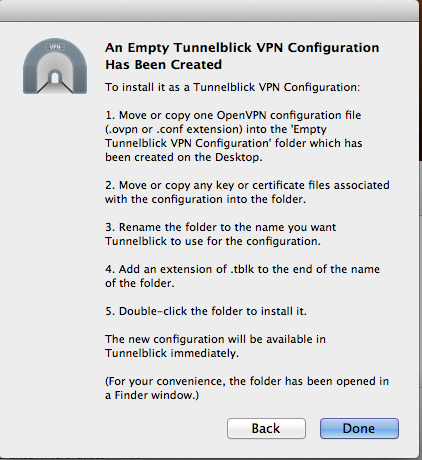
- Now connect to the nas doing a right click on the icon (top right of the screen) and click on: Connect <name of the tlbk file>
We will assume here that the person has some computer knowledge...
In a shell use the following commands:
apt-get install openvpn
Unpack the archive you took from the NAS to the /etc/openvpn folder
Start openvpn using the following command:
service openvpn start
If it doesn't work, contact BlueLight ;)
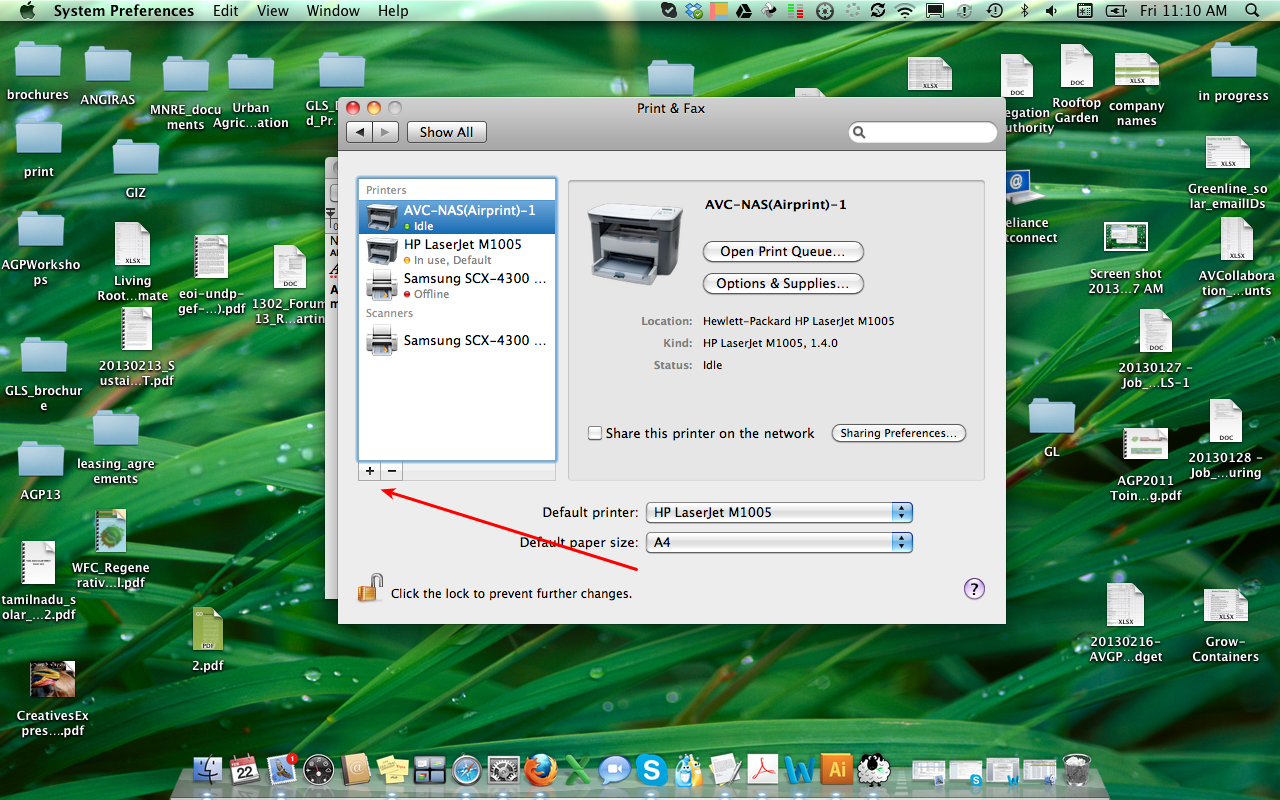
- Go to System Preferences > Printer & Fax
- Add a printer
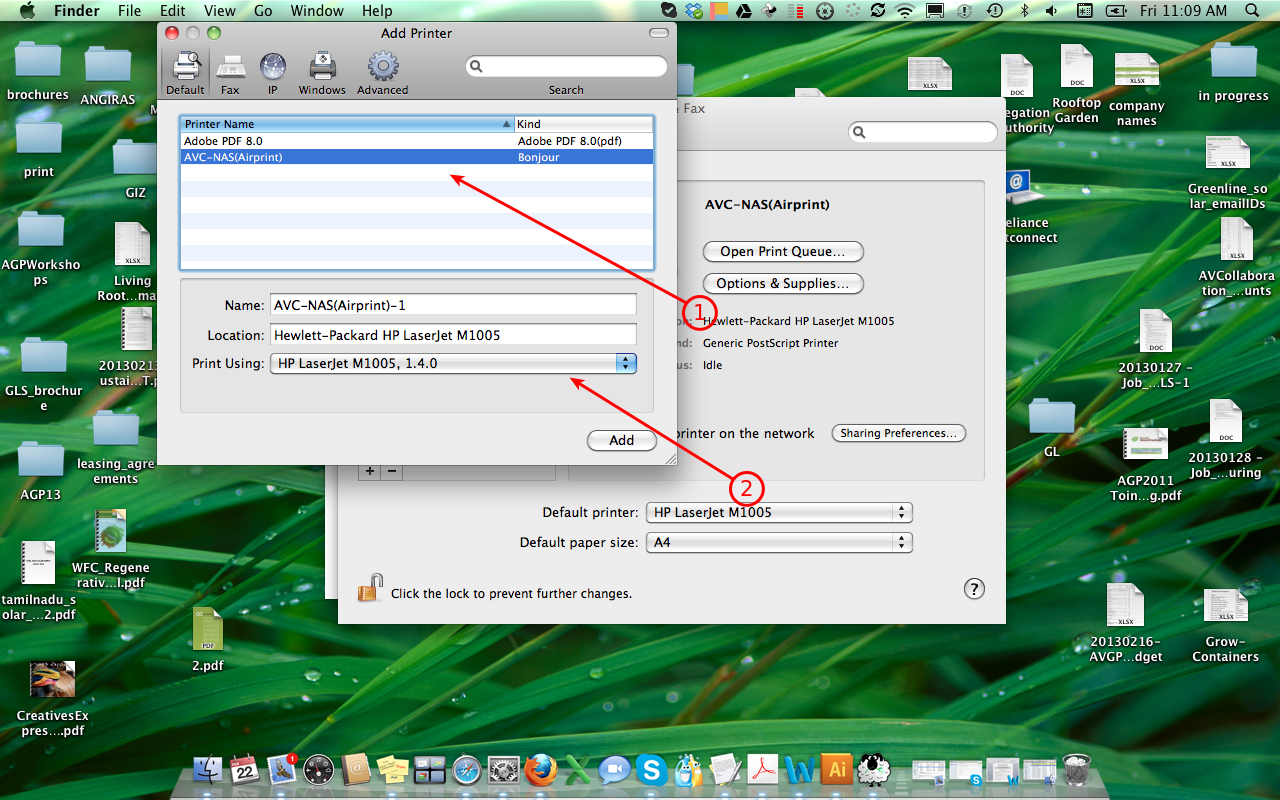
- Select AVC-NAS(Airprint)
- in Printer Using go to Printer Software and choose the appropriate printer model (HP Laserjet M1005).
- If the printer is not available from the menu you will need to install the drivers.
For scanning you will need the sane drivers and software.
Packages for Windows and Mac are available directly on the NAS at the following address:
Public > Scanning Software
- Uncompress the sane software located on the NAS (sane-windows.zip)
- Place the folder called sane at the root of yout C:\ partition
- You are good to go :) Just launch the software: C:\sane\bin\xsane.exe
- Install all the packaged corresponding to your OS located on the NAS (Public > Scanner Software>Mac Os)
- Open the terminal and do: emacs /usr/local/etc/sane.d/net.conf
- Add the following NAS IP address at the end of the file: 192.168.1.2
- Press Ctrl+x Ctrl+s to save and Crtl+x Crtl+c to exit
- Close the terminal
- You should now be able to scan using SANE with most software (doesn’t seem to work with Image Capture)
Group management allows you to define privileges not according to users but group. It is an easier and faster to define access privileges. Different groups can therefore have different access.
As an example: The “administrator” members will have access to the full Qnap data, the “team” group might have access only to the data concerning them, the “volunteer” members will only have a very restricted access in order to prevent any critical data lose.
Not complicated as such the following picture will easily guide you, follow the number (1) and (2)
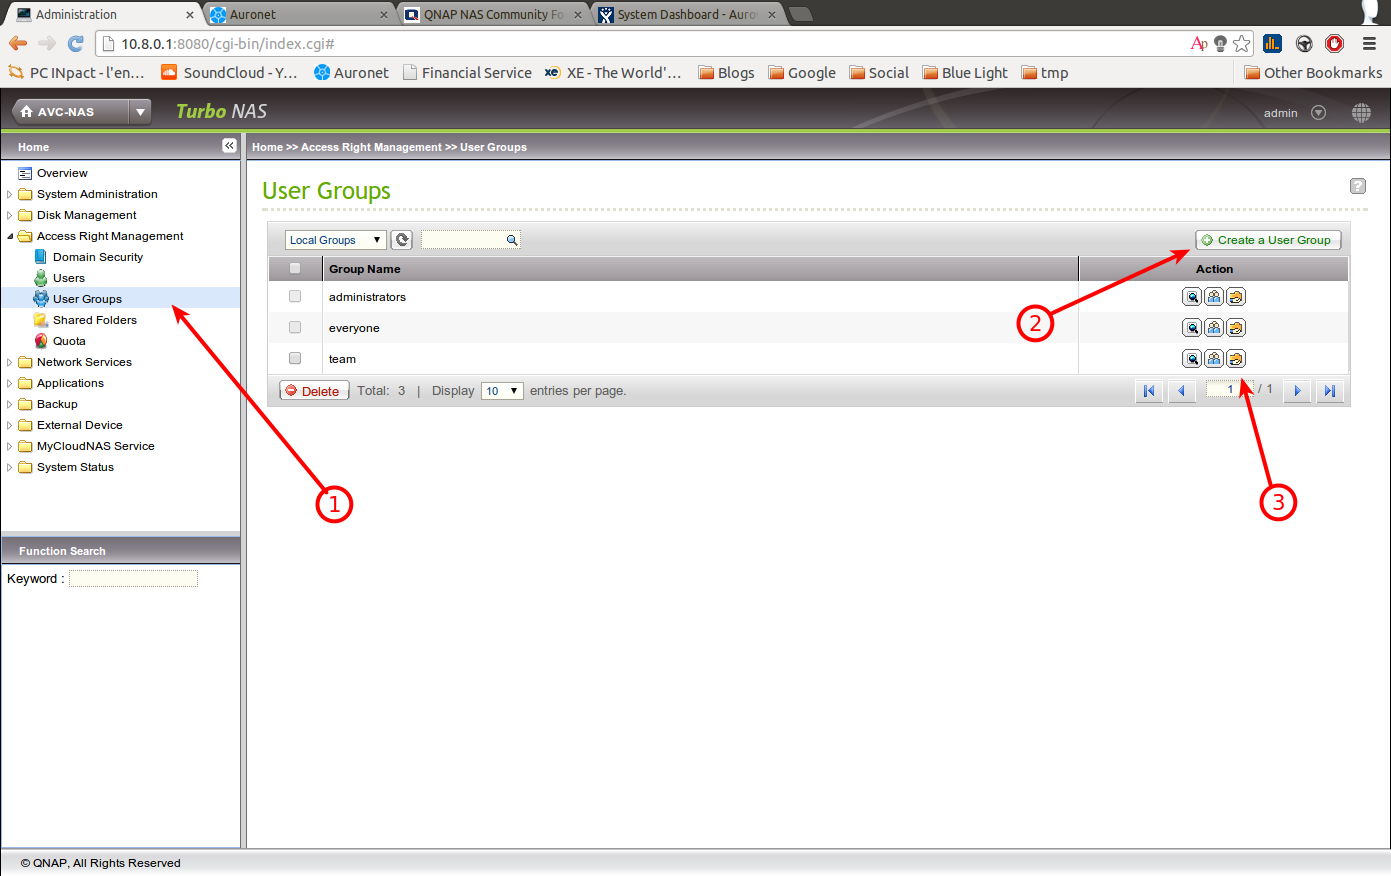
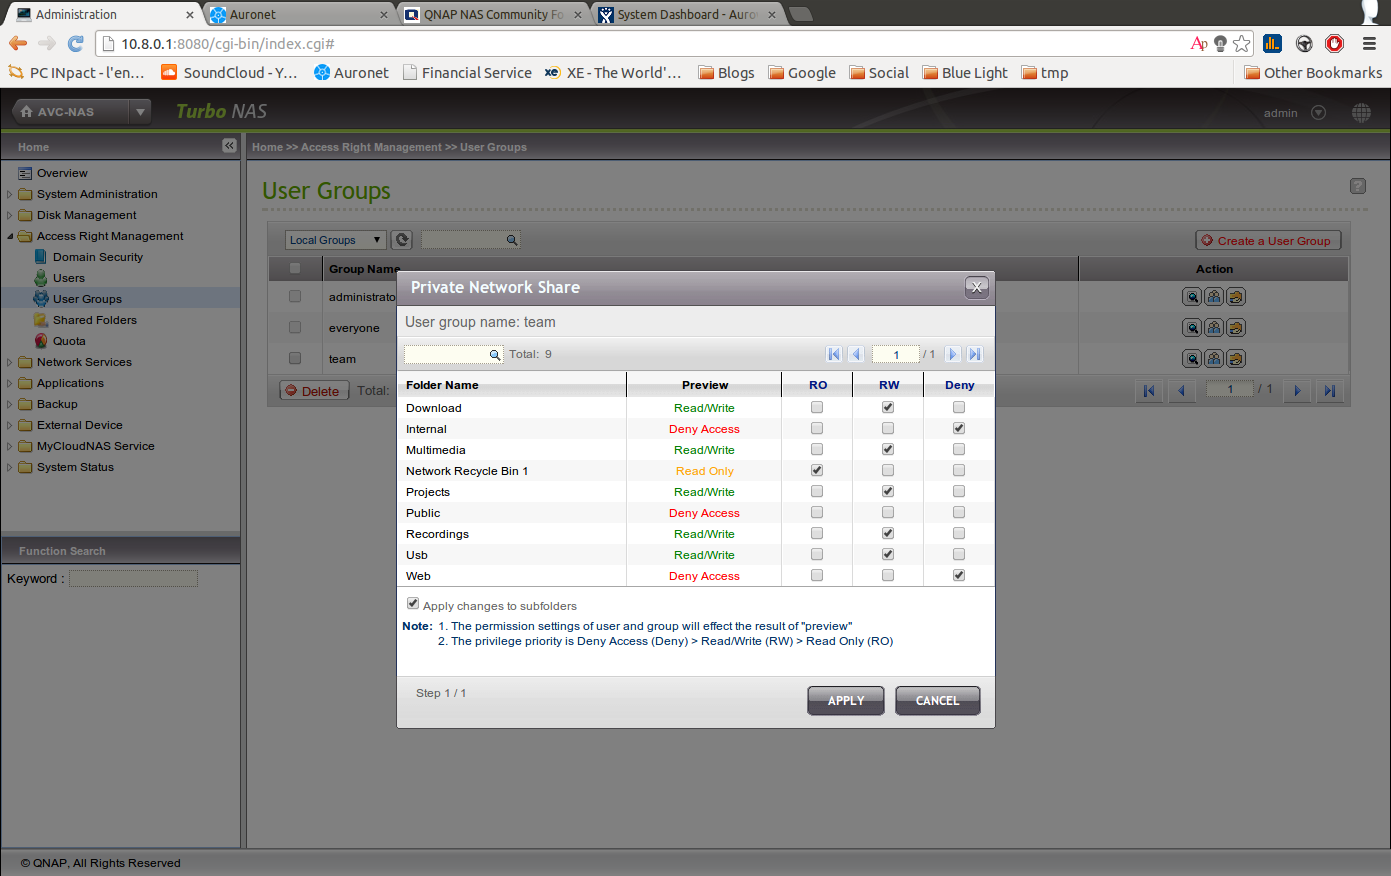
The third icon if (3) will allow you to change the access of a group to various folders
User management allows you to prevent misuse of the device. Different users will have different privileges with their own password. Once the access to the device is not required by a person anymore, do not forget to delete the user account especially if this person has external access to the NAS.
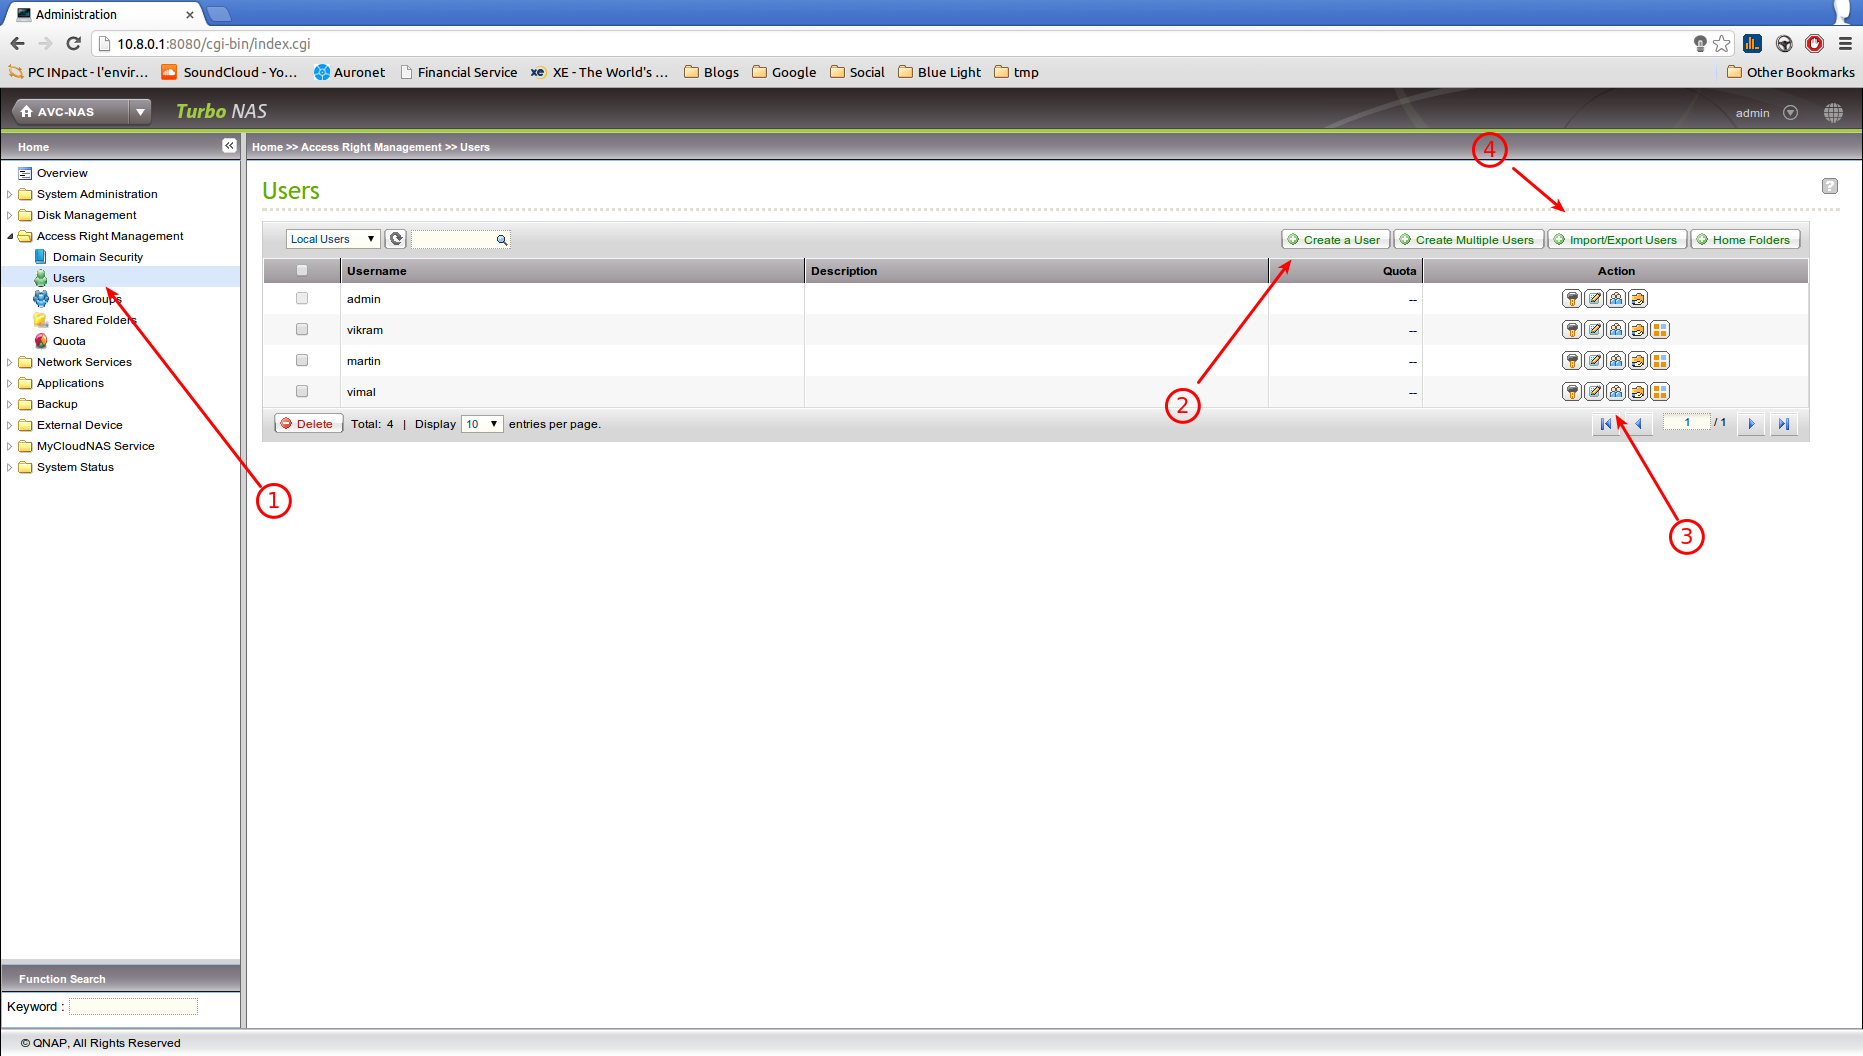
(1) Go to “Access Right Management > Users”
(2) Click on “Create a User”
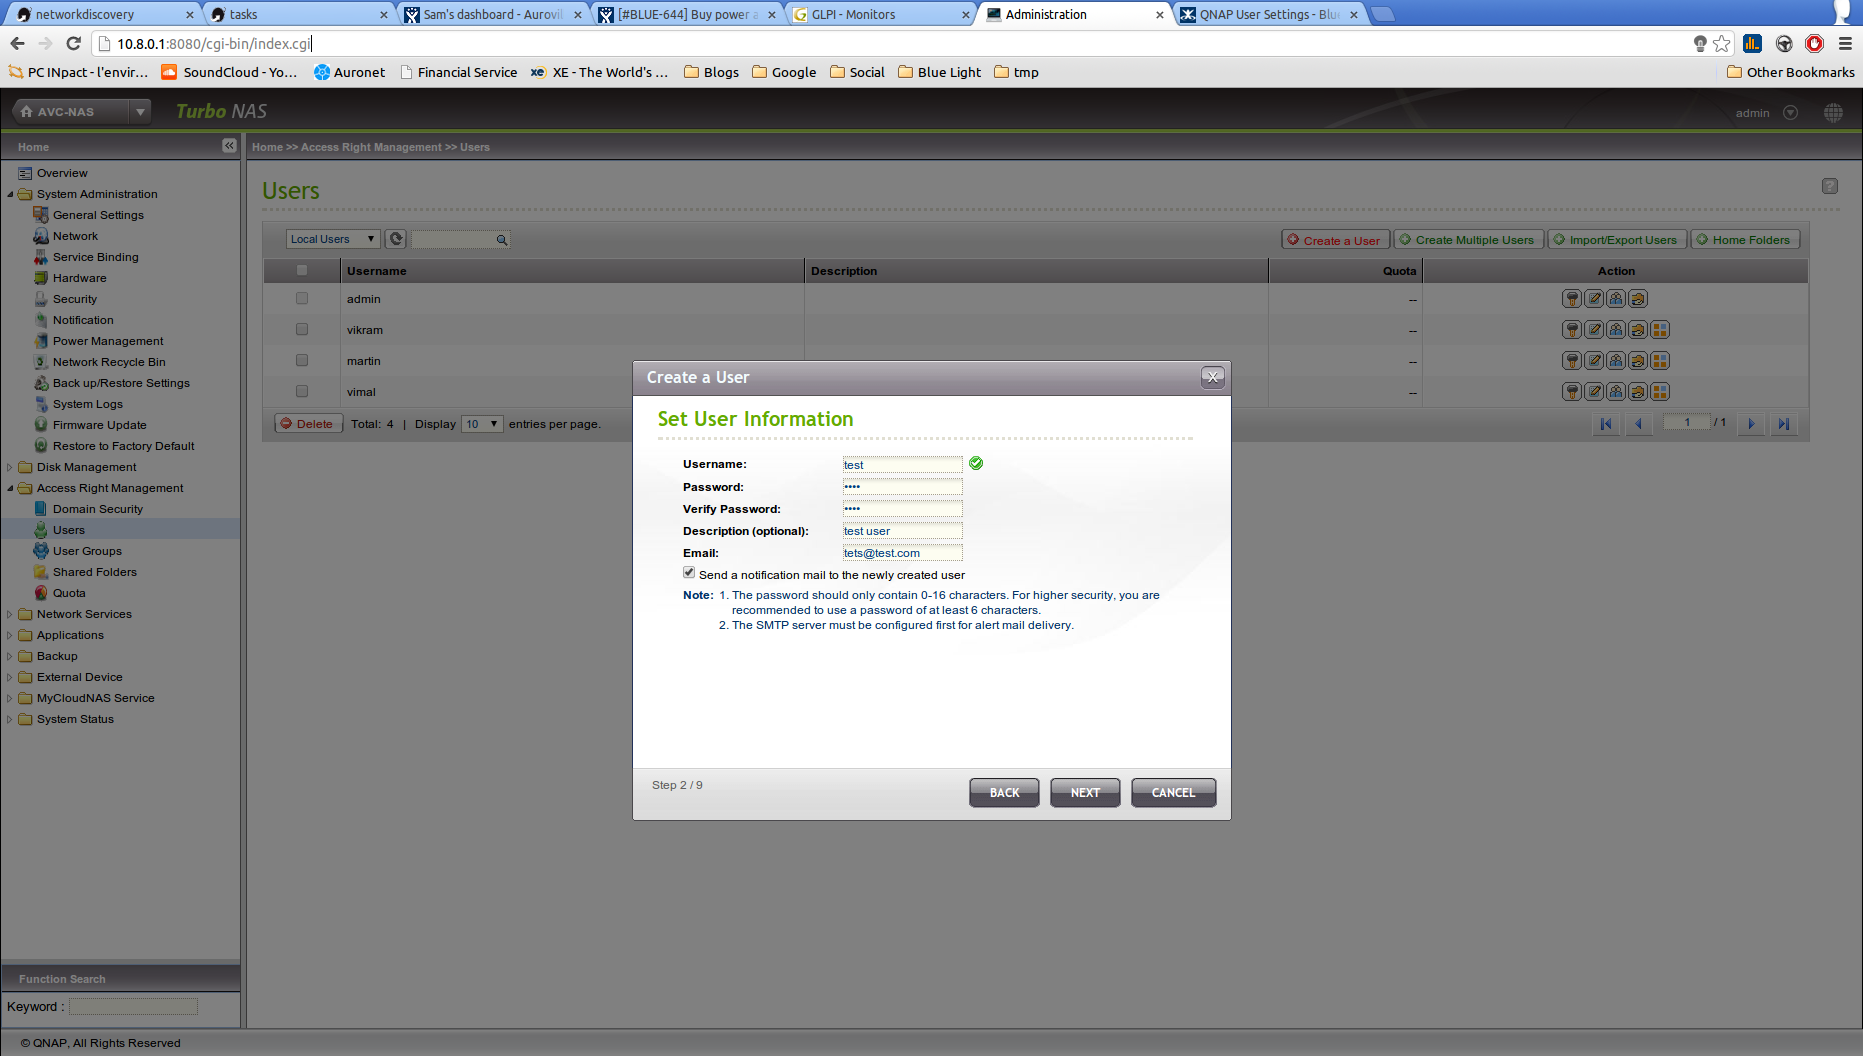
Enter the needed information for the user (name, password, ...)
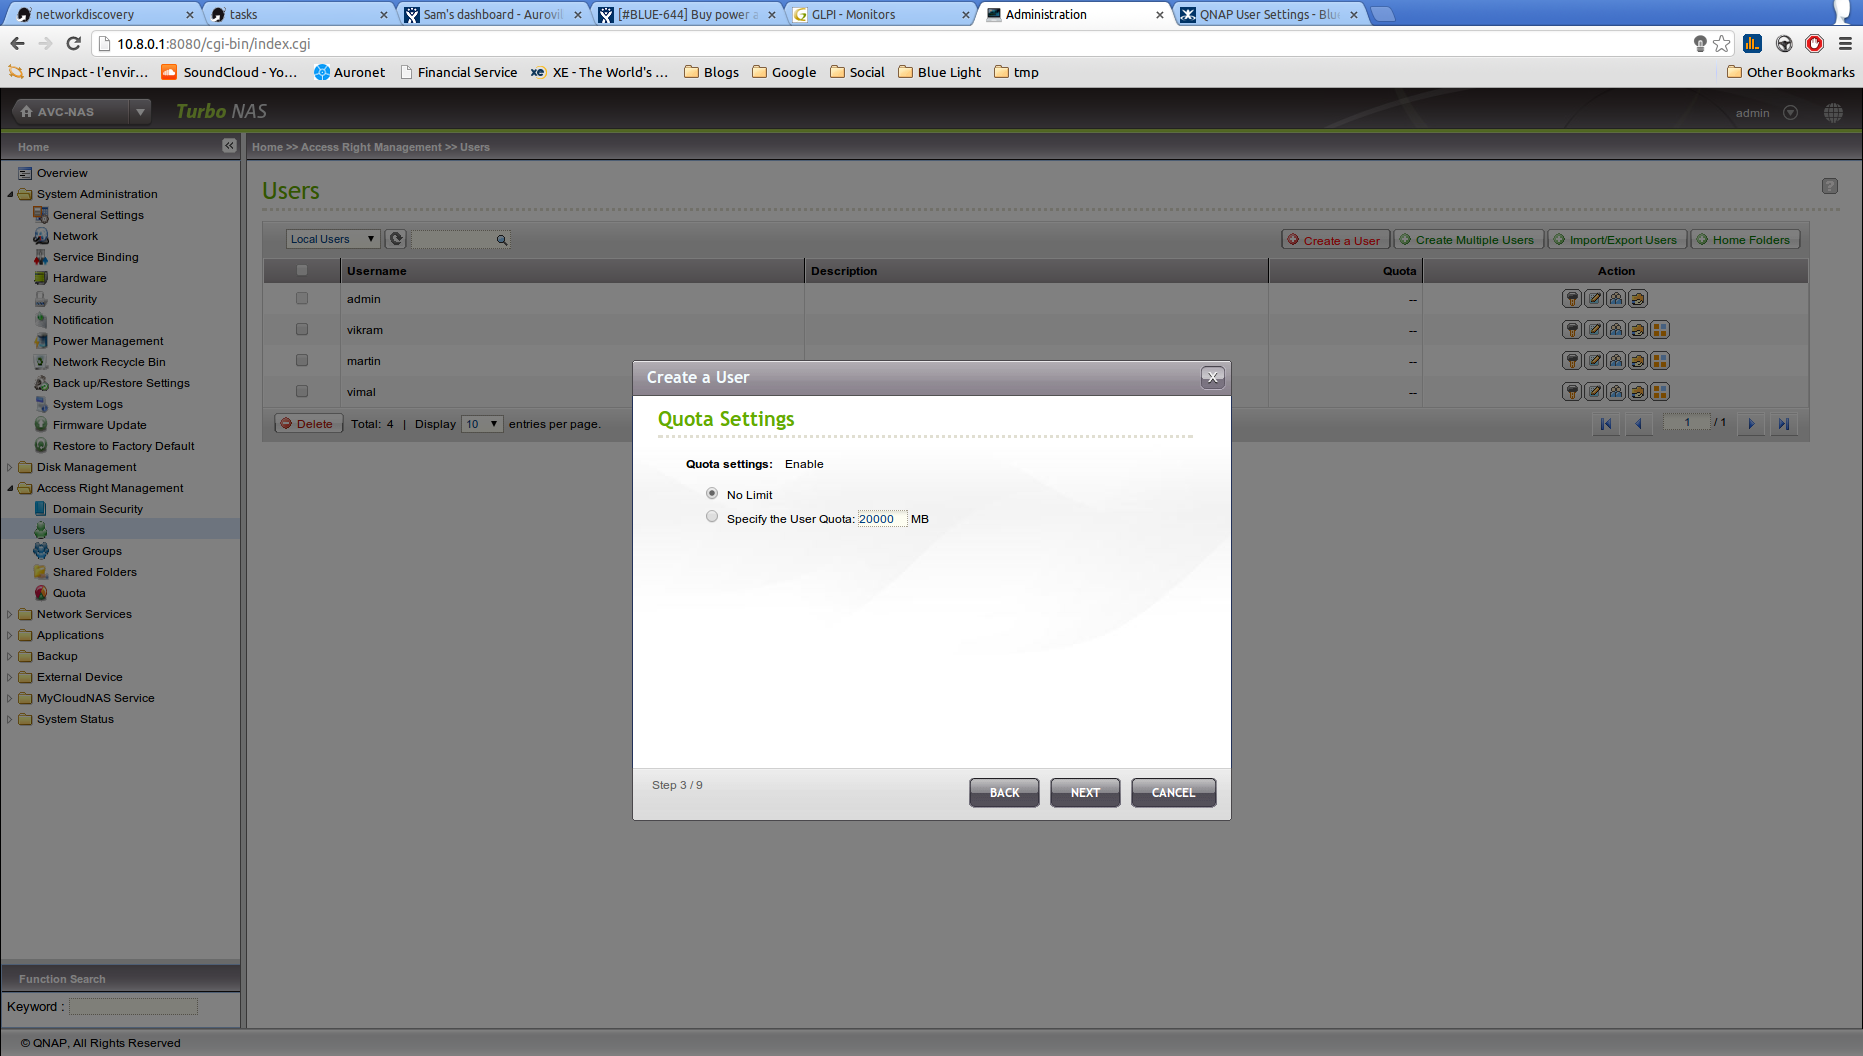
By default you will have quota of 20G per user. You don't have to keep it and it can be disable. Quotas are just here to avoid you from running out of space unnecessarily.
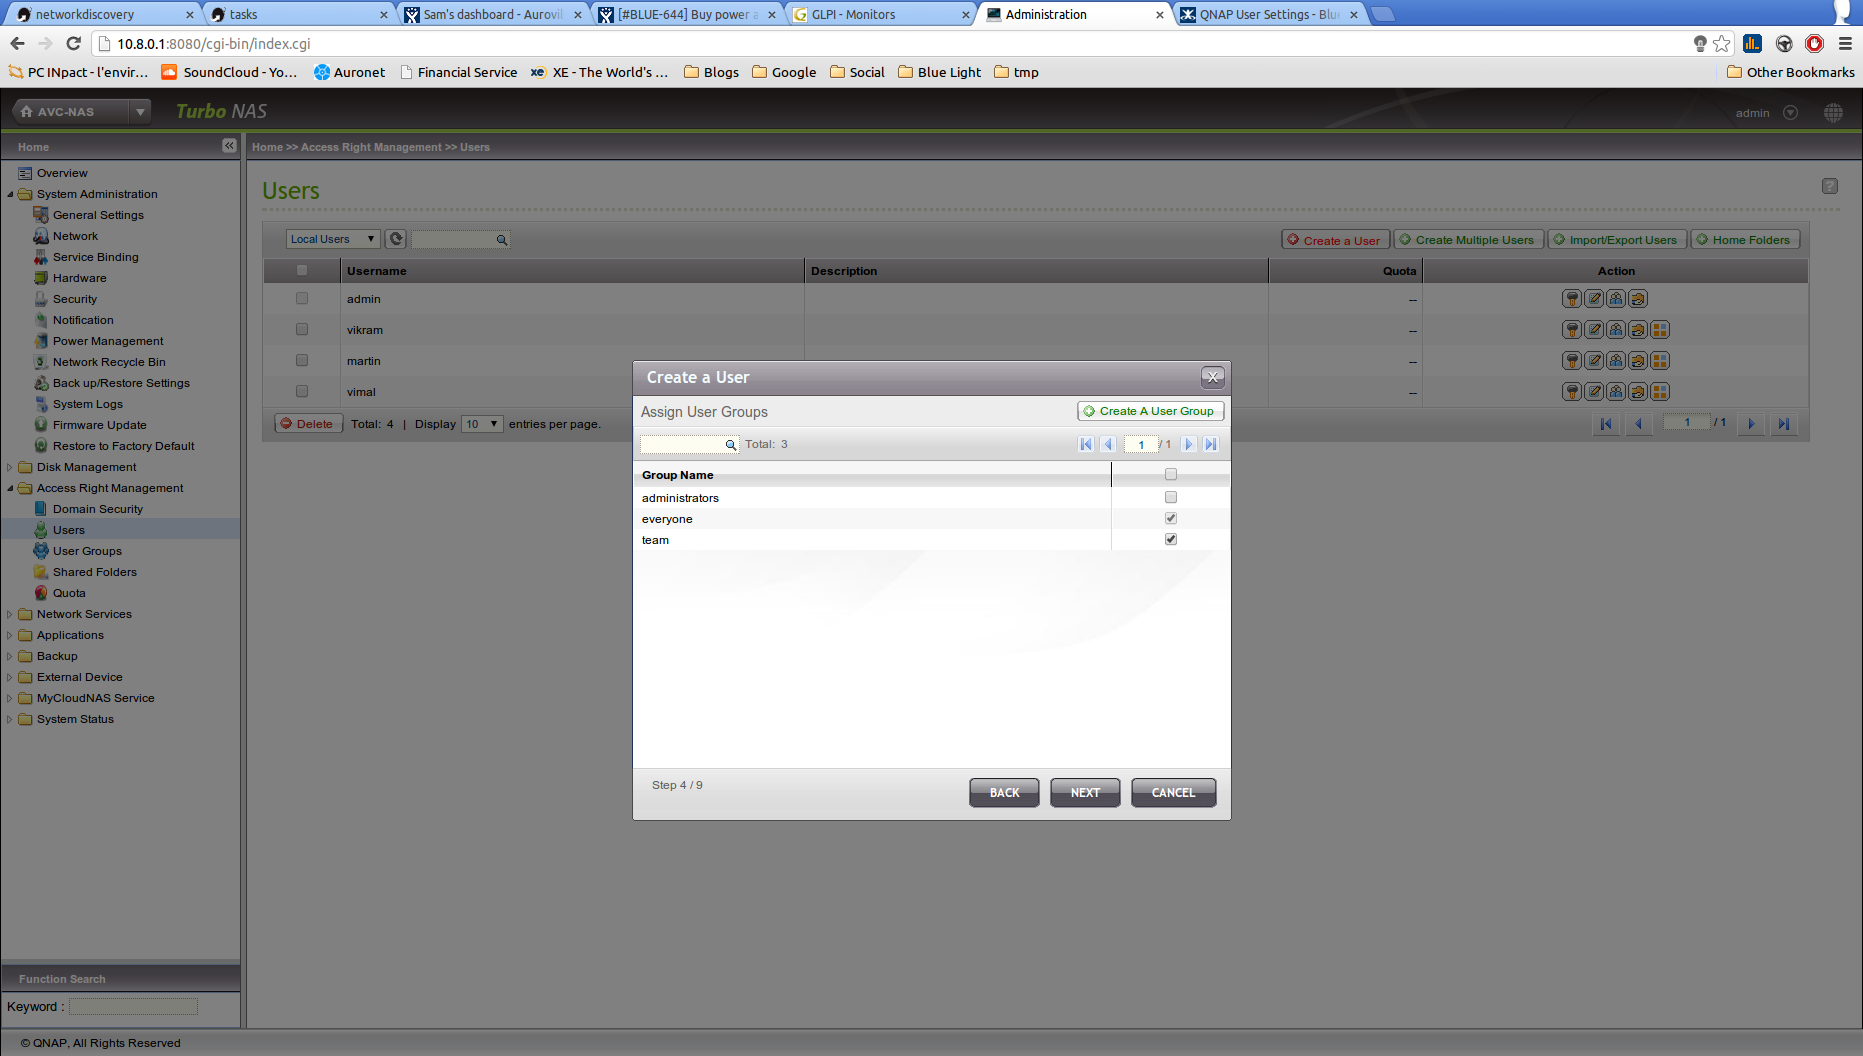
This page will allow you to assign an user to a group. Note that you can't add the user to “administrator” and “team” at the same time as there will be some conflicting permissions.
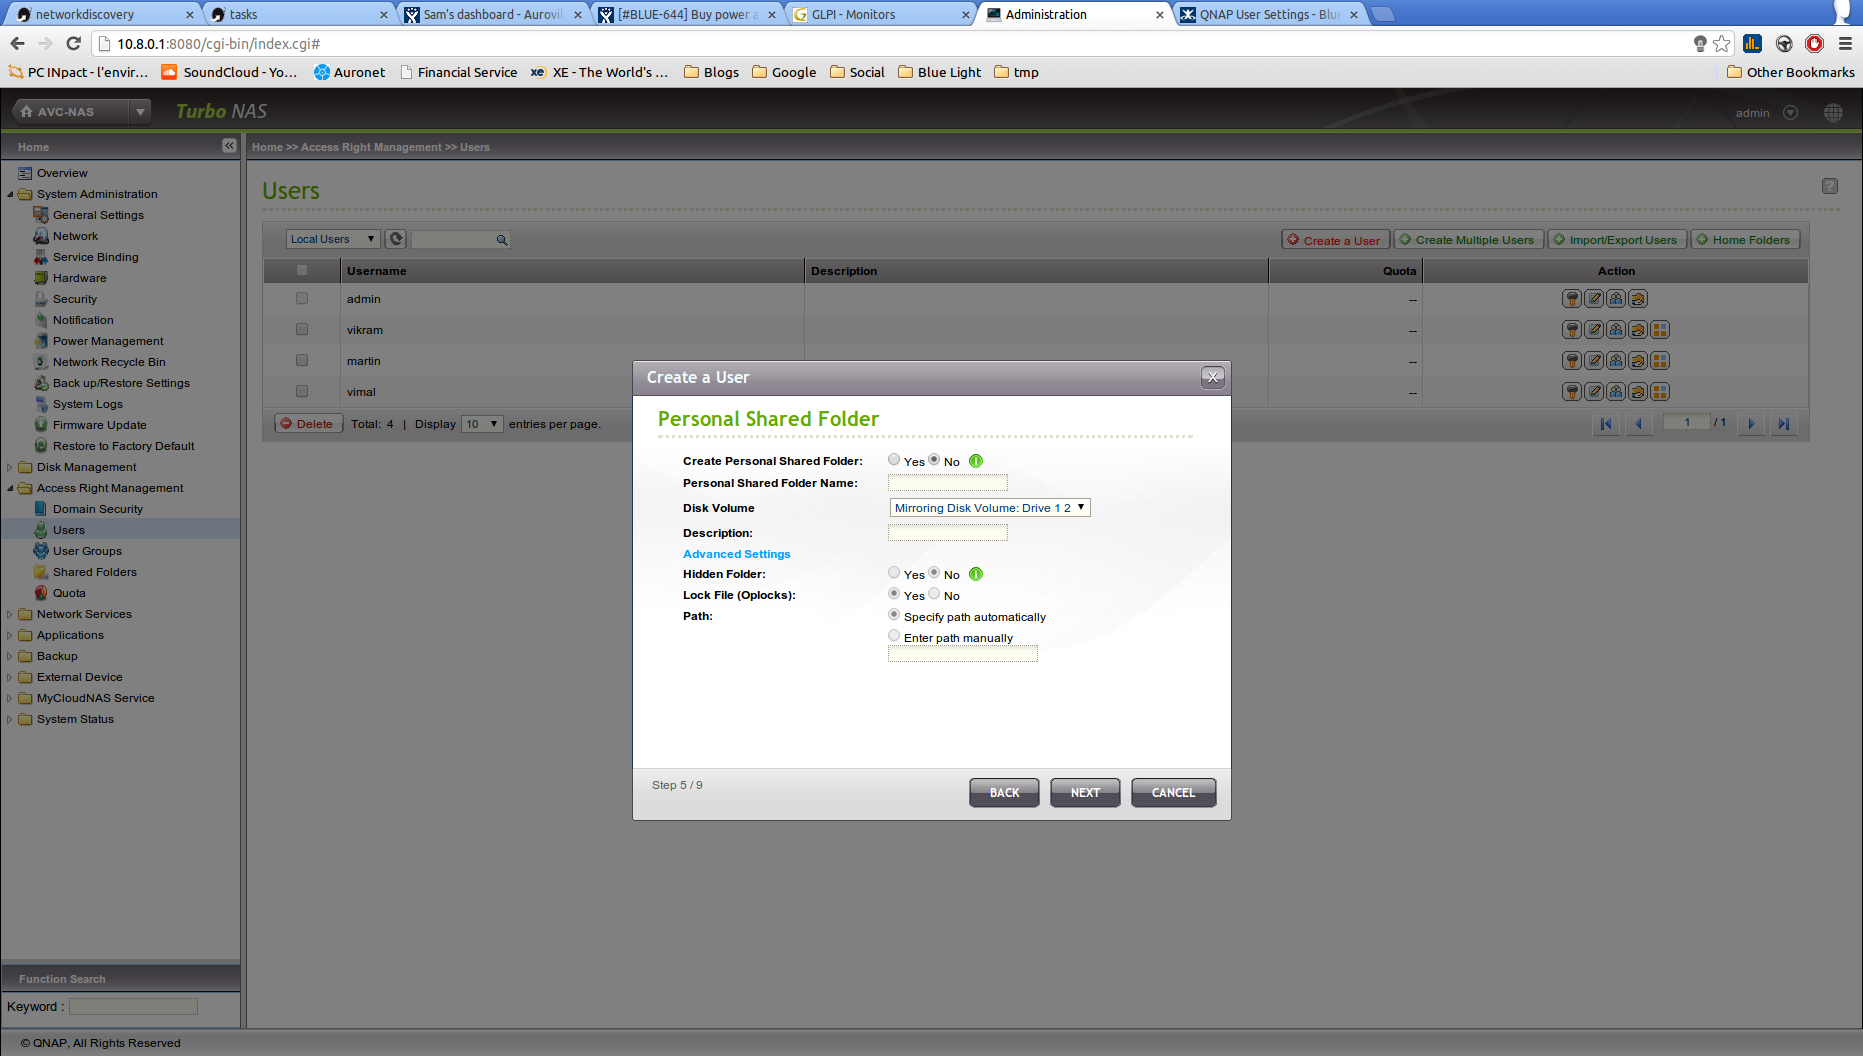
The Personal Shared folder might not be needed but if you set it up, the quota will be important to be set.
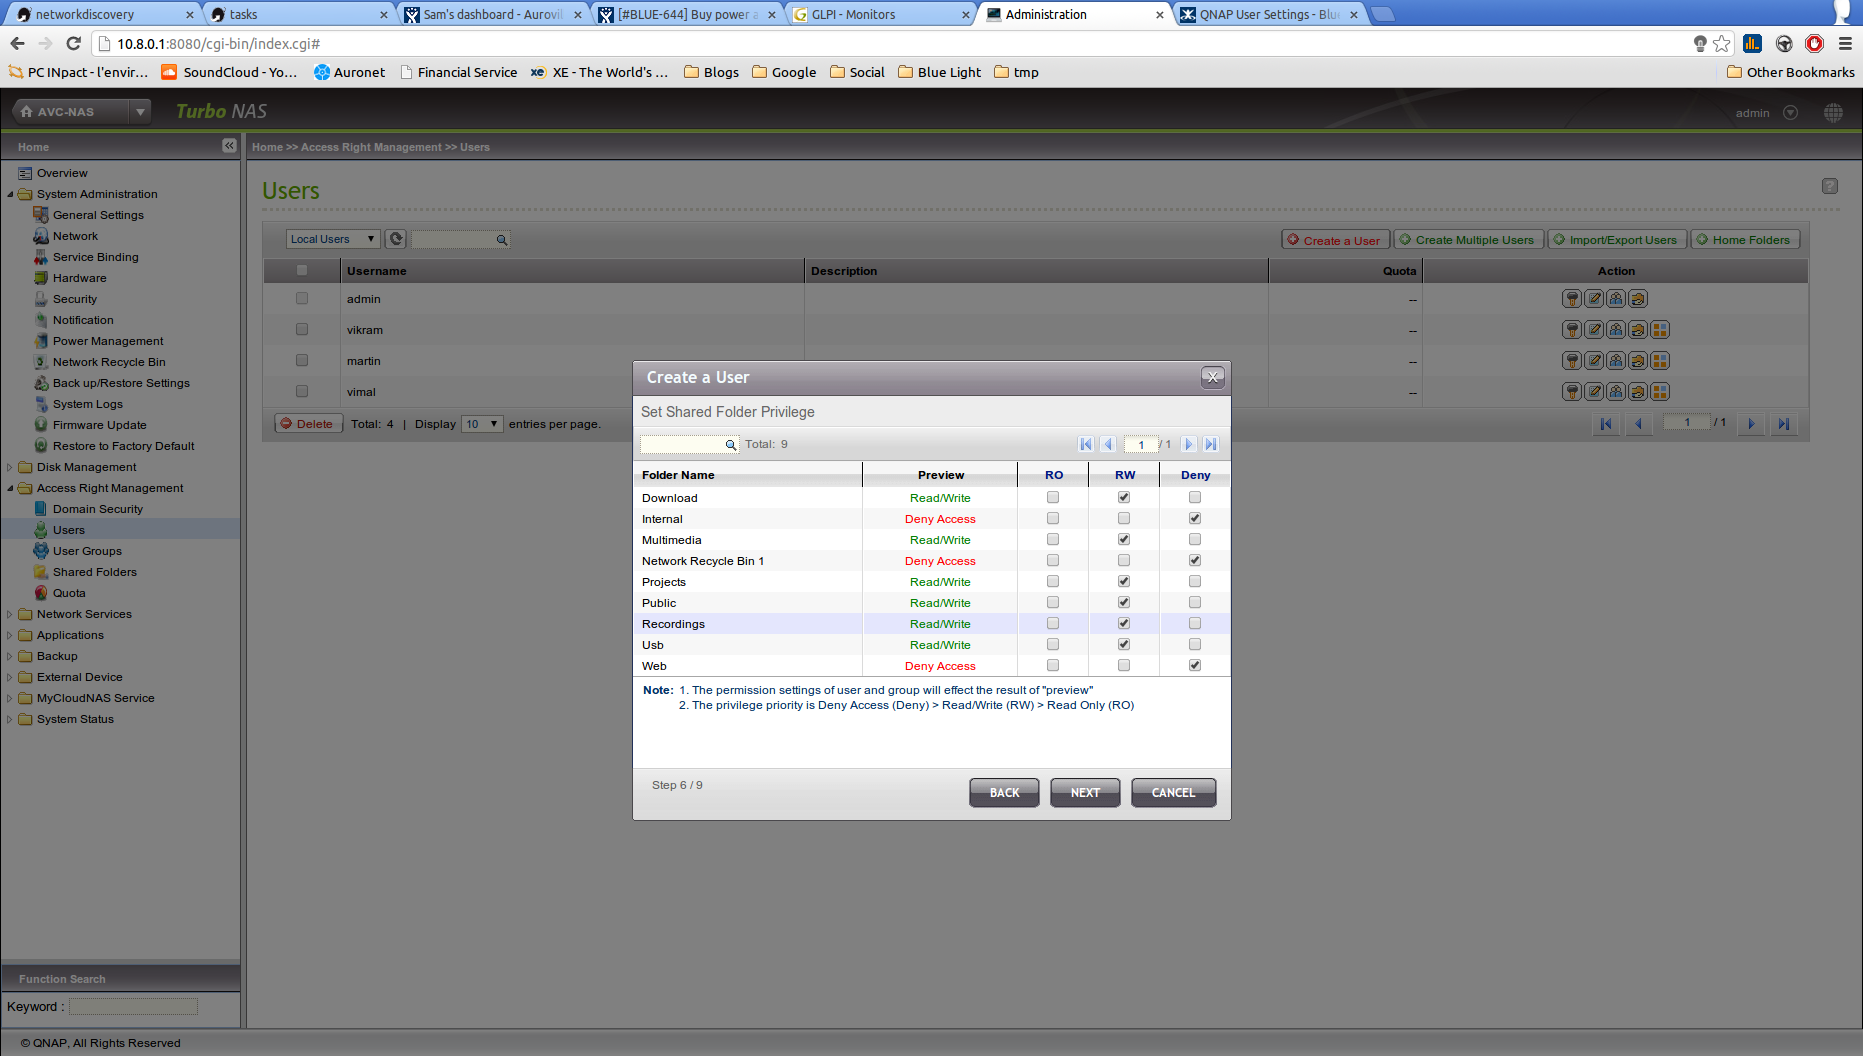
On this page you might not have to configure anything as the folder privileges are set by the group. Note that you can't allow more access than the group defines it.
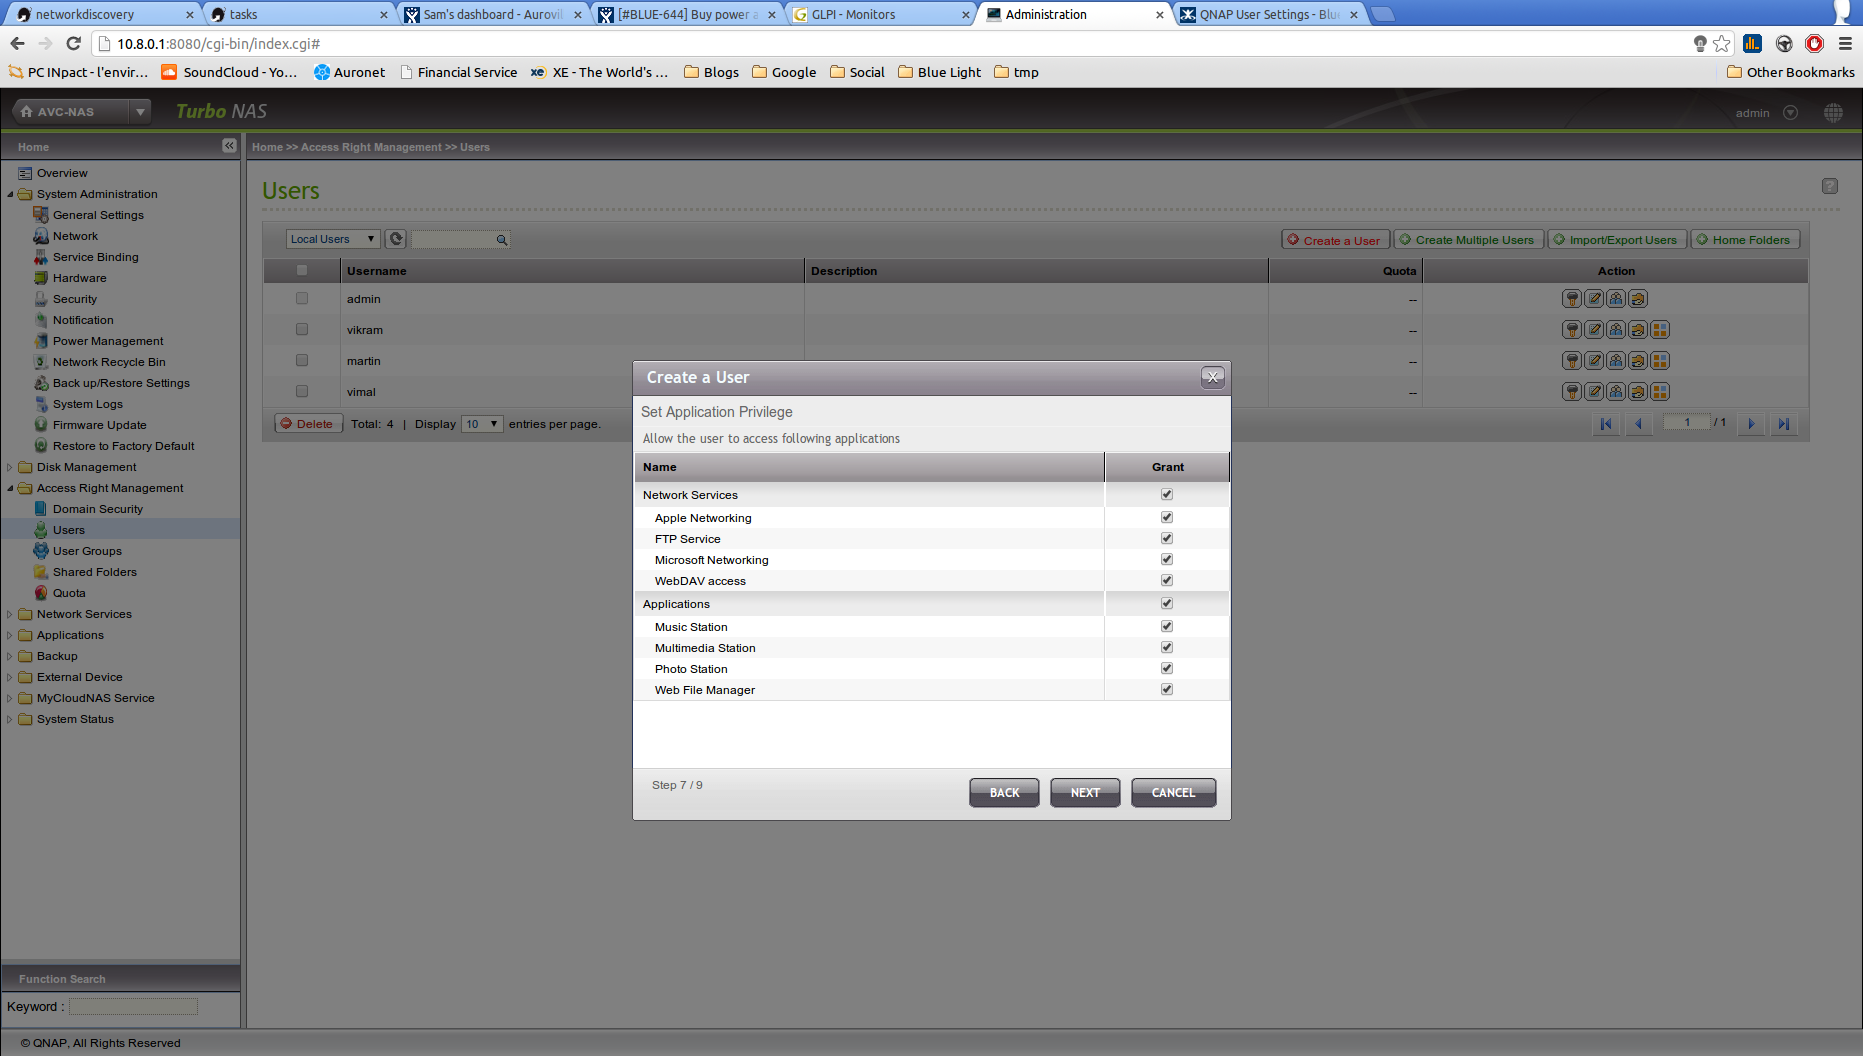
This screen set priviliges for the services.
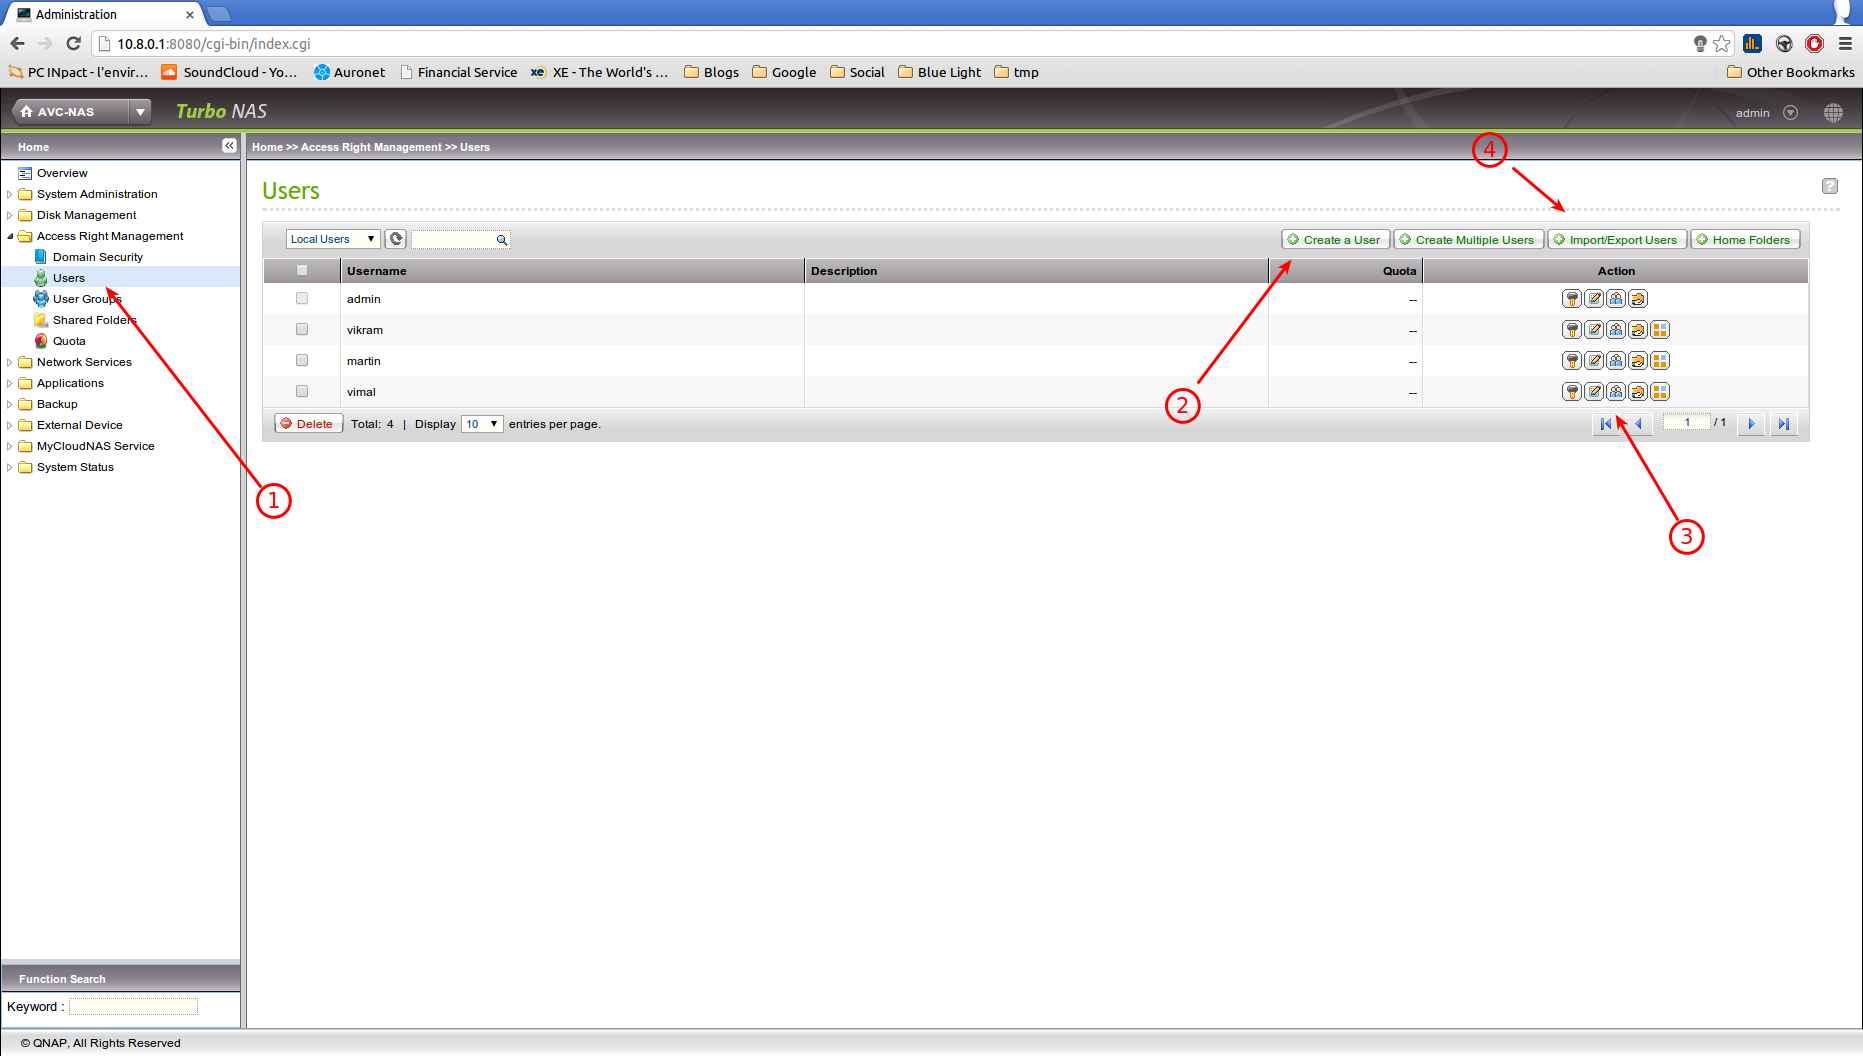
(1) Go to “Access Right Management > Users”
(3) The first icon will allow you to change the password corresponding to the user.
(3) You can also change the access to the folders, the group and other.
You might want to receive notifications from the NAS such as hard-drive failure or other system failure.
This can be done through email, SMS or chat notification. Here will be described the email setup to receive notifications. It will happen in two step: The configuration of the sender and the configuration of the recipient.
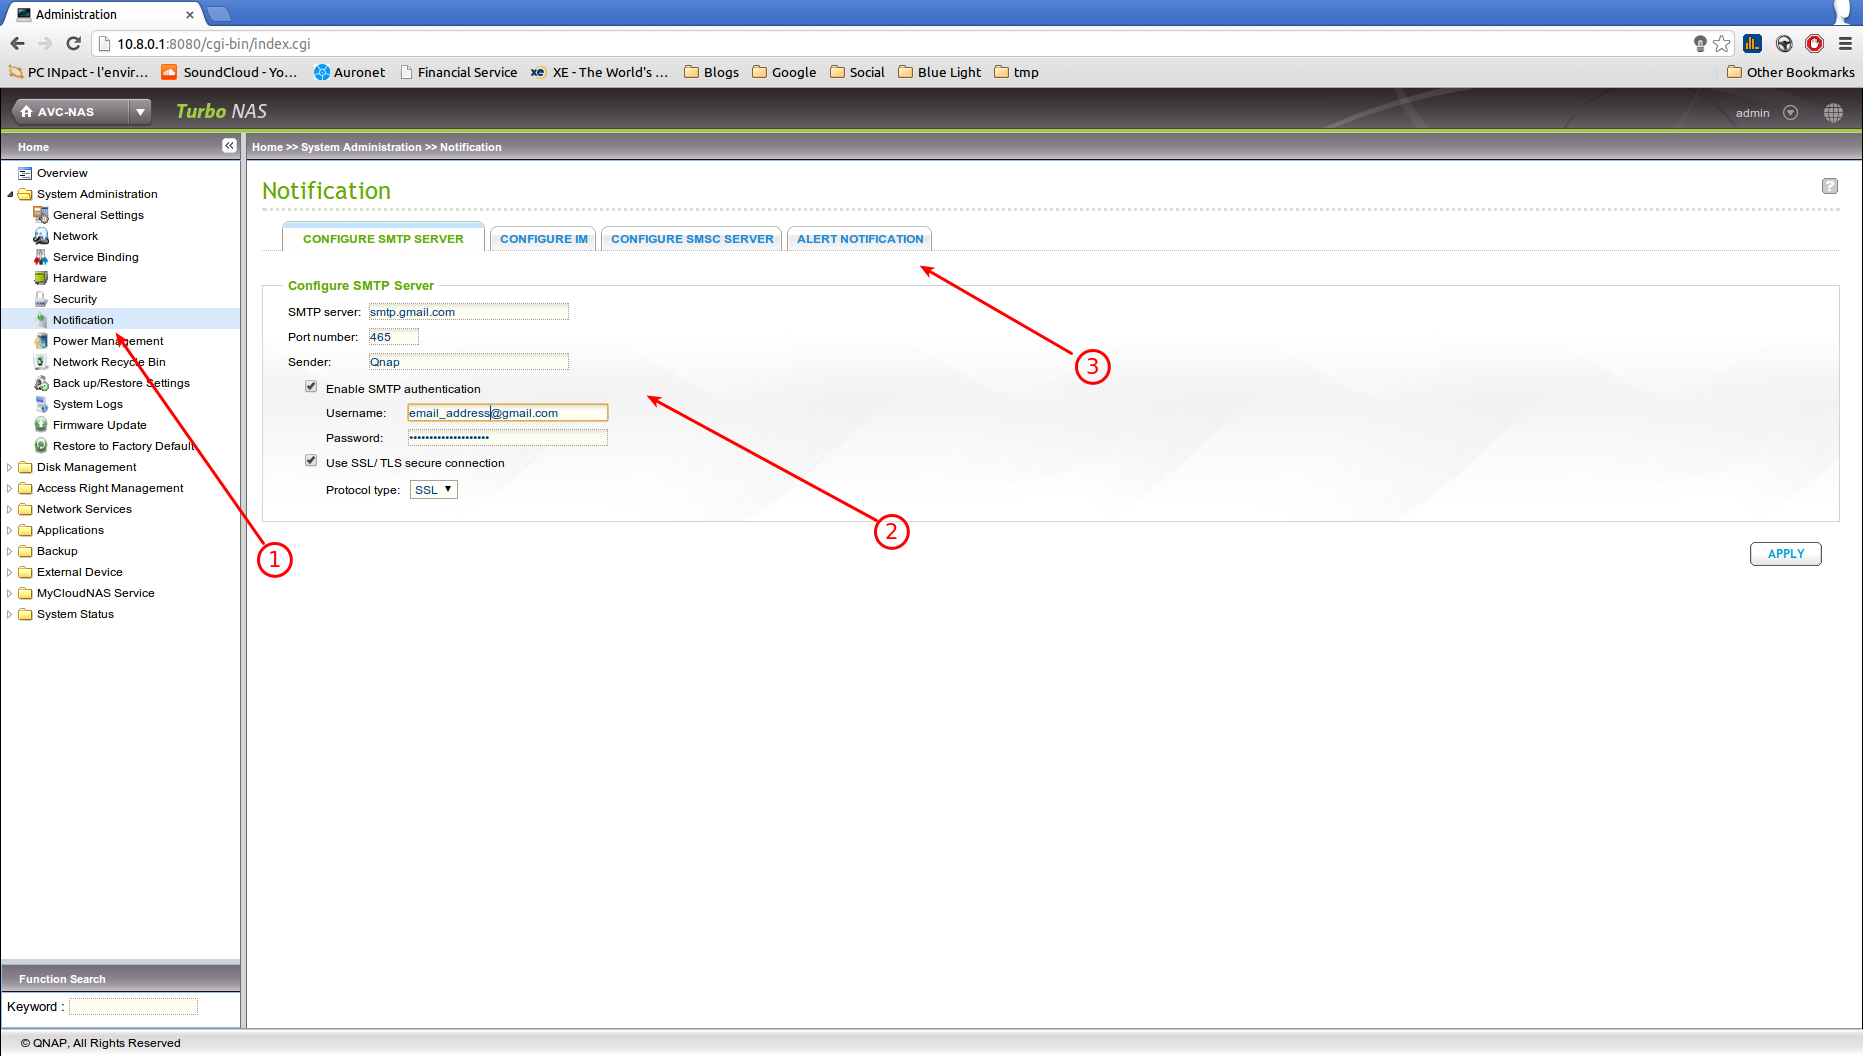
One needs to use an working email address to send the notifications. It can be an existing used daily or one that you setup just for this specific purpose.
The necessary information needed for this step are usually provided by your email provider.
(1) Go to the Notification > Configuration SMTP Server
(2) Enter the needed information according to what is given by the email provider
The "sender" section will be the name you want to give to the sender. Something like "QNAP" will clearly indicate from what the email was sent from when you receive it.
(3) Click on the Alert Notification tab
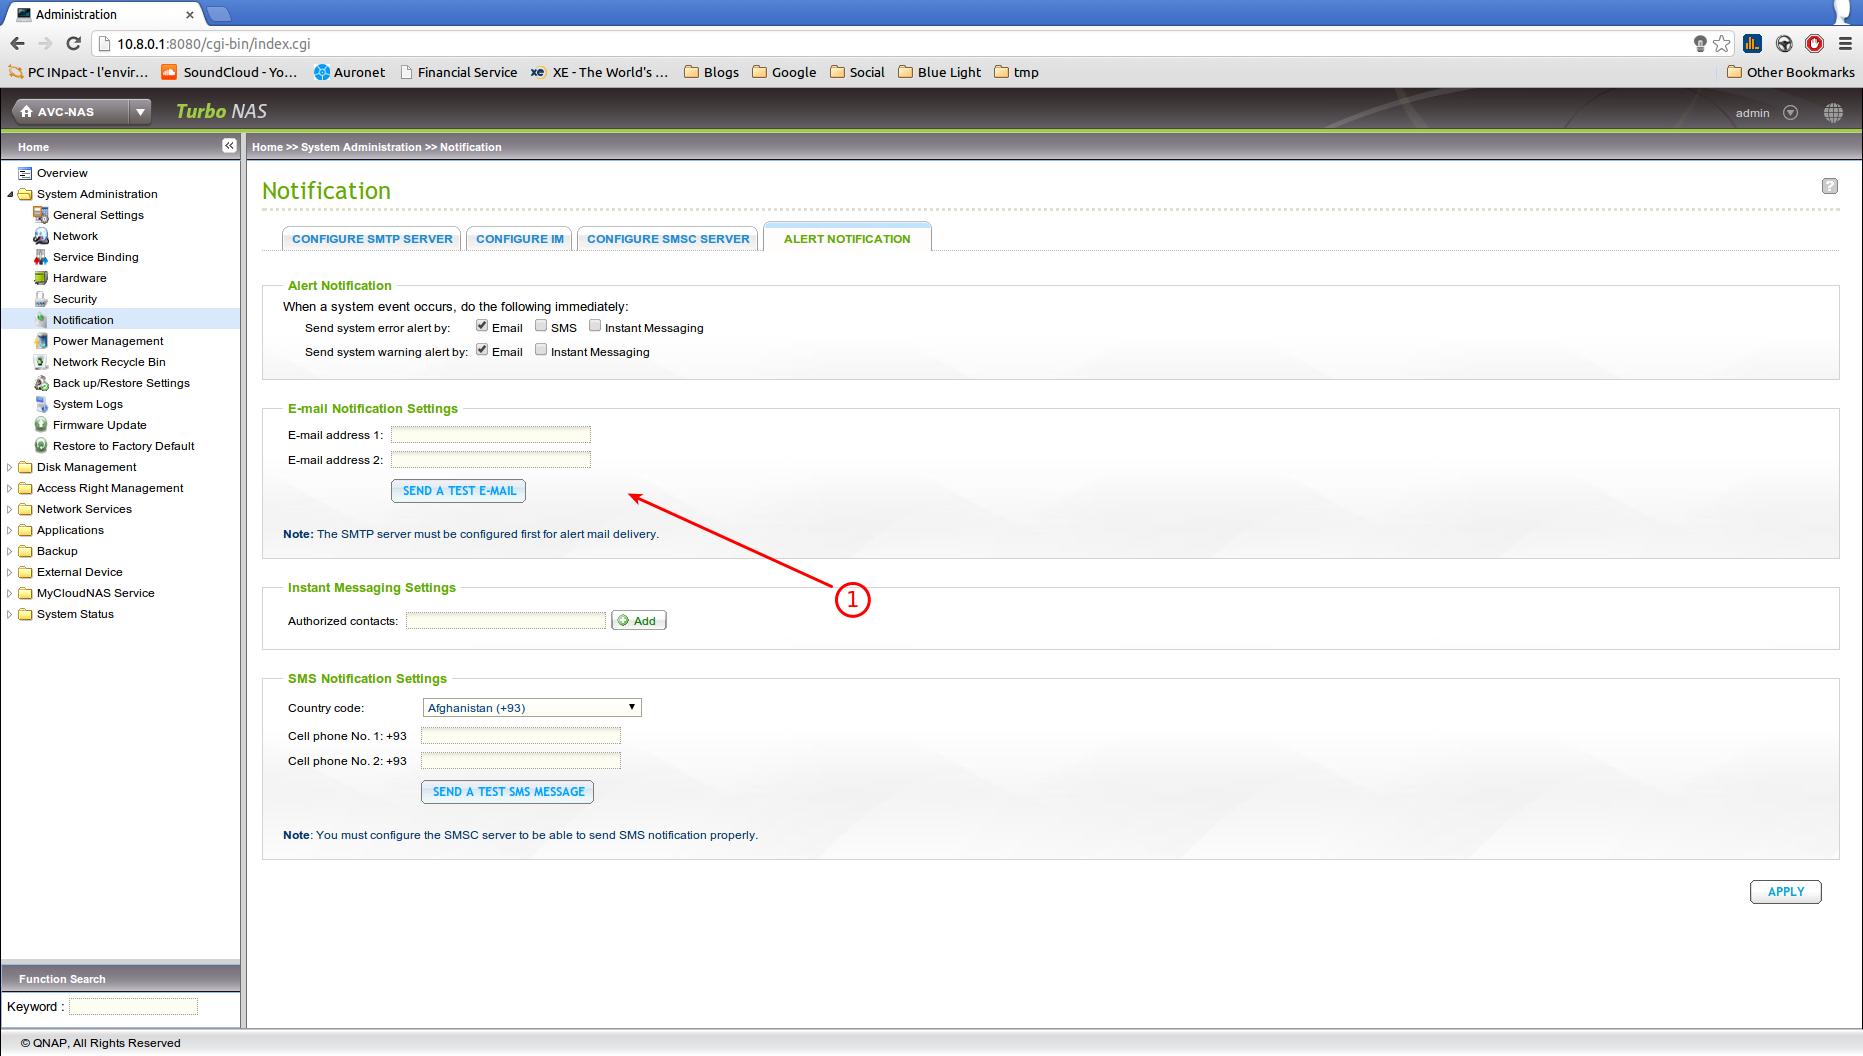
(1) Now enter one or two email receiver and click on “Send a test email” and don't forget to click “Apply”
Check the email inbox of the receiver. If nothing is received check the spam folder
BTSync is accessible at:
http://QNAPADDRESS:8080/BTSync/index.html